10281 Creator Expert Bonsai Tree Review

By Joanna Jezewska (SAFOLs Member, jhbLUG Member)

Is there such a thing as too many pink LEGO® frogs?

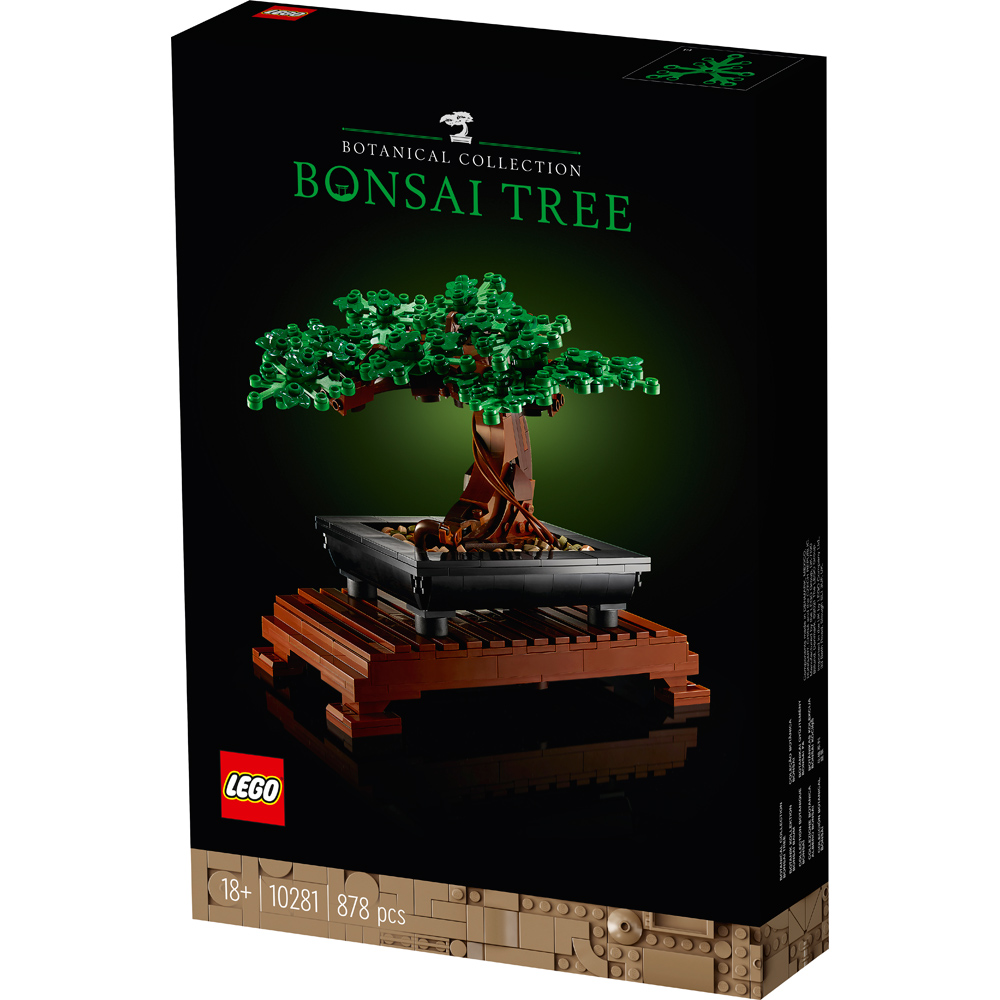
LEGO® set 10281 Bonsai Tree from the Botanical Collection sets out to prove that the answer is no, there is no such thing as too many pink LEGO® frogs.

Presentation

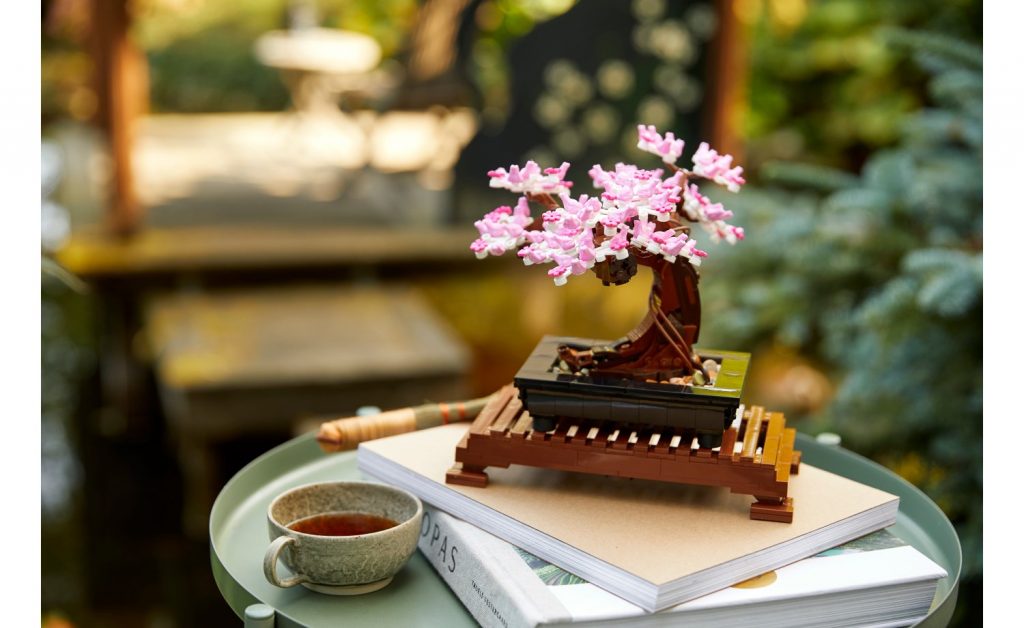
LEGO® Bonsai Tree embarks on bringing the long-held tradition of growing miniature trees, which originated over 2000 years ago in China, to the world of LEGO®. It does so in a sophisticated manner, embracing its new 18+ adult focused branding (read: plain black background means this is surely not a toy for kids anymore!). If the aim was to entice not only the avid fans of LEGO®, but adults looking for an interesting creative outlet and something that would not look out of place on an office desk or coffee table, then I personally feel that LEGO® succeeded with its presentation. The instruction booklet which comes with the set, continues the 18+ branding, but I am happy to confirm that when it comes to the actual set building part of the instructions, the background is a light greyish blue, making the steps easy to understand and follow.

The Build

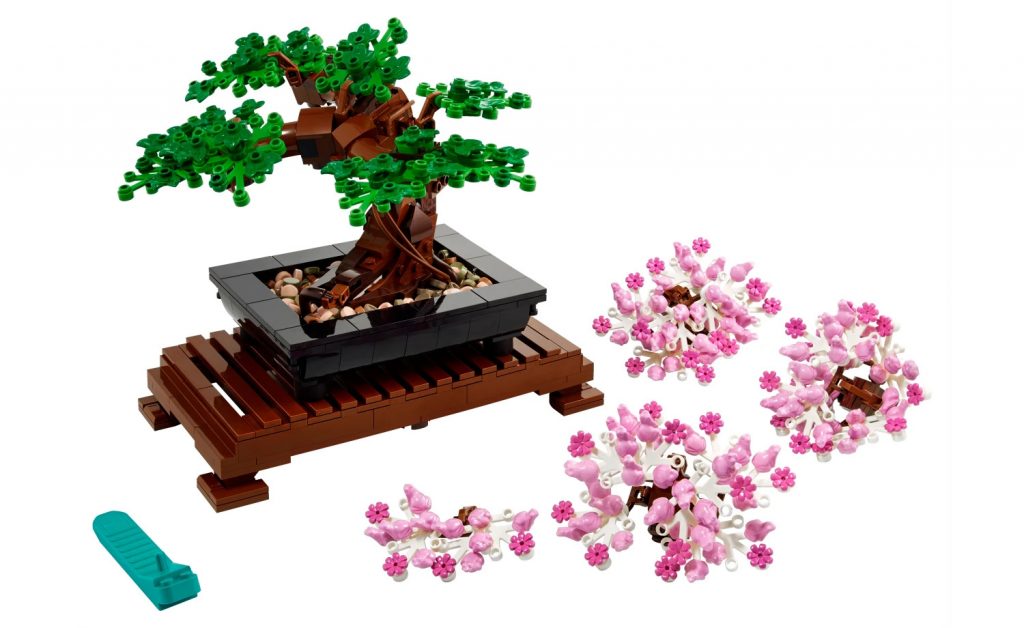
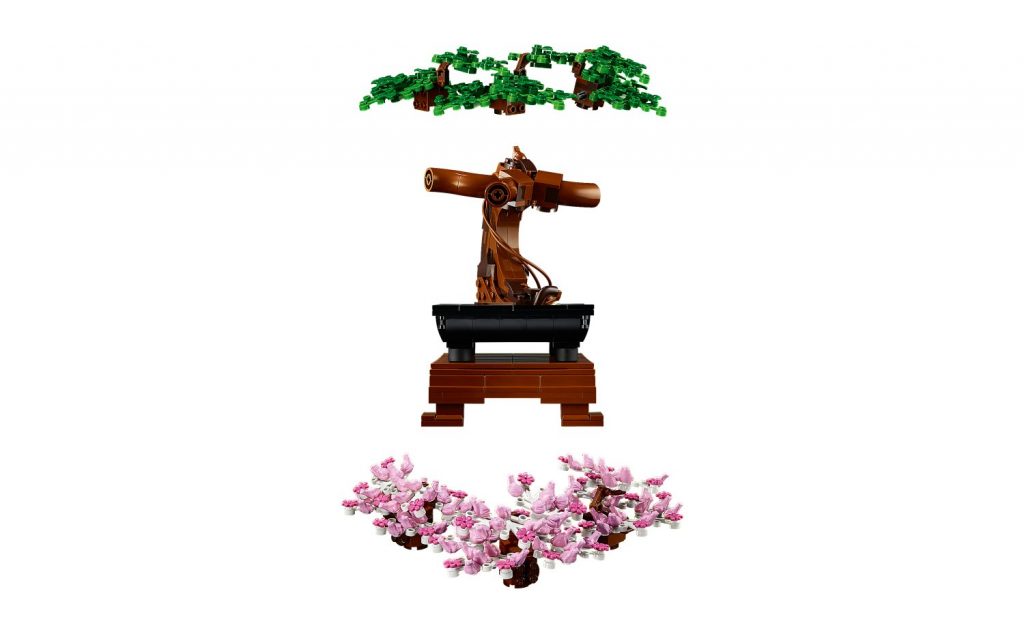
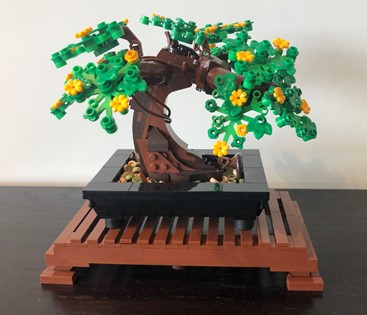
The set gives the builder an opportunity to build various components of a bonsai tree.

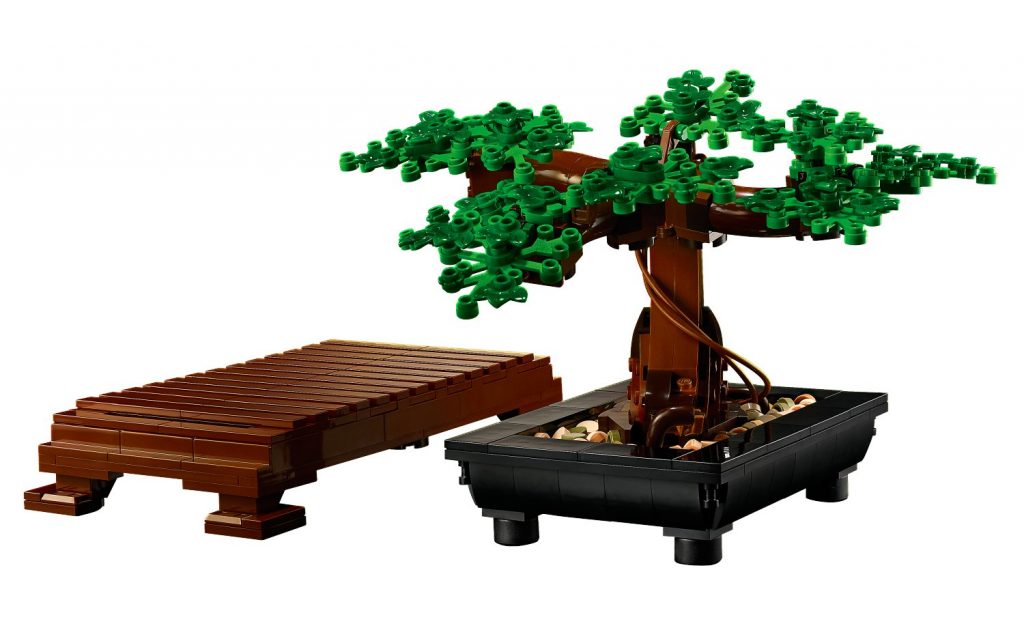
The actual black bonsai pot build is simplistic but cleverly utilises rubber tyres as its feet for the pot ensuring that the bonsai tree will not slide around too easily on any table or display shelf.

The tree itself was a fantastic build full of interesting part usage and unusual techniques. It plays around with differing shades of brown and shapes to create an organic looking bonsai trunk complete with roots, twisting vines and bending branches.

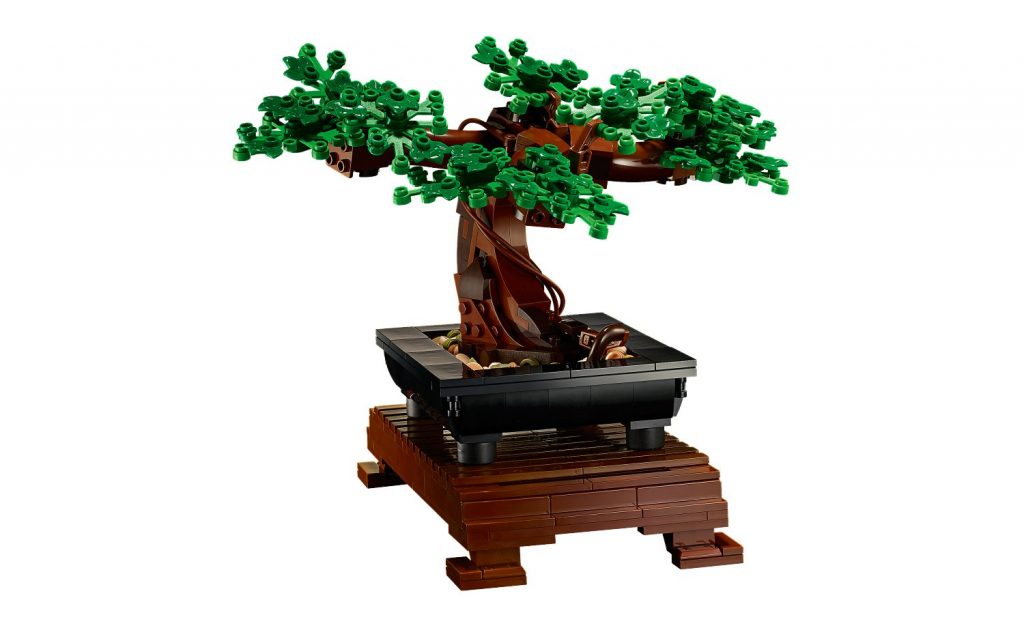
Once the tree trunk is inserted into the bonsai pot, 200 one stud sized round tiles meant to resemble pebbles are used to fill up the bonsai pot. These tiles are placed in four different coloured bags of 50 tiles which are meant to be opened and mixed before being placed into the bonsai pot. A word of caution be careful when you open these packets as picking up a lot of small pieces off the floor adds significant building time to this set!

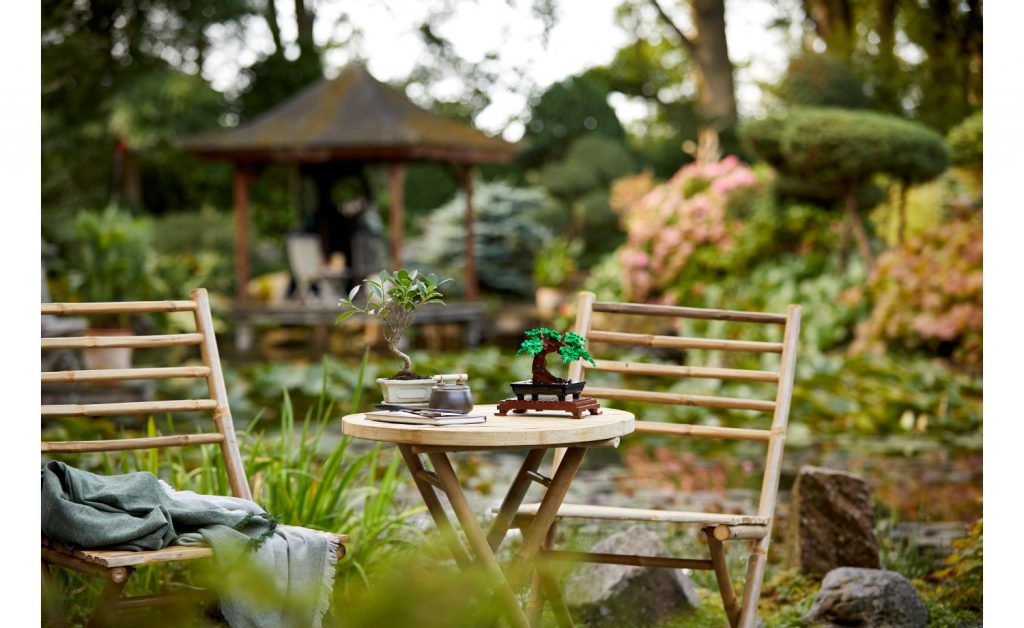
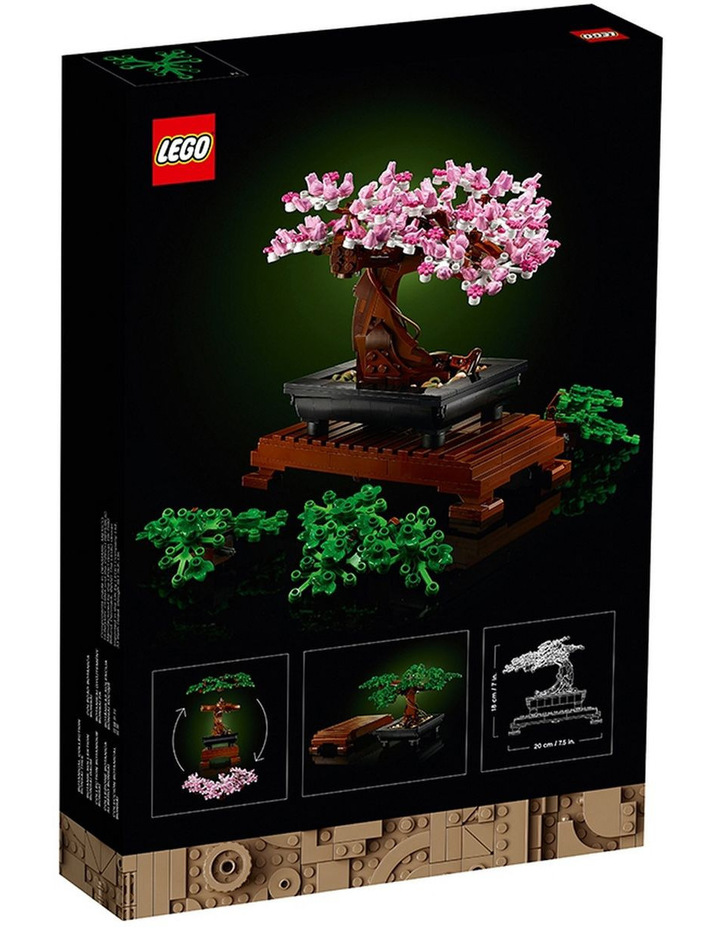
Lastly, we are spoilt with two different types of foliage for the tree. The first foliage incorporates three different green plant elements to build a more traditional looking bonsai tree, with the slightly darker and smaller leaf pieces meant to look like juvenile shoots. This part of the build was also quite simplistic and given that each branch was built the same way, it was also quite repetitive. Where the LEGO® Bonsai Tree set really shines, in my opinion, is the building of the cherry blossom foliage. It is a mad mixture of white leaves, dark pink flowers and 100 light pink frogs, which when combined bring colour, height, drama, and texture to the Bonsai tree that just feels so organic. LEGO® designer Nicolaas Vas has developed a reputation for loving to insert frogs into the sets he has designed, but with his design of this set, it never feels like a gimmick but rather a necessity. 

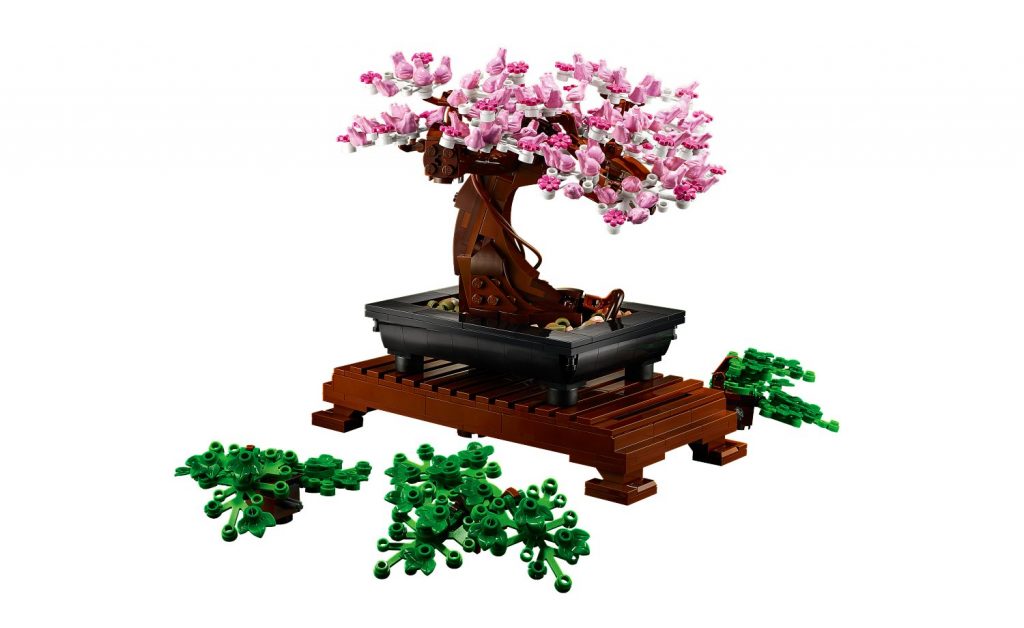
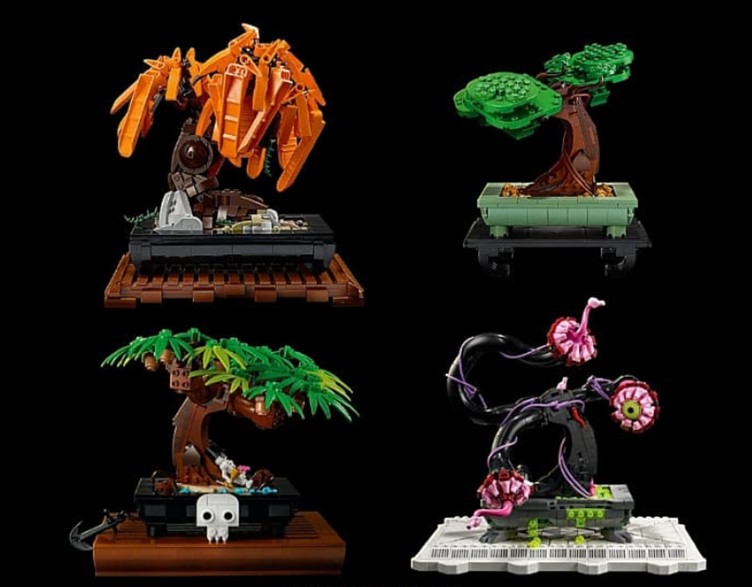
To encourage a quick change of foliage, the set is cleverly designed to easily unclip the clusters of leaves and insert the different foliage. Additionally, LEGO® Bonsai Tree encourages endless customisation and creativity with the instructions even showing some of the LEGO® designers’ own ideas for bonsai tree designs ranging from other realistic looking bonsai to truly fantastical creations. The sky (and your LEGO® budget) is the limit for what you can do with your creation.

Lastly, you have the option to build the bonsai pot stand which, with its reddish-brown long tile pieces, resembles a wooden slate stand often used to ensure proper drainage for bonsai pots (note: watering of this bonsai is strictly optional and not encouraged!). The stand is also an uncomplicated build and nicely completes the set.

Coming in at a retail price of R999.99, is LEGO® Bonsai Tree worth it? Some of my thoughts around the pros and cons:

Pros:

  • I love the customisation potential of this set. When building mine, I was inspired by the daffodils I saw blooming around us and added extra leaves and yellow flowers. I cannot wait to change it up every season;
  • Interesting build techniques for the tree itself and the cherry blossom foliage;
  • An excellent set to display and really looks organic and beautiful; and
  • The large green leaves, smaller white leaves, and brown root pieces are part of LEGO®’s “Plants from Plants” program intended to replace plastics made from fossil fuels with more-sustainable plant-based materials.

Cons:

  • At 878 pieces, do not be fooled into thinking this is a large set. With 200 pebble pieces and 100 pink frogs (plus 1 brown one used in the tree trunk design) the actual set pieces come in at under 600 pieces. While it is not a tiny bonsai tree by any means, LEGO® Bonsai Tree can be built under an hour or two. Some may feel short-changed by the price given the actual time spent building;
  • Speaking of pebble pieces, the inner perfectionist in me hates that the pebble pieces do not all face smooth side up. Somehow, I don’t think many people will be bothered with this;
  • Not enough green foliage is given to really flesh the green traditional foliage out and create enough texture. To give perspective, I added quite a lot of smaller leaves to fill out the bonsai tree when I added the yellow flowers; and
  • At times, the build is repetitive, but luckily not Taj Mahal level repetitive so it’s still enjoyable.

Given the huge worldwide demand for this set, and the number of times I have seen this set out of stock at various retailers, LEGO® Bonsai Tree certainly is proving to be popular. I could not wait to buy mine, and minor gripes aside, I loved it. It was well worth the hype and wait. With its customisation potential, this is a set that can be displayed and inspire creativity for many years to come.

71738 Ninjago Legacy Zane’s Titan Mech Battle Review

By Barry Kay (SAFOLs Brick Boss, CapeLUG EXCO, Batman … Ssshhhh!)

LEGO® is celebrating 10 years of Ninjago. With this they have recreated some awesome sets from previous years. Each set comes with a 10 Year anniversary Golden Minifigure of one of the main Characters. Each minifigure has exclusive torso printing.

This review looks at 71738 Ninjago Legacy Zane’s Titan Mech Battle with is a recreation of 70737 Titan Mech Battle from 2015 but only Zane’s Ice Mech, bigger and better. The set has 840 parts.

The box is designed with the usual Ninjago flair. The Mech posed on the front and an image of the Golden Minifigure that comes in this box. This set comes with a Golden Jay.

The back shows a posed battle scene and Mech movement / articulation images.

Inside the box there are six numbered bags, a sticker sheet, and the instructions booklet.

The Build

As with all Mech builds, we start on the torso. It is a solid build with great use of gold bars to make the spine and six pack of the Mech. Other great parts used are pearl dark grey beehives used as thrusters on the Torso, a pearl silver shuriken blade on the right arm and gold sword blade on the left arm.

The movement of this mech has been taken to the next level. Using a combination of ball and ratchet joints which makes the mech really solid and stable when posing in all different positions. It has adjustable elbows, shoulders, hips, and ankles. The truly amazing addition are the knee joints. The articulation gives the same style of movement as an actual human knee. This is achieved by using Technic 3-ball steering arms which is genius in my opinion.

On either side of the head there are two spring-loaded missile launchers for a bit of fun when playing. The cockpit where the Zane minifigure sits, is situated in the top part of the torso, just below the head. The one issue is, to get Zane in securely you must practically take the front of the torso off in order to be able to try clip him in to hold onto the steering sticks. You will also need to take off his back sword sheath. For quick play you will probably just pop him in and let him rattle around the cockpit.

The Minifigures

All the four minifigures are exclusive to this set. With dual faces and popping colours, these minifigures are really something to look at. They consist of Legacy version of Deepstone Zane, Ghoultar, Soul Archer and of course the Golden Jay Legacy Minifigure.

Conclusion:

The finished build is a spectacular sight at 26cm in height. The colours used all fit very well together.

The playability and possibility are phenomenal. This is a must for any Mech lover.

Selling at R 1,199.99 it is real value for money and highly recommended.

10274 Ghostbusters™ ECTO-1 Review

Reviewed by Patryk Szymanski (SAFOLs Member, CapeLUG Member)

My return to LEGO® building started in 2016. The second set I bought was the VW Camper Van and this set introduced me to the LEGO® Creator vehicle world. I soon thereafter bought the Mini Cooper and thereafter the VW Beetle. It was with the VW Beetle that I was introduced to the design work of Mike Psiaki.

I have never been into cars. However, I have been fascinated by the way in which LEGO® designers have been able to replicate these real-life structures into super scaled playable models. Although there have been many designers involved in the creation of the LEGO® Creator Expert vehicle range, it is Mike Psiaki who has been at the forefront of the design and engineering of these vehicles. And it was only deserving that he takes on this project.

So, let’s get the basics out the way. The Ecto-1 is based on the Ecto-1 from the yet to be released Ghostbusters: Afterlife movie. In reality, the Ecto-1 is a 1959 Cadillac Miller-Meteor Futrara Duplex. These cars were used as a limousines and ambulances in the past.

The set compromises of 2,352 pieces. It comes in the adult collector’s style box with images of the movie and the model on it. The box contains 23 numbered bags with an unnumbered bag containing the tires and some other bits. The instruction book cover has been stylised to represent that of a car manual. The first few pages cover the history of the Ecto-1, along with some information about the vehicle including the challenges faced in the design of the LEGO® model.

The set contains some new and rare parts as well as a few printed pieces. The highlights for me are the new steering wheel and thelarge 6×14 curved windscreen. The set also contains three 1×4 Ghostbuster logo printed panels. Disappointingly, there is a large sticker sheet which is predominately populated by rust stickers.

So, onto the fun bits.

The build is great! I built the model over a few evening sittings completing about one bag per sitting. This was intentional on my part as I wanted to savour the building experience. There are quite a few interesting building techniques, some of which I have seen used in previous Mike Psiaki builds, such as the door hinge mechanism that he developed for the Ford Mustang Creator Expert set. Of note is a phenomenally inventive method used to attach the hind quarter panels to the car (not going to say more than that!).

The Cadillac engine looks great and is shielded by the car grill made of forty silver roller-skate pieces. Nice parts usage!!! The car interior is sparse, but this is purposeful as there is a fare bit of under-the-hood Technic building and mechanics that needs to be housed inside the vehicle.

As with the Aston Marton DB5, Psiaki incorporates some very cool action features which includes functional steering which can be turned through a knob on the roof, the impressive gunner’s chair which is activated by pressing on a section of the car’s exterior (this is awesome!!) as well as a red barrel antenna and clear plastic dish that move and rotate when the car is rolled. There is a trap door mechanism at the rear of the car that when activated by pulling a lever releases the “Remote Trap Vehicle” or R.T.V. The R.T.V is a new technology that is going to be released into the Ghostbuster universe. Finally, there is also a little Easter egg in the form 2×4 slope build onto which a Stay-Puft Marshmallow sticker is applied. This pays homage to the Marshmallow Man seen in the original films.

The completed model boasts a length of 47cm with a height and width of 22.5cm and 16.5cm, respectively. This makes the ECTO-1 a formidable display piece. The complex curves and angles of the real-life Cadillac are exceptionally well portrayed in this LEGO® model. Special mention should be given to the back light ensemble which looks amazing! The model is also very sturdy and allows for a good amount of play without bits falling off, however the front barrel headlights do tend to fall off.

My main criticism of this set is the large number of stickers used. It would have been nice if the Cadillac, R.T.V, dashboard/cockpit and licence plate labels were printed onto the tiles and bricks. As for the rust stickers, a total of 38, but I can appreciate the fact that printed pieces would likely have pushed the price of the set up a fair bit. Furthermore, not printing the rust onto bricks may have been for more stylistic reasons. I would imagine that some AFOLS would prefer to build the vehicle in the likeness of the original Ecto-1 seen in the first two Ghostbuster films and leave the rust out of the build all together.

There has been talk in various forums that it would also have been nice if a display plaque and some special edition minifigures were added to the set as was done in the 1989 Batmobile. I suppose that it would have been a nice touch, but the addition thereof would likely mean a price increase. I would rather have the model come in at a cheaper price without the extras, as the main beauty of this build is exactly that… the build!

So, what is the final verdict??

My love for LEGO® building lies in the engineering, design and playability and Mike does this seamlessly in his latest offering. I have built every Creator vehicle that he has designed and my greatest enjoyment in this build came from seeing how he has managed to incorporate building techniques he has learnt from previous models into the Ecto-1. The curve and angle techniques are reminiscent of his work on the Ferrari F40 and VW Beetle. The mechanical workings are a culmination of his designs found in the DB5, Ford Mustang and Fat Boy Harley. And yet he is still able to surprise with new building techniques.

The Ghostbuster Ecto-1 is an exceptional model, it looks great and has super playability. Retailing at R3,999.99 it is not cheap and for that price I would have appreciated a few more printed pieces. Nonetheless, it is a welcome addition to my Creator vehicles collection!

All images used from the official press release.

75252 Star Wars Imperial Star Destroyer Review

Reviewed by Alain King (SAFOLs Member, CapeLUG Member)

This set went on sale in October 2019 and added to the Ultimate Collector Series of Star Wars models that have been released since 2000. This is the second time that a Star Destroyer is created in this series with the previous one coming out in 2002. As a massive Star Wars fan, I was glad to be able to add this one to my collection as the older one is very difficult to obtain (and we are not going to talk about the cost).

First Impressions

The box that the set comes in is huge and even has markings on the outside to ensure that you get the correct experience when opening it. The first box that comes out of the box is a long thin one which contains the instruction manual (the ring binding is a nice touch for a manual of this size) as well as the sticker sheet. The sticker sheet contains a single sticker for the plaque that goes on the stand giving you information about the ship. A nice touch but I do wish these were printed as they are very difficult to get on properly. There are an additional 4 boxes which contain all the parts for the set. There are 19 stages of the build with multiple bags per stage as well as some of the larger parts in unnumbered bags. A tip for anyone building this, take the larger parts out and keep them to one side as they keep popping up at various stages of the build (one is needed right on the first step) otherwise I found that all the bags for each step were grouped nicely in each box.

The first section of the instruction manual includes some details about the ship and interviews with the designers. A great read with some really interesting information, if you don’t have the set and want to read it, download the massive manual from the LEGO® website. The last page of this section includes directions on how to move the model around which gives an indication of how big it will be (There are dimensions on the outside of the box but the picture with a human arm in makes the scale easier to visualise).

The Build

The build starts with the stand and from there quickly progresses to complete the framework (made of technic elements) which gives you an idea of the size of the set. It is huge. You also build the 2 minifigures which come with the set which have some nice details but are not famous characters. They are very detailed and do include arm printing so a nice addition to the collection.

The next stage that you construct is the panelling – these are huge pieces made from connecting plates together. There is some evidence of the curvature that this can produce on the really long pieces. They snap onto the bottom of the ship using clips but there are only a few on each side and some of the support is an axle in a hole. This does cover well and there are minimal gaps as a result, but you need to be aware that this is a display model, it is not something you will be swooshing around and playing with. This lower section also includes the bay where the ships land and here we actually build a micro Tie Fighter. This Tie Fighter model does look a little odd, but I don’t think I could do any better myself.

After finishing the bottom covering, we move onto the top which is some very large parts that get assembled. The highlight for me was assembling the gun turrets of which there are four on each side, three of these are identical but the fourth is different. There are some clever parts used to create these. After putting the skin on the top of the ship, you start building the bridge section. This results in a great looking structure with interesting building techniques to get the shape they are going for. I did enjoy the nod to the construction sequence shown in Solo: A Star Wars Story which was included in the way we went about building the bridge. The final build in this set is a Tantive IV which shows how massive the Star Destroyer is compared to the rebel ship.

Final Thoughts

When this model is complete, the volume of space it takes makes it feel impressive and reminds me of the first time we saw this ship in the opening sequence of Star Wars IV: A New Hope especially as I have it high up on a shelf. As a fan of Star Wars and LEGO® Ultimate Collector Series models, I did feel that this was a necessary addition to my collection. There is no way to write a review of this set and not discuss the cost. It is an expensive set, but after building it the size of the finished model makes it feel worthwhile. If you can get this set for anything below full retail price and you like the big Star Wars models, then go for it, you will not be disappointed.

I am now left with hope that the LEGO® group will re-release the Super Star Destroyer and Death Star so I can complete the series of ships which indicate the scale.

Reviewer’s build images

75299 Star Wars™ Trouble on Tatooine Review

Reviewed by Xavier Cordeiro (SAFOLs Member)

Season 2 of The Mandalorian ended not long ago, so I thought it’d be fun to take a look at a set from the series. This particular set is based on Chapter 1 of Season 2.

The Minifigures

The 3 Minifigs included are The Mandalorian, now donning full Beskar armour, the Child, (AKA ‘Baby Yoda’) and a single Tusken Raider.

When I first built the Mandalorian, I was surprised by the level of detail. With printing on the legs, torso, and even on both arms, I can say that this is certainly the most detailed Minifig I own. I don’t get particularly excited about extra arm printing, but I appreciate how far LEGO went to make this Minifig accurate. They even went as far as to include the Mudhorn symbol on his right pauldron. Underneath his iconic helmet is a black head. His grey cape is included, along with his rifle and blaster to complete the look.

The Tusken Raider is the same we have gotten for years, and there is really no reason why it shouldn’t be. The design is very good, with a moulded head piece, and printed torso and leg pieces. He comes with his ‘Gaffi Stick’, which is a simple build with 4 pieces.

And finally, the possible highlight of this set, The Child, whose name we learn in Season 2. It’s difficult to capture the cuteness and character of The Child with 2 small pieces, but LEGO did a good job. His design isn’t super detailed, which I think works better here. He has some torso printing, and his head is a rather hard plastic, with slightly flexible ears. Overall, there are really no faults I could find with these Minifigs, and the Mandalorian and the Child are possibly the highlight of my collection now. I believe that a full 10/10 is deserved here.

The Build

This set consists of three builds: The Tusken Raider’s hut, his ballista, and Mando’s Speeder bike.

The hut is definitely the weak point of this set. While the colour scheme works well, I feel like a handful of pieces could’ve been used to fill the gaps in the walls. The walls are hinged, so by pushing them out the gaps disappear, but I think the general look of the more enclosed hut works better. Although I’m not the biggest fan of the hut, I can say that the other two builds are some of my favourite small builds from Star Wars.

The ballista is small, but the build is surprisingly fun, and it looks great when completed. The use of small pieces gives it a mechanical look, while staying primitive, which is good for a weapon built by the Sand People. The winch at the rear is so well done that for me it’s almost the highlight. There’s just enough friction to make it seem like there’s really something to winch back.

Last is Mando’s Speeder Bike. Again, the build is really fun for a small speeder.

I like how it isn’t super oversized like other LEGO speeders/bikes, but it’s still large enough to work as its own build. There’s some nice greebling for detail, and even accommodation for The Child. Overall, the speeder looks great, and is my favourite small vehicle from Star Wars.

The ballista is excellent, and the hut, although not bad, could have been slightly better. I think less than 8/10 here would be unfair.

Packaging

There’s not really much to talk about here. The box is just the standard ‘$30’ box size, with three plastic bags inside. I know that LEGO is working to cut down on plastic use, so something that I always wonder about is why they don’t use slightly smaller bags, or just fewer bags. It’s a minor point, but I feel like it could help slightly. A single instructions manual is included, which gives us a look at the yet unreleased March Star Wars wave. In case anyone’s concerned, the blue Lightsaber blade with Luke from the Imperial Shuttle set is just a misprint and has been confirmed to be green. An additional point to mention is that no stickers are included in this set. There’s never really much wrong with LEGO’s packaging, and I believe 9/10 is fair.

Playability

There aren’t many play features in this set, but I personally don’t like too many. There’s obviously the feature where the hut can hinge back to make a more open space, but I wouldn’t necessarily call it a play feature. The only real play feature here is the spring-loaded projectile on the ballista. It works decently, and the ballista’s legs allow it to adjust up or down. I like the positioning of the projectile, as it’s just high enough to hit Minifigs square in the torso, which is always fun to play around with. I’ve found it slightly difficult to launch sometimes, because the design of the back of the ballista makes it difficult to push the projectile down far enough to launch, so you have to just press down a little higher up on the missile. It feels a bit strange to me, but aside from that it works fine. The ballista is a rare case in Star Wars sets where the projectile almost exactly matches the in-universe weapon, both in colour and design, so I feel some credit should be given there. 9/10 meets the case here in my opinion.

Value

This set costs between R580 and R600, with 276 pieces. That comes to about R2.13 per piece, which feels a bit steep. For the price, I feel that another Minifig like an extra Tusken Raider would make the price perfect. Alternatively, if the price were nearer to R500-550 I’d be perfectly happy. However, it should be considered that the Mando minifig is highly detailed, and the set provides a cheap way of getting the two main characters in the series. In conclusion, I feel that one or two things could’ve been changed to make this set really worth the money. Given the quality of the Minifigs and the builds, I feel that 7/10 is about right for value.

This is a tad unconventional, but I have one recommendation for this set. As I’ve said, it’s a great set, but to take it to the next level, I suggest pairing it with set 75265 – T-16 Skyhopper vs Bantha Microfighter to create the perfect Tatooine environment. The T-16 doesn’t really fit, but the Bantha and the extra Tusken Raider make it a really complete combination. I’ve put them into the same display, and it almost feels like they were designed for each other. It brings some more life into the whole scene, and makes the link to the episode it’s based on even better.

Overall, I really enjoyed this set. It’s been sitting on my shelf for over a week now, and I still like it as much as when I built it. Sure, the value isn’t perfect, but there are so many merits to this set. The builds are great, with the hut being a minor let-down. The Minifigs are honestly perfect for the set, and although I feel like the value isn’t excellent, what you get once you’ve built it feels good. The ballista and the speeder bike are very complete builds, and again, Mando and The Child are great additions to my collection. It’s not perfect, but I believe LEGO designed a great set with just 276 pieces. My overall score comes to 86/100, which I think is just right: Not perfect, but close to it for a small set.

76161 Batman 1989 Batwing Review

Reviewed by Thys Brits (SAFOLs Member, jhbLUG Member)

I have not done many reviews on LEGO® sets (in fact, this is only my second one), but I’ve read quite a few and appreciate what people who have done many of them try to put into them. Seeing as there have been so many other reviews done on pretty much every LEGO® set out there, I decided to keep it straightforward and simple. Here are the views of an avid LEGO® builder (not collector), although as a family, we have managed to build up quite a collection over the last few years.

Apart from looking great next to the earlier released 1989 Batmobile, the Batwing makes a unique display piece that can be easily wall-mounted. This set has quite a few surprises to it, from plain building fun, to very clever building techniques and hidden gems. There are also a few parts that only appear in this set.

The build starts with what feels like building a Technic set, with a very big structure to keep the model together. While building this, you already start getting the feel of the size of the final build.

After completing bag set 1, the framework is complete and the unique Batman minifigure is inspecting the build process. The minifigure is in fact the same minifigure from the Batmobile set, with the unique moulded cape and cowl.

From there on, most of the building happens with the many black parts that make up this set. If you are purely looking to build up your collection of black parts, this set will go a long way. The techniques used to get to the unique shape of the final build are as varied and unique as the model it represents. Various sideways and upside-down mini constructions are put together and then attached to the main construction. The SNOT (Stud Not on Top) technique is used a lot.

One odd thing about the set is the few odd parts that are hidden away inside the build, including a round 2×2 tile with the Bat signal printed on it.

The set does have a sticker sheet, but only a few stickers to make up details for the cockpit and of course the big display plate.

The build took the better part of a week, building two to three sets of bags per night, so as for value for money, it is worth it. Finding a place to display it will always be a problem, due to its size, so many people will be tempted into putting it up against a wall. The instruction manual has great instructions on how to do this. Purists, like with the Batmobile, will say you need to build this set with gloves, as all the black parts tend to show fingerprint smudges very easily. But for those who build this for the fun of building and having it played with, this should not be an issue. It certainly is playable. My 8-year-old son has flown it through the house quite a few times, and the build is extremely sturdy, with no parts coming off while playing with it.

The final product is amazing, and it displays beautifully next to the Batmobile. All in all, a great set. Lots of fun to build, play with, and for those who collect parts it is a great set to get a load of black parts.

Official LEGO® Images

21322 Ideas Pirates of Barracuda Bay Review

By Rakesh Gosai (SAFOLs Brick Deputy)

How much did it cost the pirate to pierce his ears? A Buccaneer!

Coming in at R3999.00, this set has 2445 pieces. Sure to please even the fussiest LEGO® Fan. A massive shipwreck island that contains the wreckage of the infamous Black Seas Barracuda. The set can be transformed to create the full, seaworthy sailing ship, inspired by the 1989 LEGO®® model, “Captain Redbeard’s Black Seas Barracuda” thus ensuring maximum bang for your buck!

Milan Madge, LEGO® set designer, really worked hard to bring the original Ideas Set “Pirate Bay” designed by Pablo Sanchez into line with the classic LEGO® Pirates world. He made an awesome feature packed set! You will notice that the Inn is named after Pablo’s father José. José introduced Pablo to LEGO® Pirates, so this was his way of paying respects and to honour His father.

Austin Carlson, LEGO® Minifigure designer, designed 8 highly detailed minifigures for this set. They are Captain Redbeard, Lady Anchor, Quartermaster Riggings, Jack “Dark Shark” Doubloons, Tattooga, Robin Loot and twins Port and Starboard for pirate role-play action, plus a shark, pig, 2 parrots, 3 crabs, 2 frogs and 2 skeleton figures.

The shipwreck island model measures 59cm high, 64cm wide and 32cm deep. The build time would be approximately 5 hours depending on how fast you build. The build is immersive and will keep you entertained as you build this highly detailed set. The ship is split into three sections, and fits seamlessly in either model i.e. The Shipwreck or The Black Seas Barracuda.

Split into 27 numbered bags, a 460 page instruction manual which introduces the key figures in its development. Pablo Sánchez designed the original submission on Ideas and is responsible for returning the pirates to LEGO®’s portfolio. There is also an interview with Milan Madge and Austin Carlson. The book also includes a backstory on the pirates, as well as an introduction to the crew.

If you owned previous LEGO® Pirates sets, you will notice that in this set, the Minifigures have aged, this was a really nice touch. The box has the yellow frame and diagonal stripe to mimic the classic LEGO®LAND boxes from the late 80’s and 90’s sets. The only missing part in the box design was the flap and clear panels to see the parts in the set, like how it was in the older sets.

I was considering going into detail about the build but I thought I’d leave the treasure for you to enjoy in detail. I love this set and it really makes an epic display set with the hidden treasure chest, palm trees, and the island is packed with details! There are crates and barrels all stacked in a haphazard way replicating a busy dock. Three cannons guard the various angles of approach and each are positioned on a different level of the structure.

From Bag 15, you will notice that there are still 50 pages left in the instruction manual. This makes it relatively easy to convert the shipwreck into a sea worthy vessel. The process should take 20 minutes BUT converting it back to a shipwreck would be a challenge as you must work backwards in the instruction manual. All part of the fun I suppose.

The sight of the red and white sails when the build is completed is sure to get any enthusiast excited.

After completing this build, how would you know if you are a LEGO® Pirates fan? You don’t! You just ARRRRRRRR!

All images are from the Official Press Release.

10270 Creator Expert Bookshop

By Rakesh Gosai (SAFOLs Brick Deputy)

Released on 01 January 2020, this is the last instalment of the LEGO® Creator Expert Modular Buildings. Do not be alarmed, LEGO® will still be making the Creator Expert Modular Buildings but I suspect that this range will change to be in line with the 18+ Range, aimed at us Adult Collectors. I am keen to see what the new designs would be! This set is slightly cheaper than previous modular buildings.

This is the 14th year of the modular buildings from the Creator Expert team and should be an exciting build. The set is split on two 16×32 baseplates and is split into 8 numbered bags. I like that with this Modular Building, you can build the two buildings separately but therein lies the catch. There is an extra wall in each building, with extra items to decorate the walls. These extras bring the part count higher.

They can be displayed separately or together and fits well within a city setup. I did find that this set was very detailed in front, but not much attention was given to the interior and back of them. The “Birch” Tree is awesomely designed in the Bookshop section and the Townhouse bricks are an amazing teal colour.

The Bookshop “Birch Books” occupies the left ground floor and mid-level. The apartment takes up the top left side. I found the interior to be lacking in both the bookshop and apartment. I built the Corner Garage last year and I was expecting similar detail but, was sadly disappointed.

On the right-hand side is the Townhouse. I enjoyed building the dining room because it has some great details like, a dinner table and fireplace. Upstairs is a small bedroom with access to the balcony. The Townhouse has some nice details but sadly it is incomplete, there is no kitchen and bathroom. I wish the designers paid more attention to the details that where included in the interior of this whole set.

The Bookshop comes with 5 minifigures, which is less than the previous sets in this range. Corner Garage came with 6 minifigures, Downtown Diner 6 and Assembly Square 8 minifigures. An Adult Collector would definitely add this to his collection despite the shortcomings, the high expectations where set by the previous Modular Buildings.

The building profile is lower and should you buy another set, you could increase the height. Should us Modular fans add this to our collection? YES, because the exterior has some really fun details, the colour scheme is on point and provides us with some interesting building techniques even though the Modular Building feels less substantial next to its predecessors.

Overall, this is a good build but falls short of its predecessors like the Corner Garage, and the Assembly Square. After building those, I expected the same detail in this set. I would rate this set 6/10 because of the interior lacking many details that we have become accustomed to.

60264 The Ocean Exploration Submarine

Reviewed by Xavier Cordeiro (SAFOLs Member)

When my sisters and I really started playing with themed LEGO® 12-13 years ago, we collected City sets exclusively, but as the years passed we slowly moved on, and by 2011 we had almost stopped buying them completely. As a result, this is the first City set I’ve built since 2011, so it’s interesting for me to see how far the theme has come in nine years. This set, along with a small handful of City sets in The LEGO® Group’s partnership with National Geographic, marks a return to the Ocean Exploration sub-theme. This has always been part of the City theme, but hasn’t had much going on for the last 5 years. When looking at a set, I like to approach it using a score system for each main aspect, so I’ll do the same here.

Firstly, the Minifigures

This set comes with 4 Minifigures, which I think is the perfect number for a set of this size. There are two Deep Sea Divers, one Explorer, and lastly, Jessica Sharpe, who is featured in the LEGO® City Adventures show, and is exclusive to this set. Many of the Minifigure pieces in this set are exclusive to the Ocean Exploration theme. The level of detail on the figures is pretty good, and what I like about two of them is that they could easily be used in other contexts. The Deep Sea Divers have dual-sided heads, showing some happy, and some more alarmed expressions. They also have rather large diving suits, with large lights, and a handful of accessories. Overall, the Minifigures are of high quality, with some nice new prints and good accessories, and I think they deserve a nifty 9/10.

Now, onto the build

The three main builds in this set are quite simple, and something you’d expect from a relatively inexpensive City set. However, they were still quite fun to build, and I appreciate the size of the Submarine, and the sea-bed cave. I particularly appreciate the different colours used. The Sub has more classic, bright colours, whereas the cave uses some more muted, natural tones. The Submarine is a simple design which looks nice all-round. I only have two small complaints with it, being that there are no studs to hold the Explorer who sits in the back half of the Sub, and the fact that the vehicle isn’t entirely enclosed. Admittedly this is difficult for a small vehicle, but it does bother me somewhat. Otherwise it’s a solid build, designed for play, but still nice for those who wish to display it. It serves its purpose well, with some minor faults, and I think 8/10 is a fair rating.

Next, “Playability”

What I like about this set is that it isn’t loaded with play features. While I think it’s a lot of fun for kids, (and sometimes adults) to have designed features, sometimes less is more, and I believe that this set shows that. A major feature is the way the glow in the dark Angler fish can pop out of the crevice in its cave, which is effective, but isn’t perfect in my mind. My problem with it is just how the clear Technic beam that holds the fish protrudes quite far out and makes it a bit difficult if you want to keep the build against the wall. The Submarine’s claws can quite easily clasp the gems which is something I really like. Its super simple, but still very satisfying, and they are quite poseable. The small vehicle clips onto the Sub when not in use, which makes it look more enclosed, and serves to prevent the Explorer from falling out through the back. The Angler Fish really does glow in the dark quite well and is more menacing than I had anticipated.

I think this set has good playability, with the only blemish being the Technic beam. I believe a solid 8/10 is justified.

A small point, but one I usually consider is packaging. The box is nice, but there’s not really much to it aside from the National Geographic label. The set comes with three instruction booklets, which I think is too much. It’s not a serious point, but two booklets are more than sufficient, although I suspect it’s to enable several builders to tackle the set at the same time. The instructions were easy to follow, and there are some images of what the real-life counterparts of the builds look like. In the end LEGO® seems to always do a good job when it comes to packaging. 8/10 is a fair score in my opinion.

Last up is the question of value

So, I thought some stats might be helpful to provide some context to this set’s value. This set retails for R550, with 286 pieces. In comparison, the Ninjago set, Jay and Lloyd’s Velocity Racers (71709) goes for the same price, with a more generous 322 pieces. The recent Star Wars Jedi Interceptor (75281) is also the same price, with a somewhat underwhelming 248 pieces. Going by this we can see that while it’s not the cheapest set out there, it’s worthwhile, and I feel that for what you get, it’s not bad at all. If it were rounded down to R500 then I’d be perfectly happy. One last point to consider is that this set uses quite a few large pieces, and some that are new for 2020, such as the sea plant piece, and of course the Angler fish. Given these points, I feel that 8/10 is an accurate judgement of this set’s value.

Overall, this set earns a favourable 41/50 in my opinion. It has a few minor faults, but it does what it needs to. The Minifigures are all great, and the Submarine is nice. The sea-cave provides some texture and colour, and everybody likes the adorable LEGO® crabs, two of which are included. I really like how LEGO® has used its extensive inventory to give the four Minifigures a lot of character, which was something that was more limited back in 2011. At the end of the day it’s an enjoyable, inexpensive set that I imagine most children, and even older fans will like very much.

6399 Airport Shuttle

Reviewed by Clive Crafford (SAFOLs Member, jhbLUG Member)

Suffice it to say I was jumping up and down like a five year old on Christmas morning when I received this set. When joining the LEGO® hobby, it doesn’t take long before you have a wish list of sets that your heart desires. And it is not every day that you get the opportunity to add one to your collection, so when I saw this, I could not let it go by. Advertised on Facebook for more than a month without selling it, I made the seller an offer nearly 35% less then what he was asking, and he was happy to take it. It was also far less than the cheapest one currently on Bricklink – and with the set in a good condition with the original box – a bargain!

The set was first released in 1990, with 767 pieces, 9 minifigures and a retail price of $140.00. The set I have unfortunately is missing one window, one minifigure and one 16 x 16 baseplate, but sure I will be able to replace those – the important (and expensive) parts are included – working motor and track. The box has some tears around the corners (as can be seen above – left bottom corner). It still holds up well though, and can be carried around with all parts inside. The box art is not faded, can still clearly see the image of the monorail car. The track layout is shown as well, and this is the smallest configuration space wise, that it can be set up in. The age range is given as 8 – 12 years, so I am a bit old for it – but the set itself is older than I am.

The box has a cover that you can lift up – revealing some images of a child enjoying the set, and instructions on how to operate the monorail. The bottom has windows so you can see the perfectly packed parts, or in my case, scattered parts in a few Ziploc bags.

The original price sticker of this set was also still visible, retailing for US $159.99 in New Jersey at Jamesway Discount Stores that unfortunately did not last as long. I bought this set from a guy that received this set from his parents back in 1990/1991. It was built and played with by him as a child, but was then boxed up and packed away for more than a decade, until he discovered it again and decided to sell it.

The first item out of the box is the manual – there are a lot of pages with creases, and also some loose pages as can be expected from a set belonging to a child that just wanted to have fun. Despite that, it is still well preserved. The majority was clear though, and I used it to build the model. LEGO instruction manuals have come far though compared to this nearly 30 years old manual, and big improvements have been made by the LEGO Group. There are times where you really have to check what parts are needed, as they aren’t always listed, or check where they go, and the page cuts them off without you being able to identify which piece it is.

The next parts are the baseplates that come with the set. There are also two 8 x 16 green baseplates, just not pictured here. The grey parts are quite discoloured here, but the green baseplates is still in an excellent condition. There is another 16 x 16 grey baseplate for this set that I did not receive, but was able to use one from my parts. Both the shuttle stations are built on these, one being a raised platform, and the other being on ground level.

Also included are the track supports, 8 tall ones, and 2 half the height, for the middle of the ramps. They slot into the monorail track easily, but still with enough gripping power to not fall out when you lift the track. They also have plates at the bottom that can be stuck onto other plates or bricks, however is preferred.

The most expensive pieces in the set are of course the track itself. With this set comes 8 quarter curves, 6 quarter straights, 5 straight pieces, 4 straight ramp pieces, 2 half straight pieces that allow you to control the monorail train and 1 half straight. Unfortunately one of the track control pieces was broken in my set, so although it works for the train to go across, it doesn’t allow you to control the train. The ratio of straight to curved sections of track was a lot better back in the day, as you got more straight pieces, which are the hard to come by and always in demand pieces.

The monorail train itself is a good size, has a sturdy design, and is similar to other train sets of the time. There is certainly room for MOC’s here, especially using pieces that are available today for a much more modern take. The motor still works perfectly, and I hope it will for a long time to come. There is space at each end of both cabs for a driver. The one on the left above only has space for two passengers as opposed to four in the other side, because of the space being taken up by the battery pack. The more recent city sets with a monorail or tram car don’t have space for more minifigures either. The sides and windshields of both cars also flip open for easy access to place minifigures inside. The on/off switch for the battery is on the battery itself, and access is gained by lifting the side cover up.

The first station you get to build is the one on ground floor. (There is one tan plate instead of a white plate.) The station itself is very simple, just a platform with a small roof overhang, and seating for two people. The cross walk extends over the road, to a bus stop, also with two seats and a phone booth. A nice touch, remembering that this set came out long before cell phones became popular. There are some flowers decorating the sidewalk – made from pieces with the same moulding we can find today.

The second station is raised about 10 bricks high. The platform has seating for two minifigures, with a staircase leading up. The stairs are completely brick built, and parts intensive, so I understand why they have the single stair piece now. There is also a hot dog stand underneath. The newer sets contain a few more details then this set, but still nice to have it included. On the opposite side has a bus stop with two seats for waiting minifigures, some flowers and two lamp posts. (One missing above.)

The set assembled completely. It is an impressive set, and takes up quite a large area, 120cm x 140cm. In comparison to train set today, it takes up more space, mostly due to the two stations that are included. I think it would be great if LEGO could do something similar again with its current train sets, including bigger stations, or at least have proper stations for sale separately. The market for trains and related products is definitely big enough world-wide to encourage this. The stickers are all intact, and still well stuck one, with just one exception.

Overall I am very pleased with this set, and feel the lack of monorail sets today. It was a great theme that LEGO surely can continue. I will be playing with it all weekend, and planning on how to incorporate it into my yet to be built city. I hope to add to my monorail track collection in the near future, and incorporate this set along with that on a much larger scale.