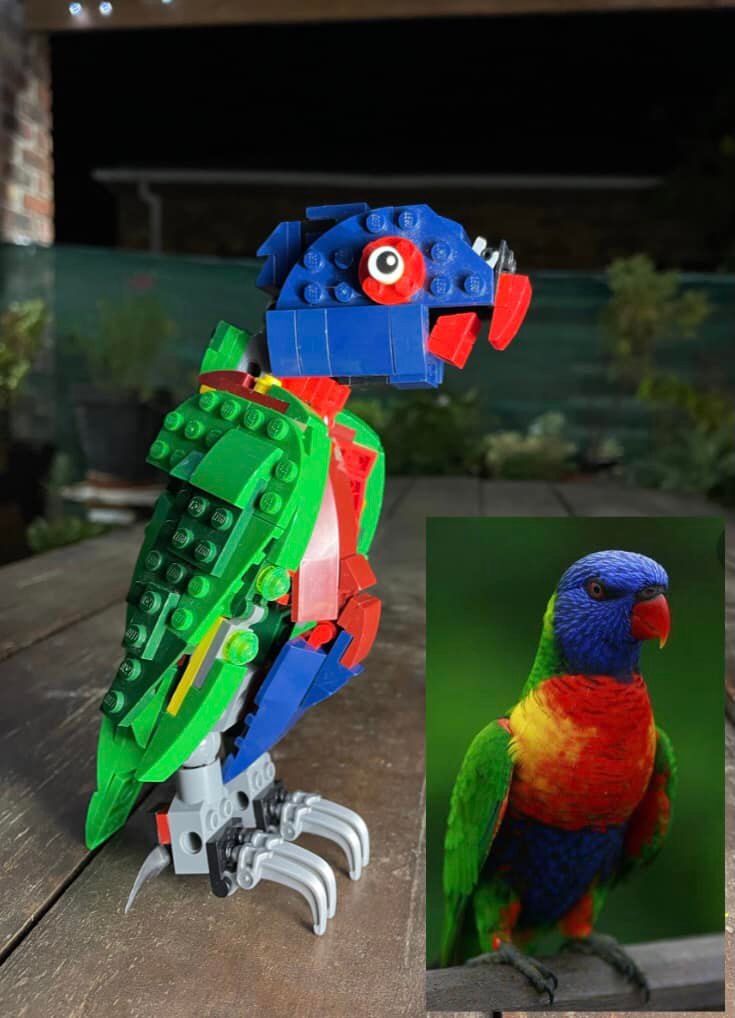
One of the most anticipated LEGO® sets for me released this
year, the LEGO® Boutique Hotel 10297. This is the 17th LEGO® Modular
building that LEGO® has made. The LEGO® Boutique Hotel was designed to
celebrate the 15th Anniversary of this well-loved Creator Expert
Theme.
The set consists of 3066 pieces and is already available
from your favourite LEGO® store in South Africa. Get your bags packed and get
checked in to this beautiful rendition of this hotel!
This hotel is unlike anything LEGO® has done on a Modular
Building and its fitting for the 15th Anniversary set to be
something special. The instruction manual has a fitting introduction to the
Boutique Hotel and the Modular Building theme. The designer is Anderson Ward Grubb,
and he has cleverly hidden references to the previous Modular Buildings. I
enjoyed that because it helped me appreciate the current and previous renditions
in this series.
The amount of minifigures in this set is 7, which is above the average amount of minifigures that were included previously. More minifigures just increase the playability of this set.
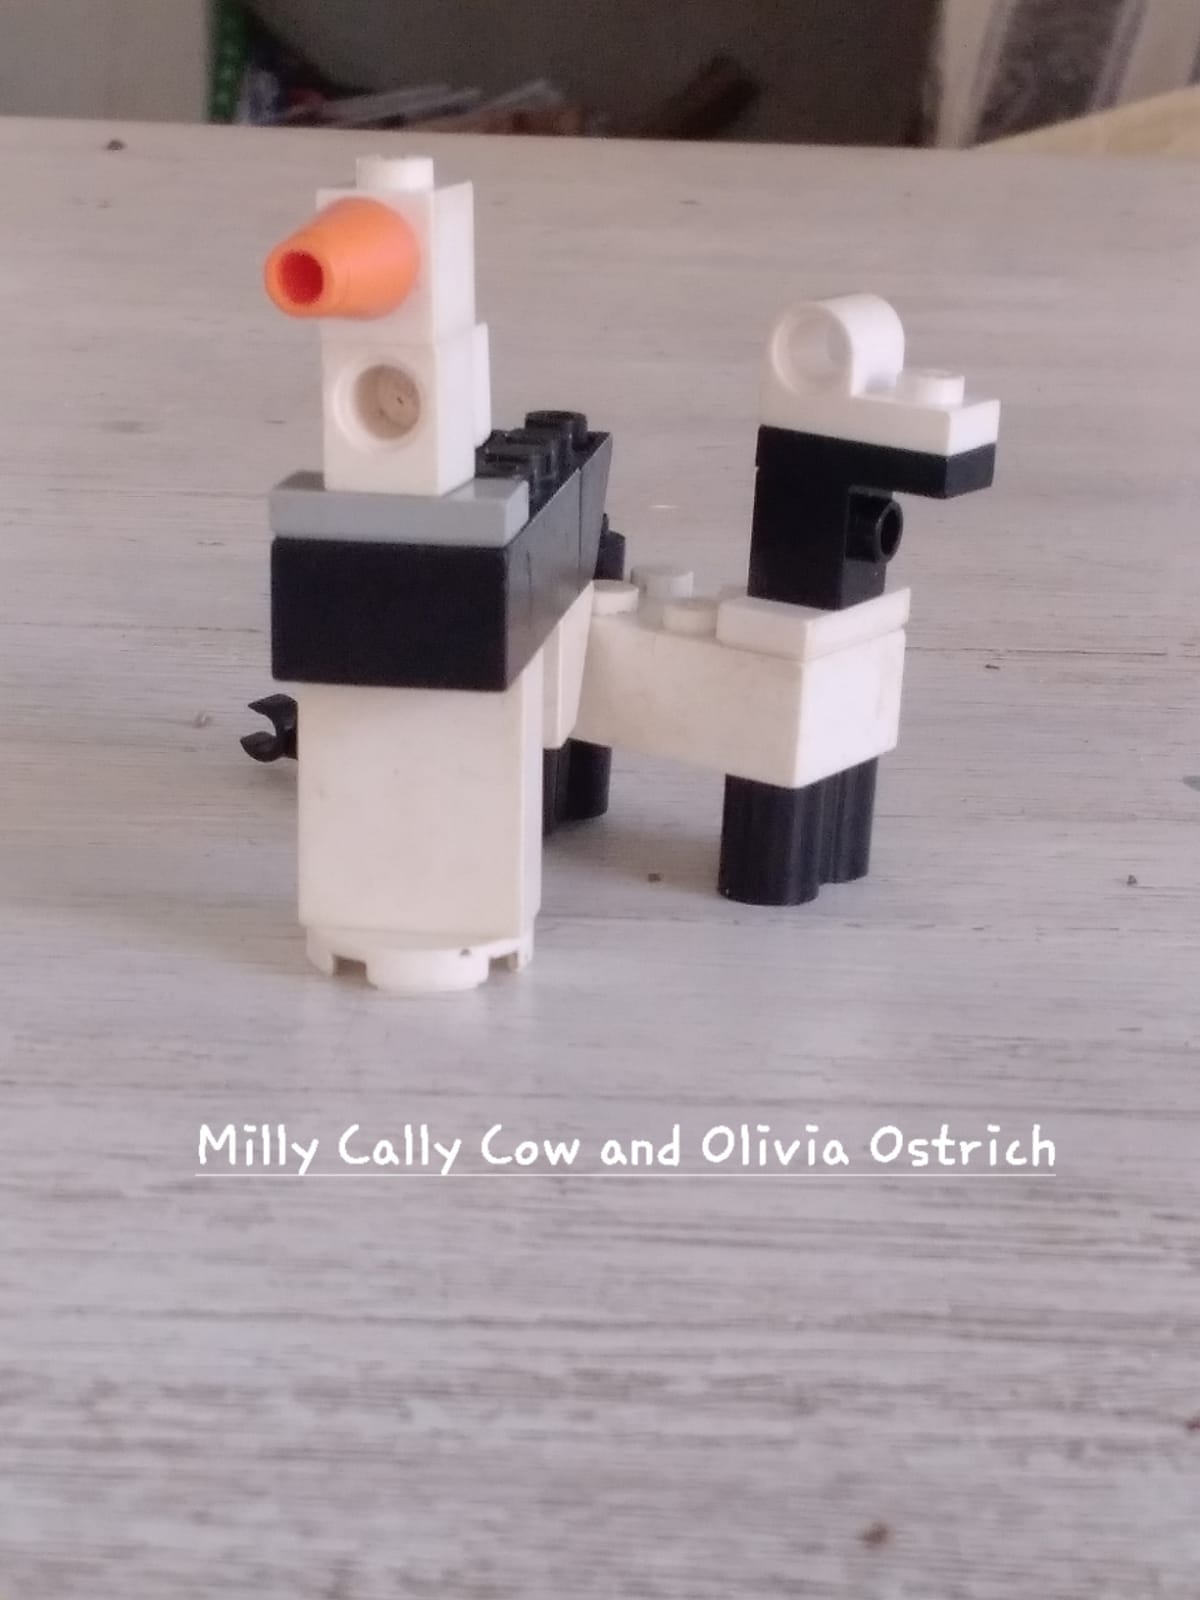
The minifigures are:
An accountant
A backpacker
An older lady
The art gallery curator
A barista
A male bellhop
A female bellhop
Included with the above minifigures are two mini builds i.e. A coffee cart and a luggage trolley.
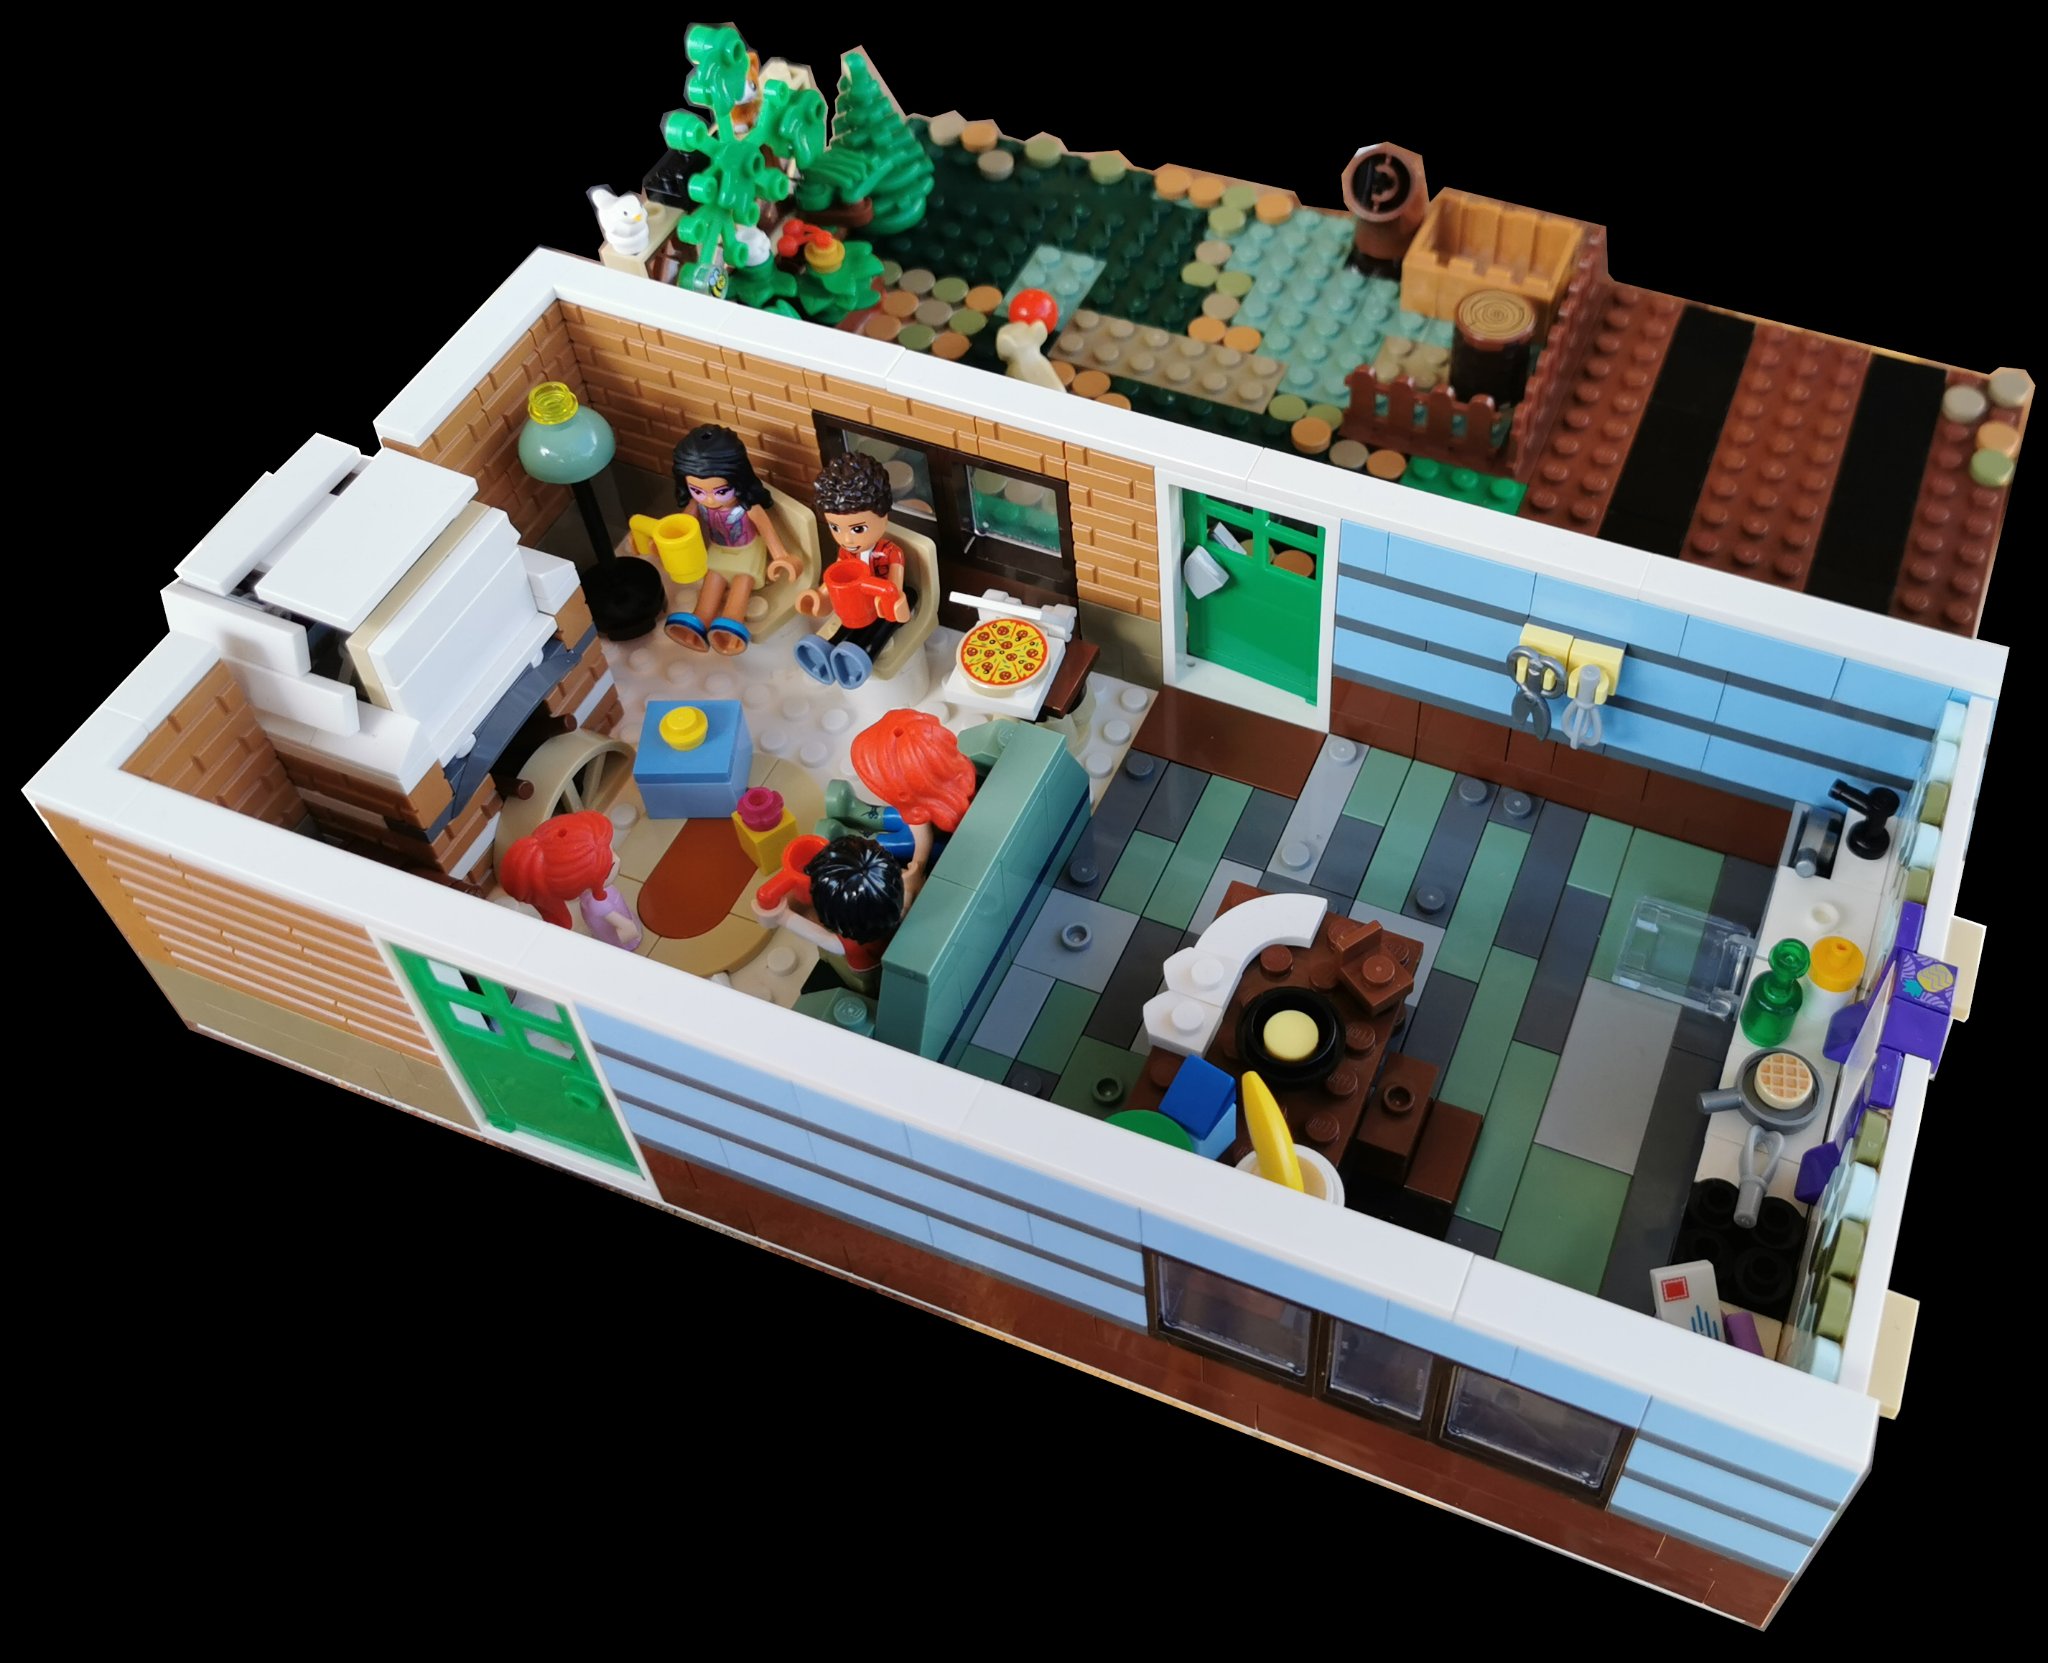
The build is an amazing experience and continuously engages you as you build the various sections. The variety in the build kept me engaged with the furniture on the inside, the variety of colours used in this set, the staircases, and the beautiful architectural details on the exterior of the hotel. Each bag feels like you are building something different.
Sand Green is a favourite colour of mines, this is used at
the top section of the hotel. I enjoyed the clever use of the black snakes on
the roof, keep an eye out for that! One of the stand-out features of the build
is the way the building is angled and gives the set a unique feel.
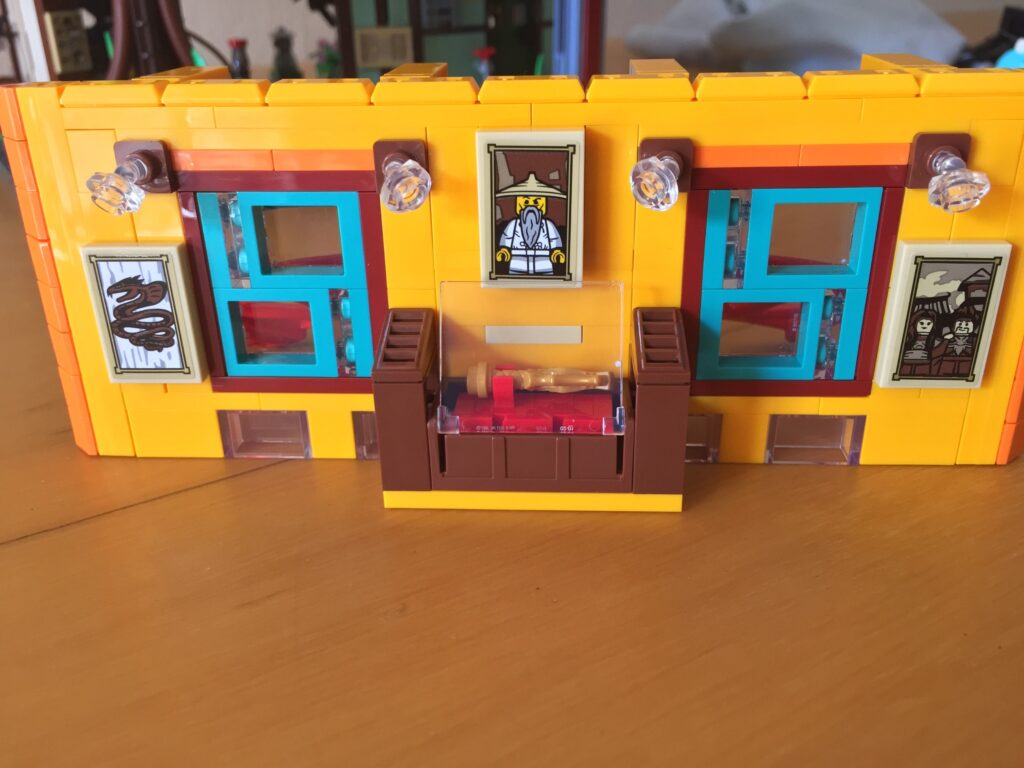
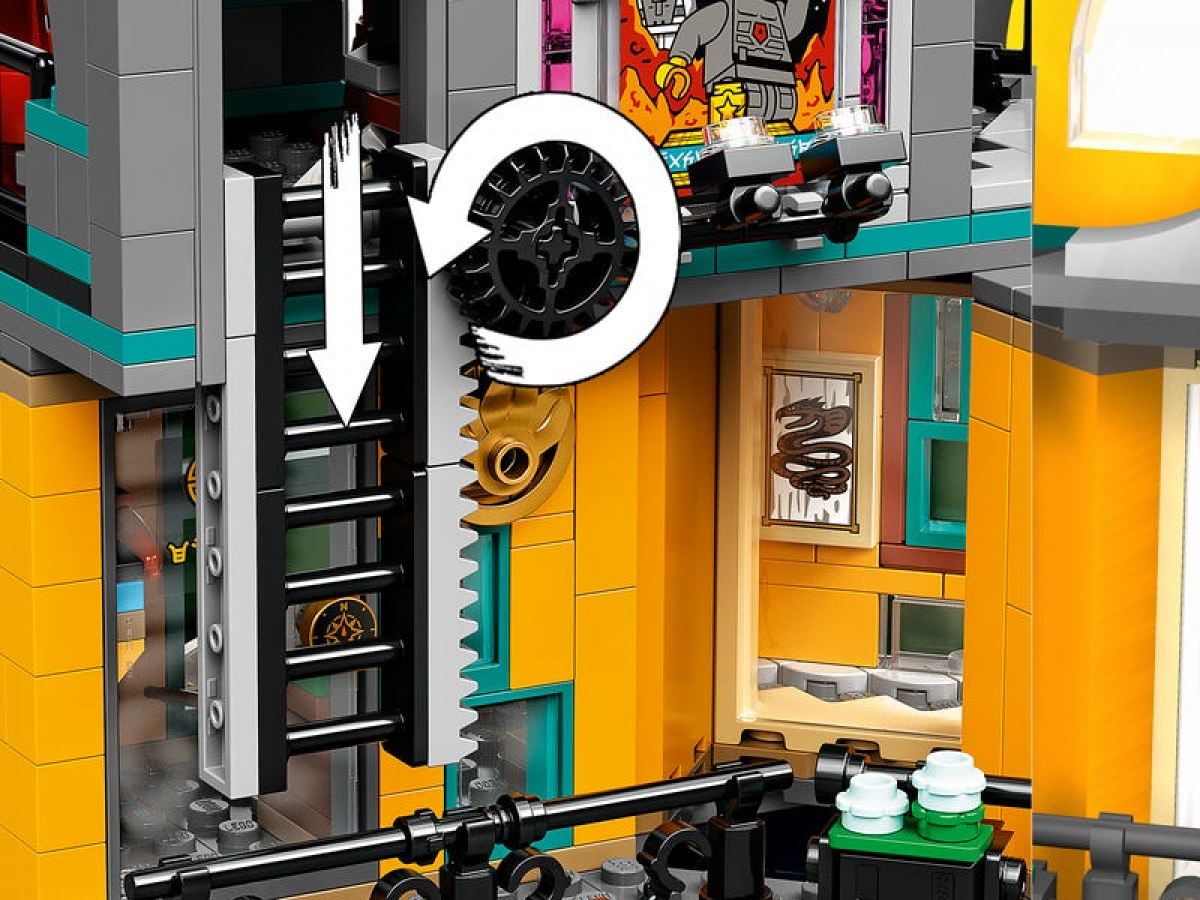
Keep an eye out for the beautifully designed staircases in
this build, there are many as this set is three stories high. The art gallery
is an amazing addition, it does feel very small, but the details squeezed into
this section are really fun. The painting inside looks like a character from
the theme called “Galidor”, an unknown theme to me. Included in the gallery is
a LEGO® sculpture, I have not seen this featured in any other sets.
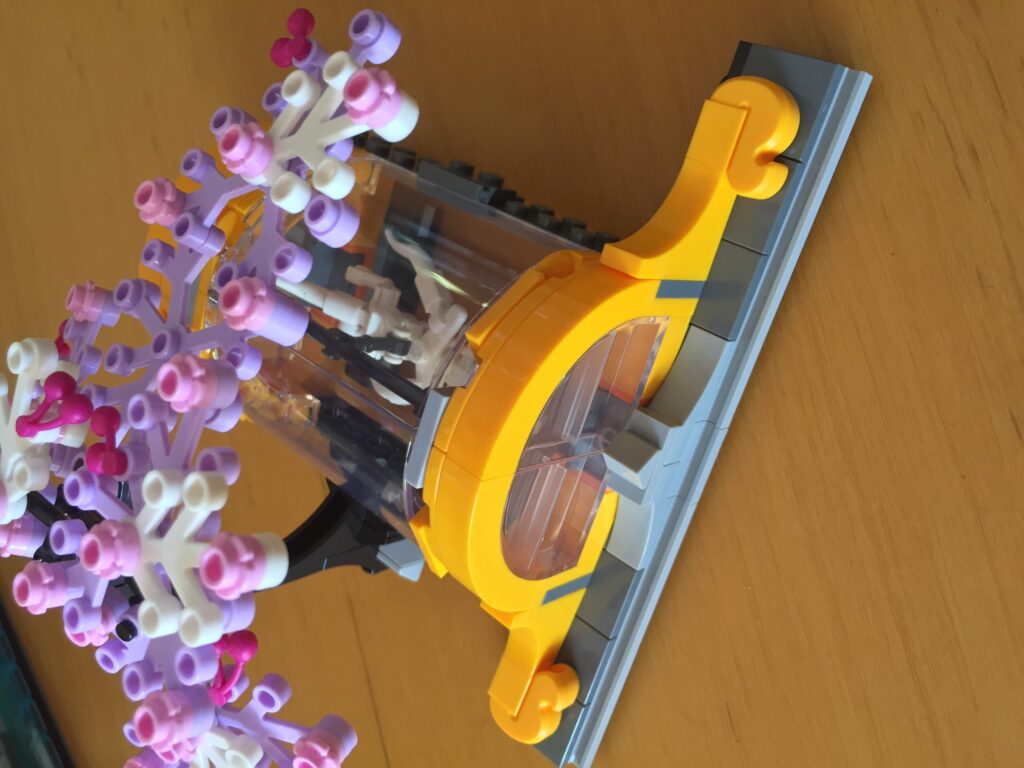
The palm tree at the outside bar is another amazing detail,
something new and bright unlike the ones I am used to seeing in older sets. The
staircase at the rooftop bar has a notice board which has plenty of references
to the previous modular buildings, a very clever way to include this in such a
small board.
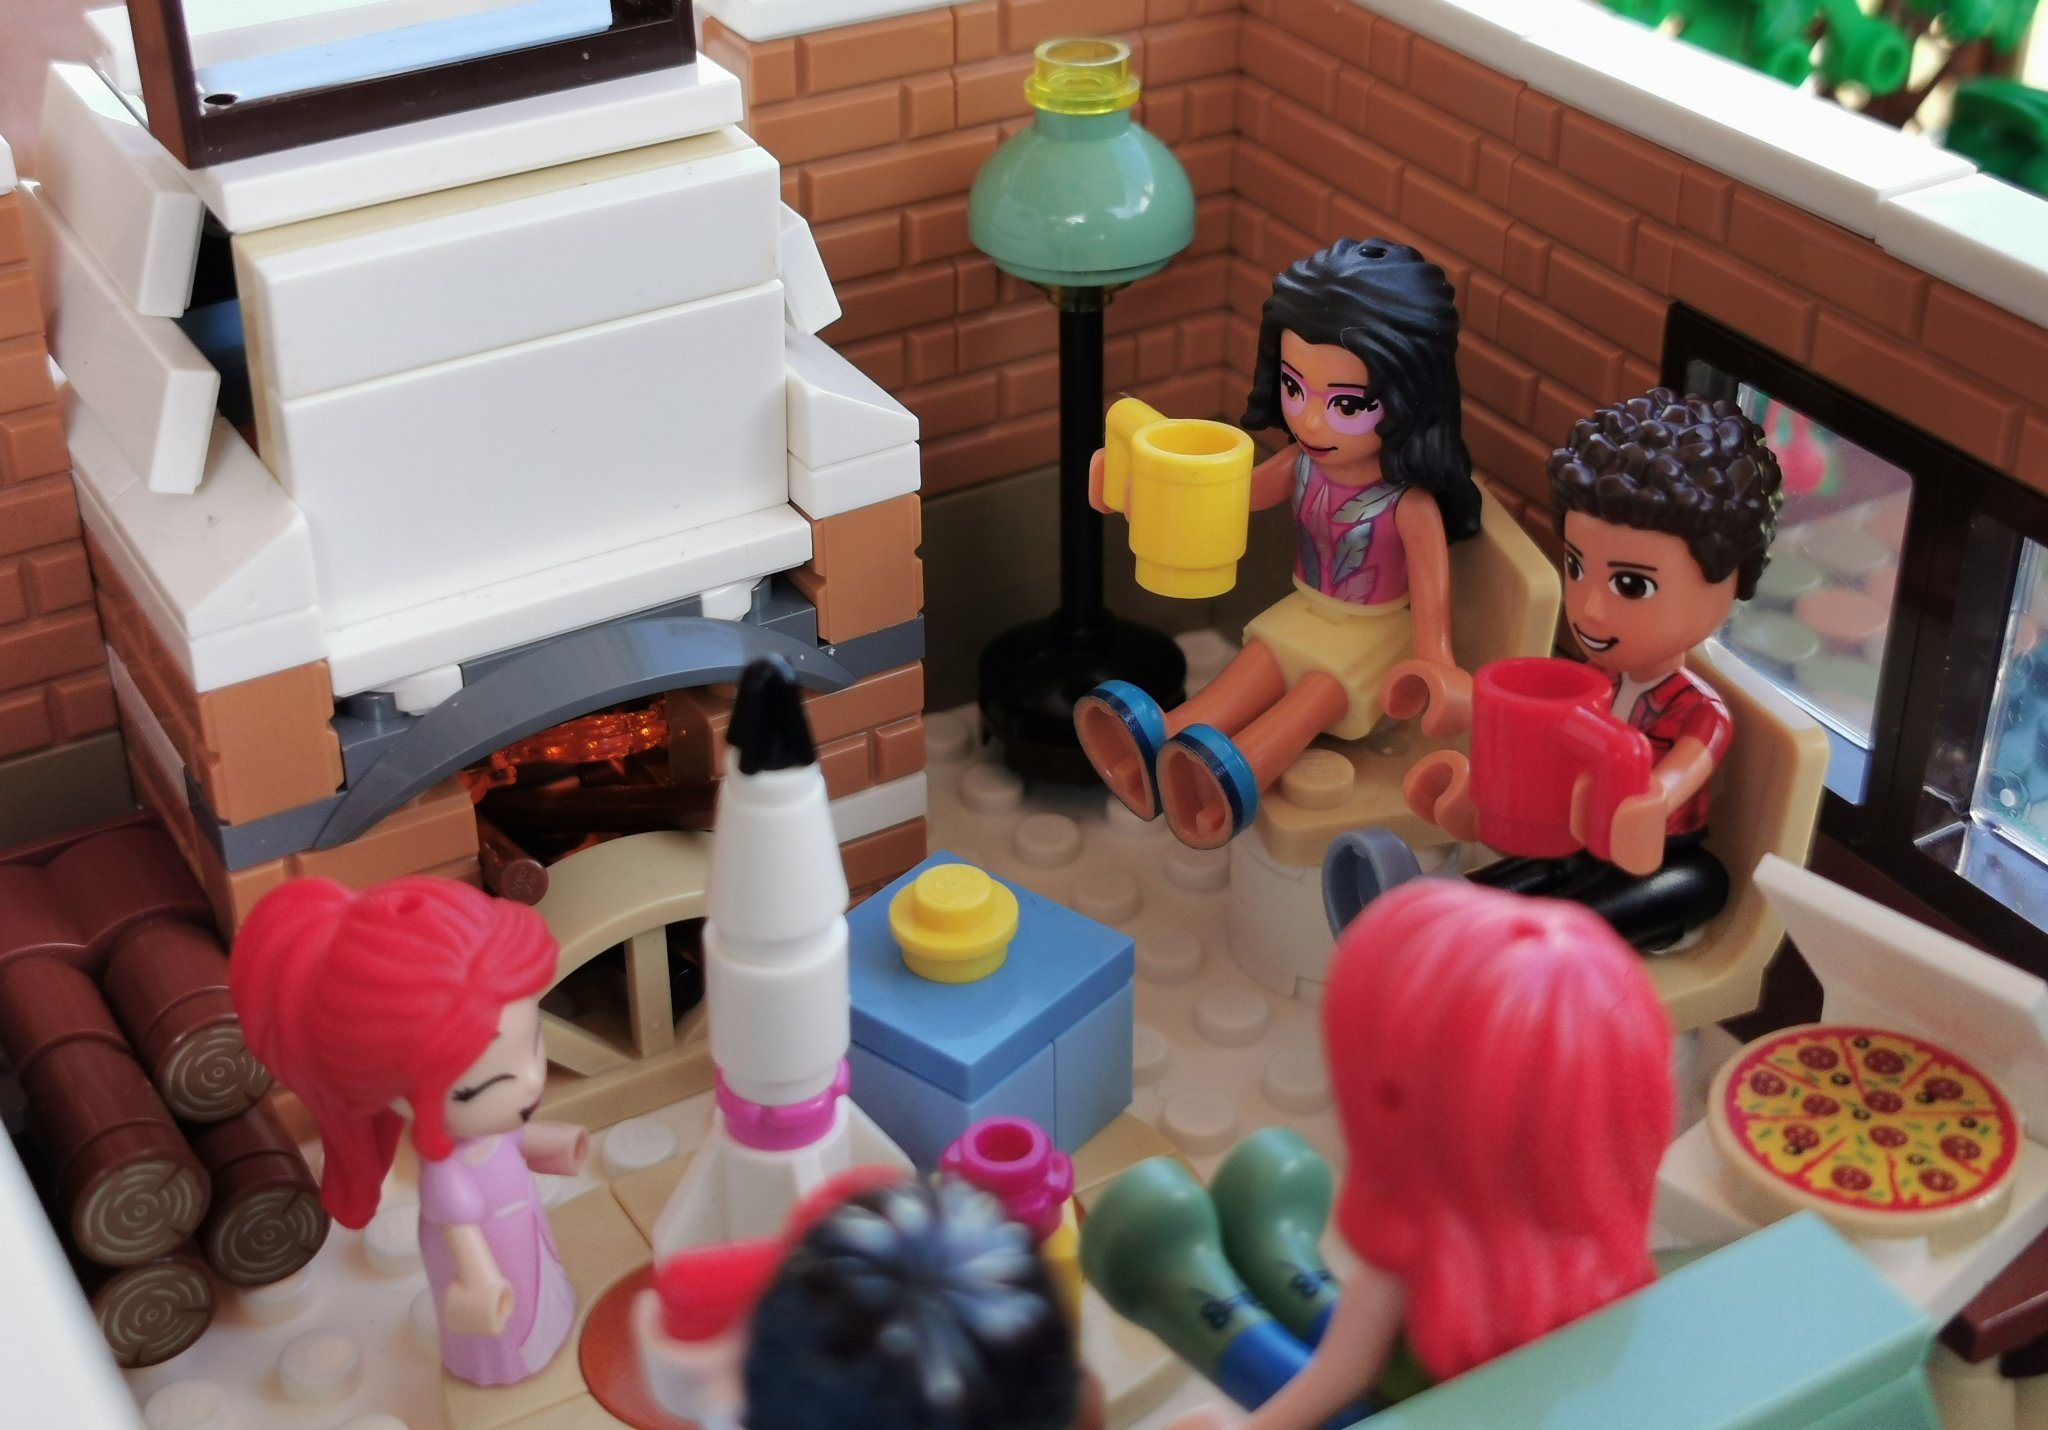
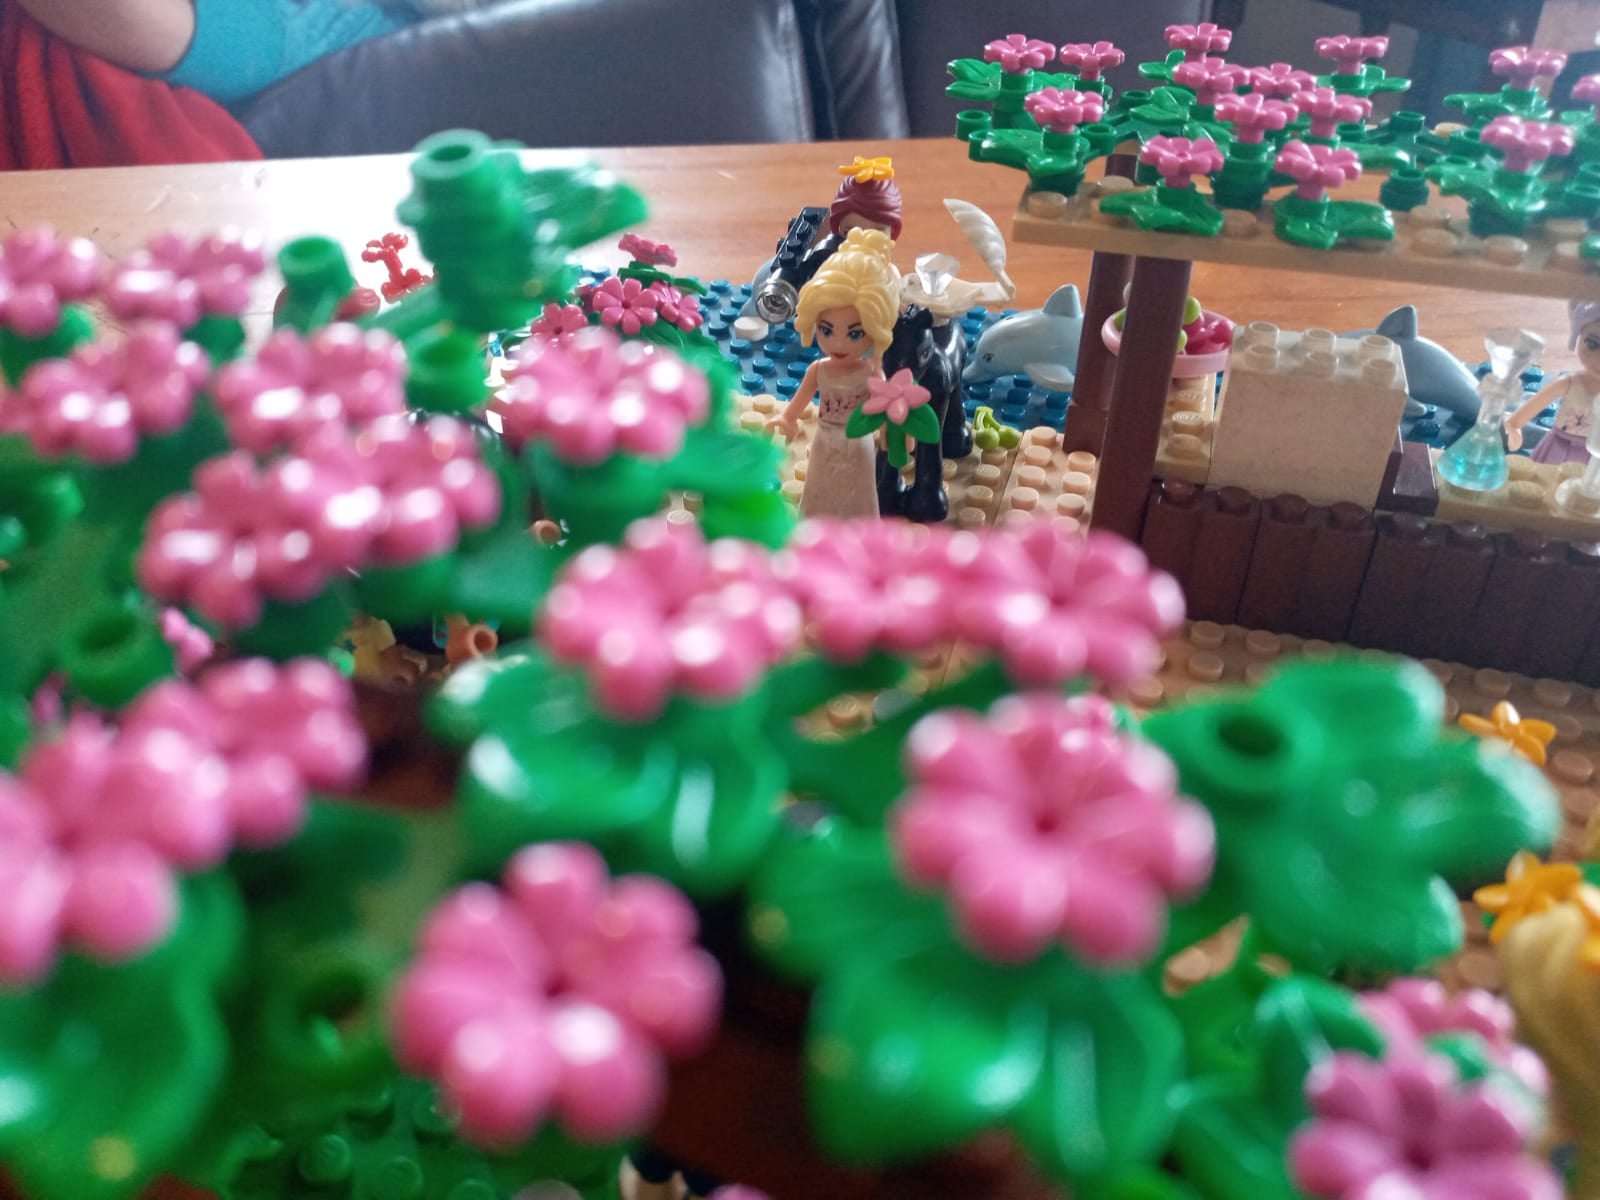
The hotel itself features two rooms, one large suite and a
smaller room. My daughter always asks me where the toilets are in these sets,
and this set has only one in the large suite! Poor minifigures that use the
smaller room! In the large suite, a nice feature was the chocolate on the bed
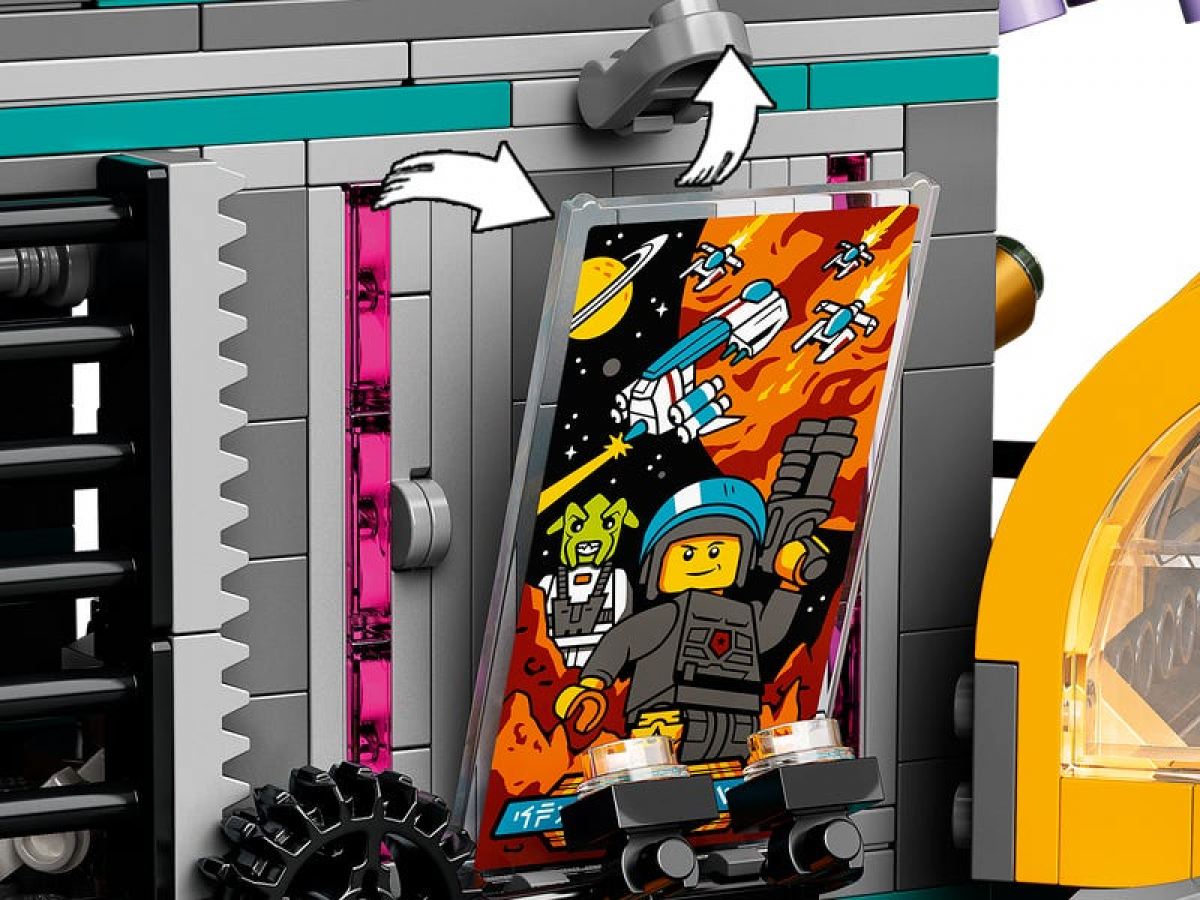
and bottle of wine. This suite has a black and white television with an actress
from The Palace Cinema.
The Boutique Hotel makes is an amazing build with beautiful colours and beautiful design. From start to finish, I was engaged. Once the build is completed, you can’t help but admire it from all angles. This was a perfect set for me and rated 10/10!
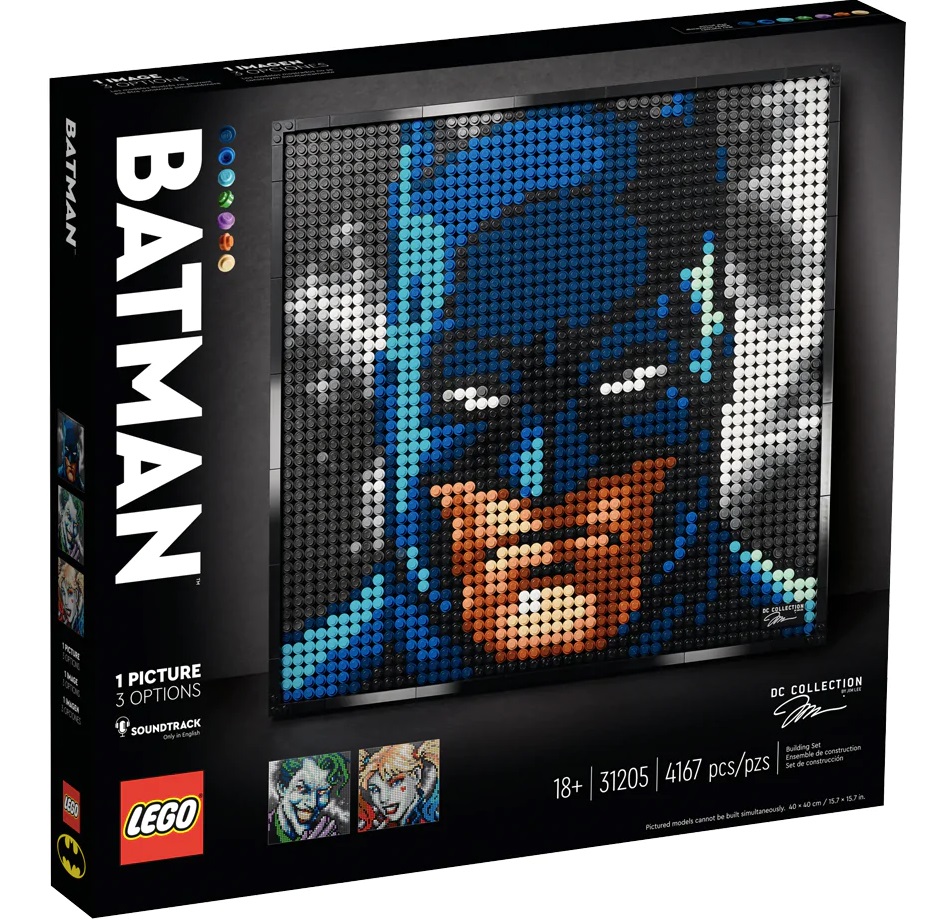
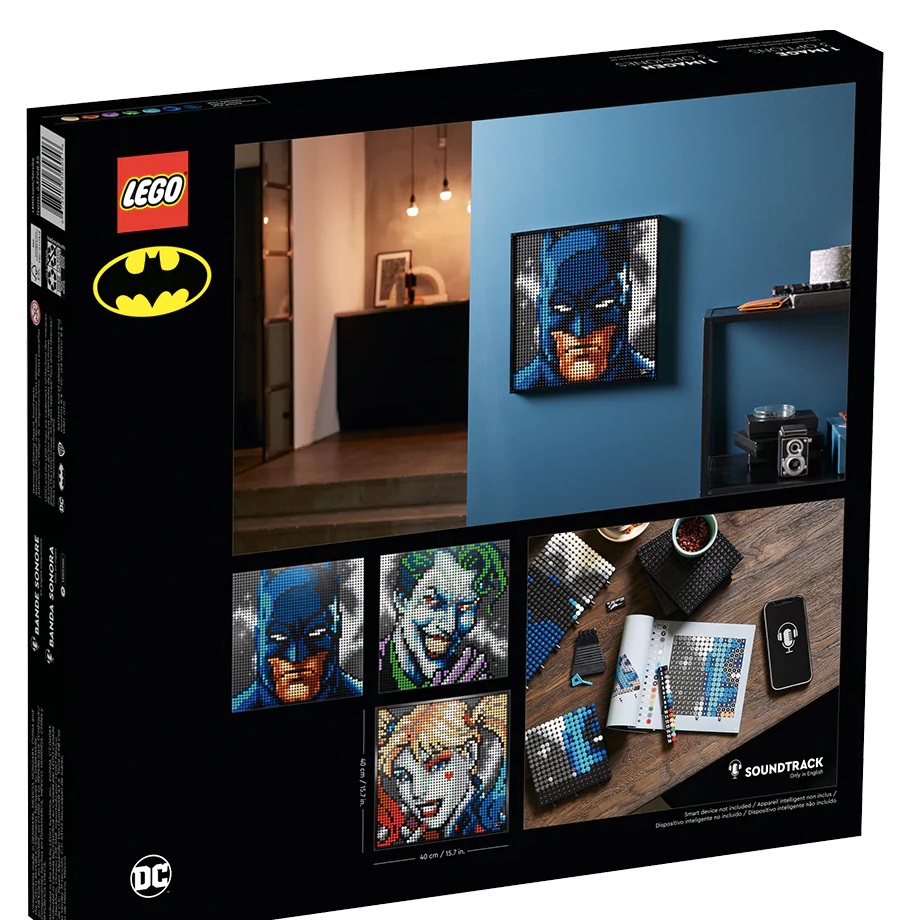
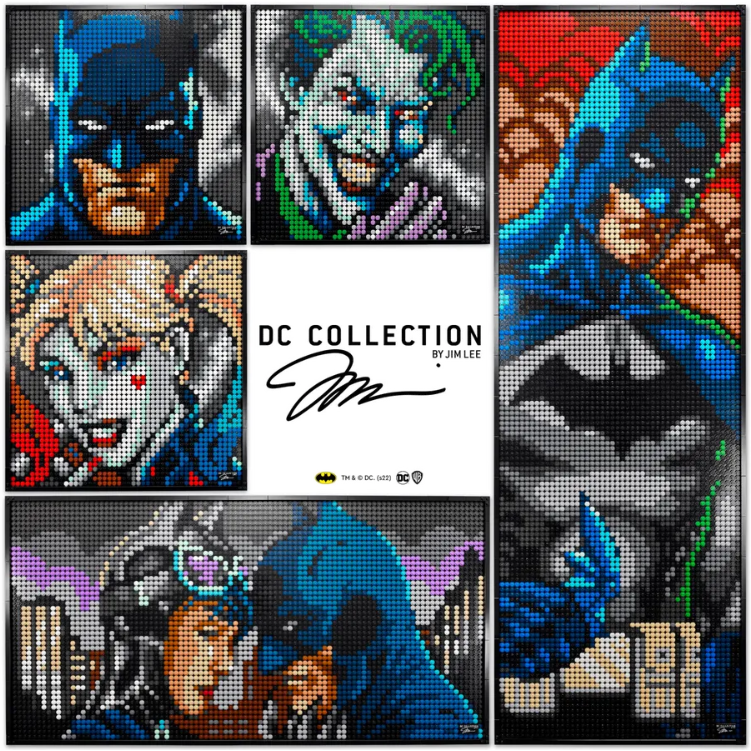
The Jim Lee Batman collection Lego Art set was release in
March 2022. The set consists of 4167 pieces, the bulk of which is made up of
the coloured 1×1 round tiles. That being said, as with all Lego Art sets, not
all of these will be used. The set allows the builder to choose one of three
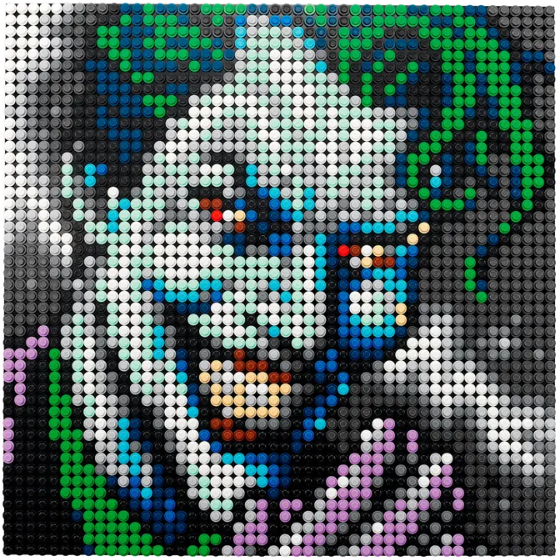
portraits: Batman, Joker or Harley-Quinn. The artwork itself is based off the
drawings of legendary DC artist and current publisher and Chief Creative
Officer Jim Lee, coloured by Alex Sinclair.
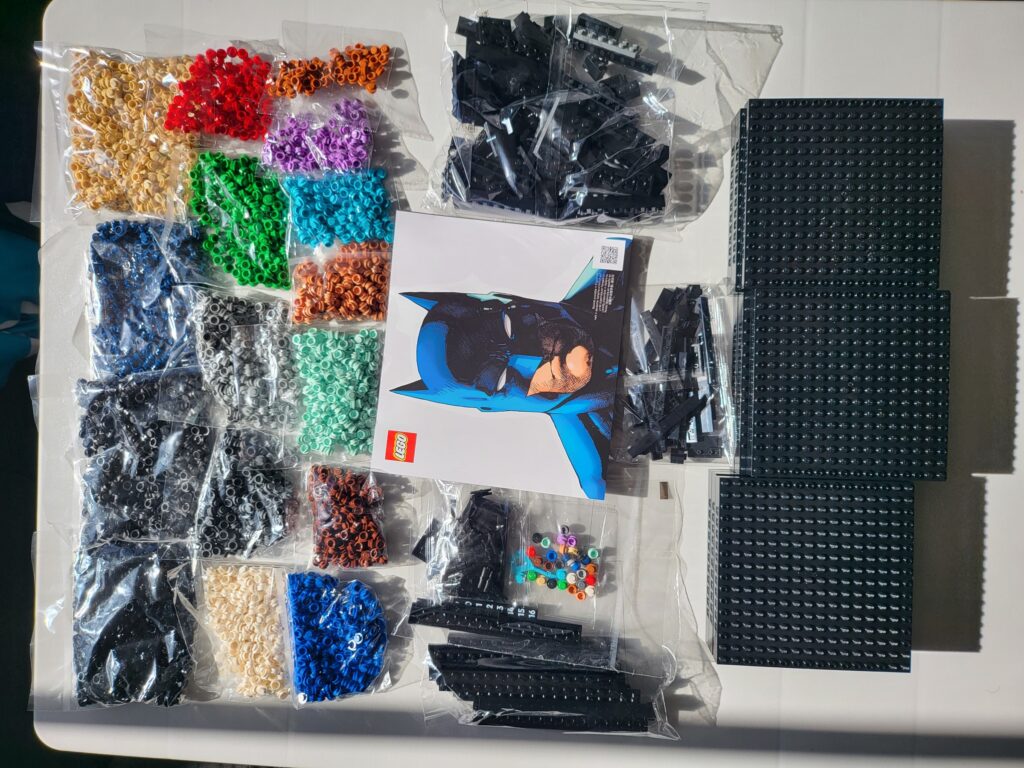
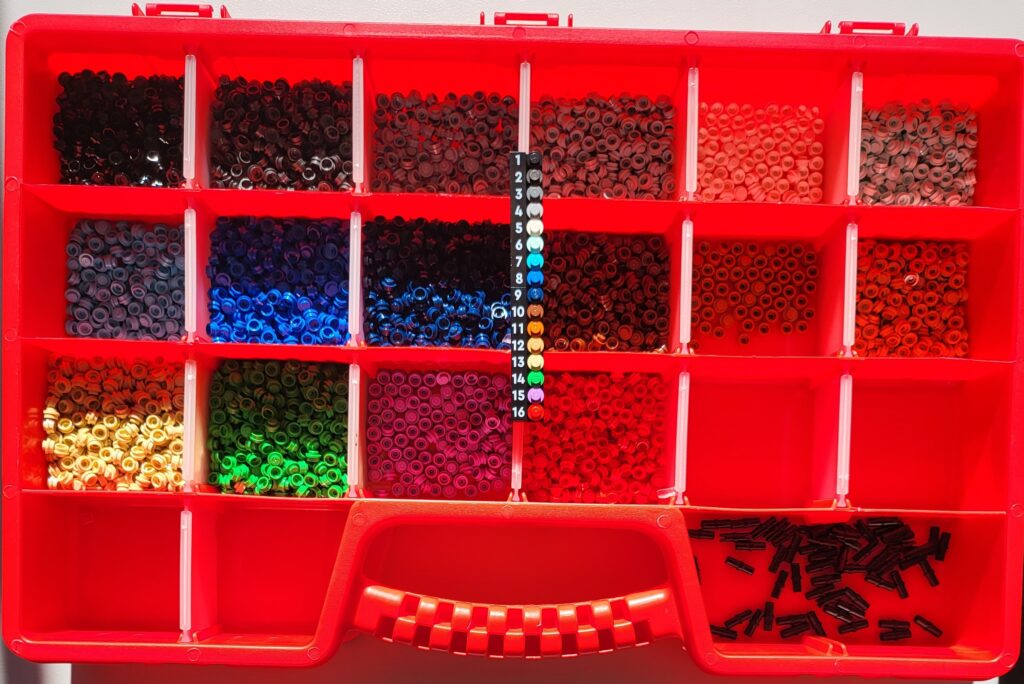
The set consists of the default 9 16×16 black panels that are assembled into a 3×3 grid and locked into place by a border made of black bricks and making your final portrait 40cmx40cm. The image is created by using 16 different coloured 1×1 round tiles. The set also comes with a large black brick separator for removing multiple tiles at a time and a smaller separator for removing specific tiles for those inevitable moments when you mix up your colours and place a piece in the wrong location.
The instruction manual does a good job of breaking down what
could be a very intimidating, complex build into small manageable steps. You
start with building the all-important colour key that assigns each of the 16
colours a number. A good idea is to decant the different colours into their own
container and arrange them in numeric order to minimise your time searching for
the correct colour.
Next you need to decide which of the 3 portraits you want to build and find the appropriate starting point in the instruction manual and start building. The build itself is very much like painting by numbers and can be very monotonous at times. This is not necessarily a bad thing as sometimes after a long day you just want to relax, building some LEGO® that does not need a lot of concentration. The experience is added to by downloading and listening to the unique soundtrack for this LEGO® Art set, which is an interview featuring both LEGO® designers and DC artists, the link for which can be found in the instruction manual.
I loved watching the image develop as you add each completed
tile to form a row, and then adding each row to form the completed image. Of
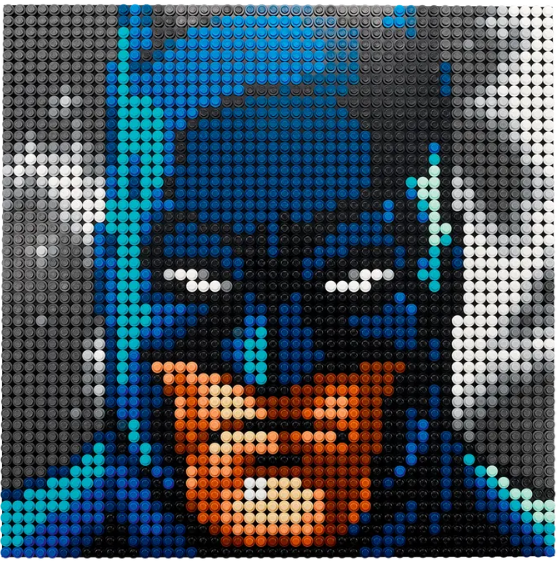
the three picture options from the single set my favourite is The Batman™, that
is in no way influenced by me being a huge Batman™ fan 😉
In addition to the three options out of the box, there are two further image options available. Using two sets you can build an image of Batman™ and Catwoman with the Gotham City skyline in the background. Combining three sets you can build a large profile image of The Batman™
On the downside, due to the number of pieces and possibly
the IP involved these sets are not cheap and go for round R2000 each. This
means that to build all 5 possible images at once you would have to purchase 8
of these sets; 1 each for the default options, 2 for the Batman™/Catwoman portrait
and a further 3 for the large Batman™ portrait, and since you will never use
all the pieces for any particular image it does mean that you will end up with
a huge excess of coloured tiles. This however is not necessarily a bad thing,
especially if you fancy yourself a little creative. There is plenty of software
on the internet that will produce a pixilated version of any image, giving you
the opportunity to make your own art piece with the left-over pieces.
Overall, I am a fan of the LEGO® Art series having collected the previous Star Wars Art sets, but the Jim Lee Batman™ collection is definitely my favourite. With a build time of 2.5 to 4 hours per image, depending on how quickly you can find and place tiles. I find building these sets very relaxing and is a great way to spend the evening and when you are finished you have a new piece of art to hang on your wall.
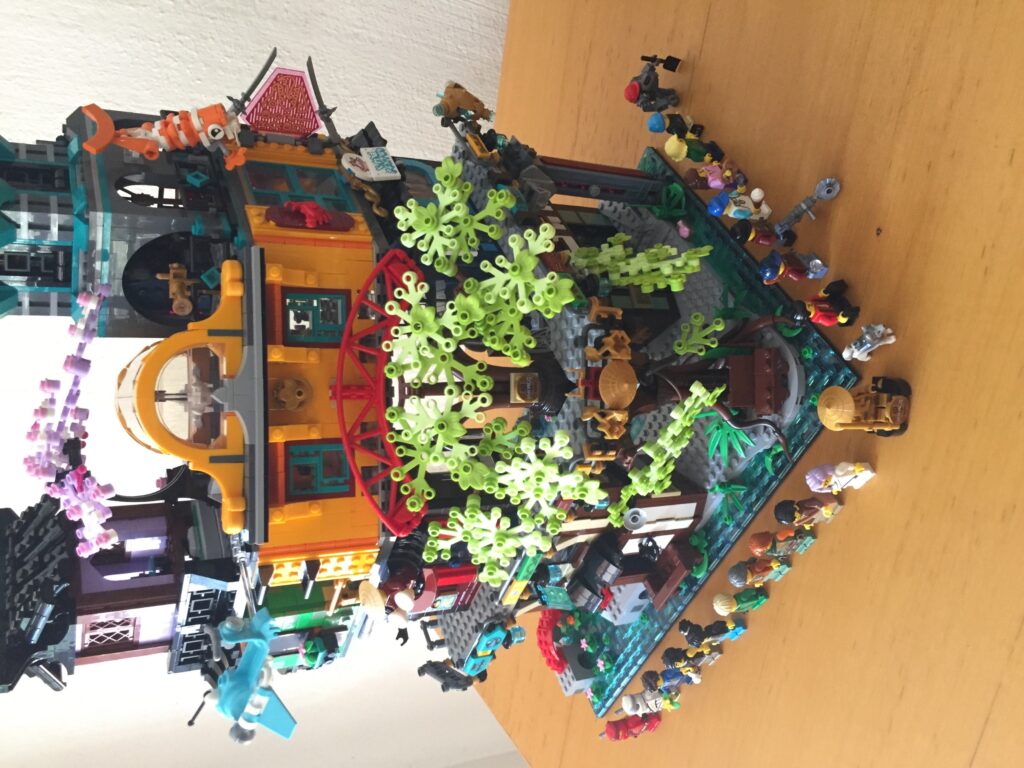
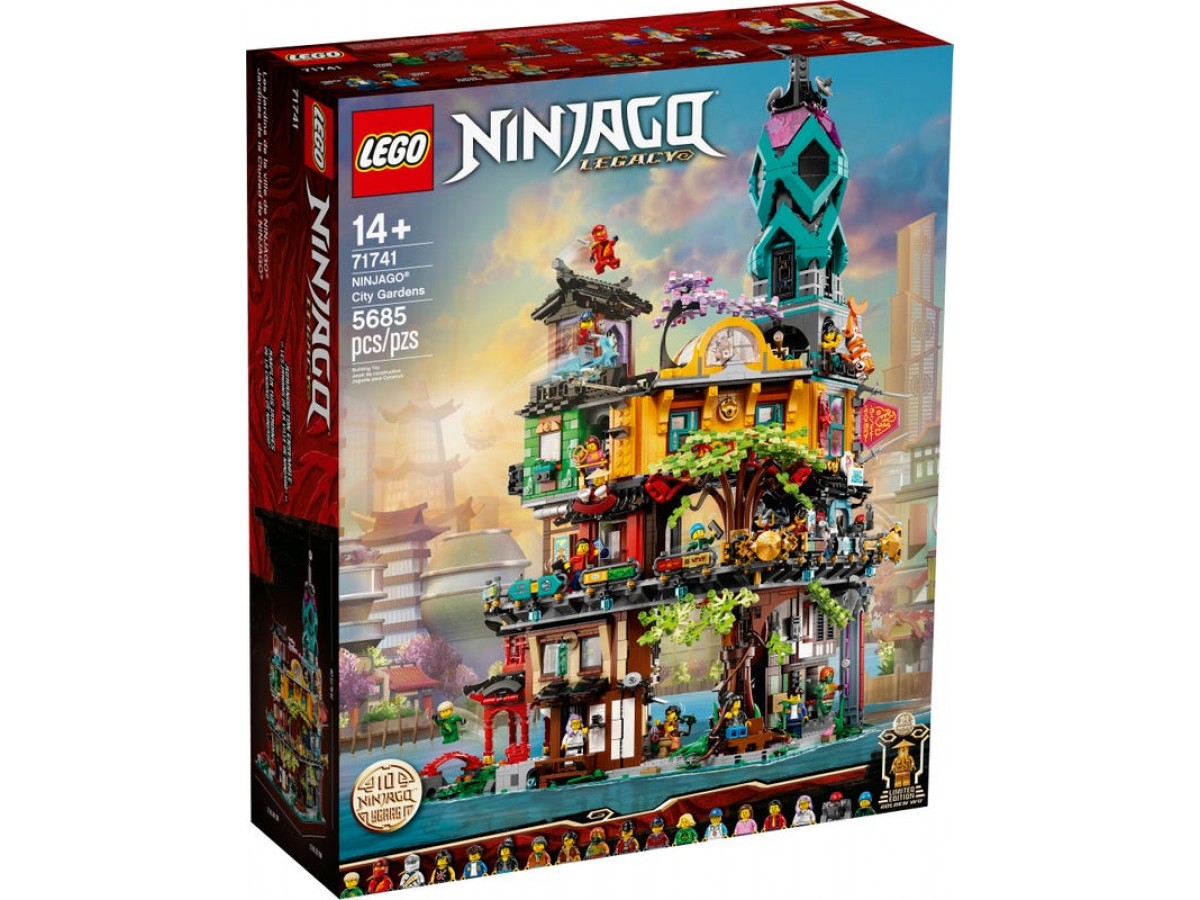
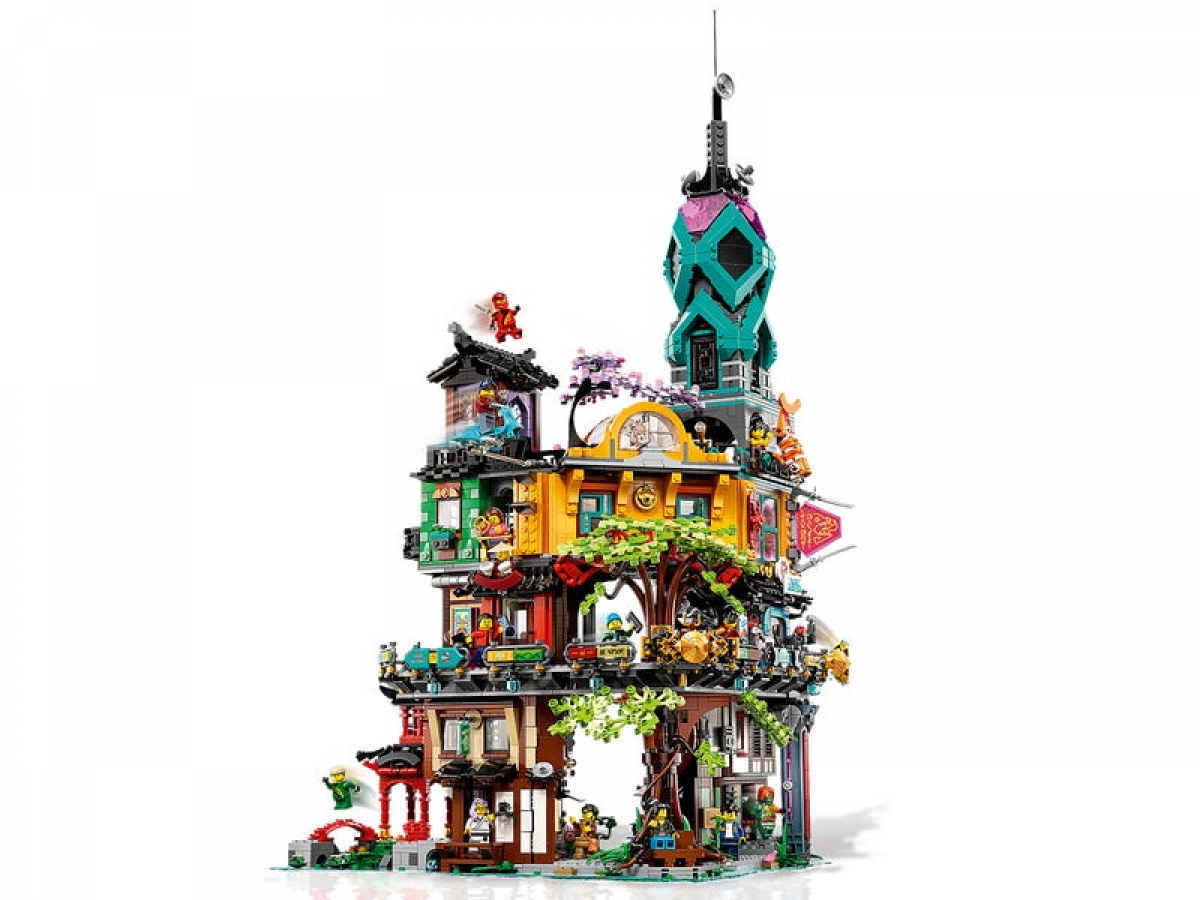
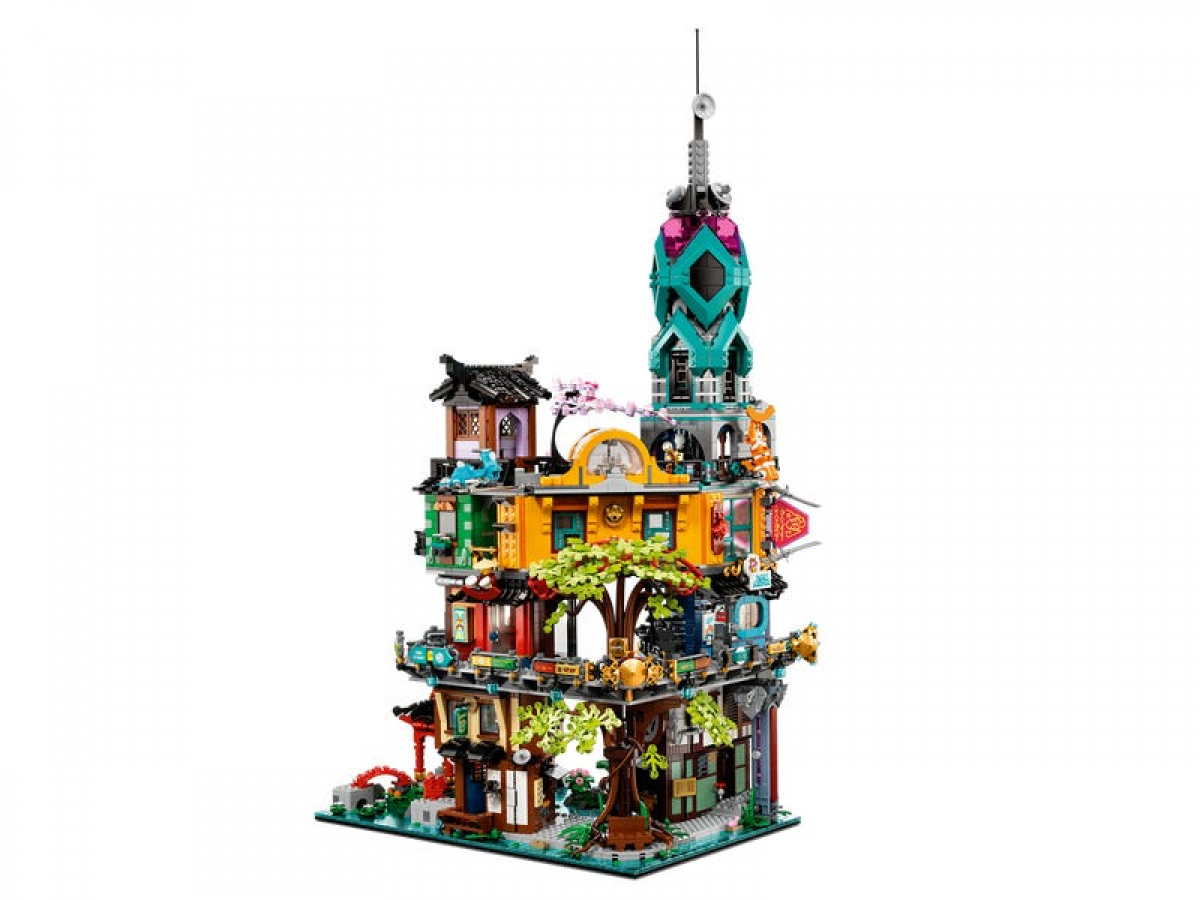
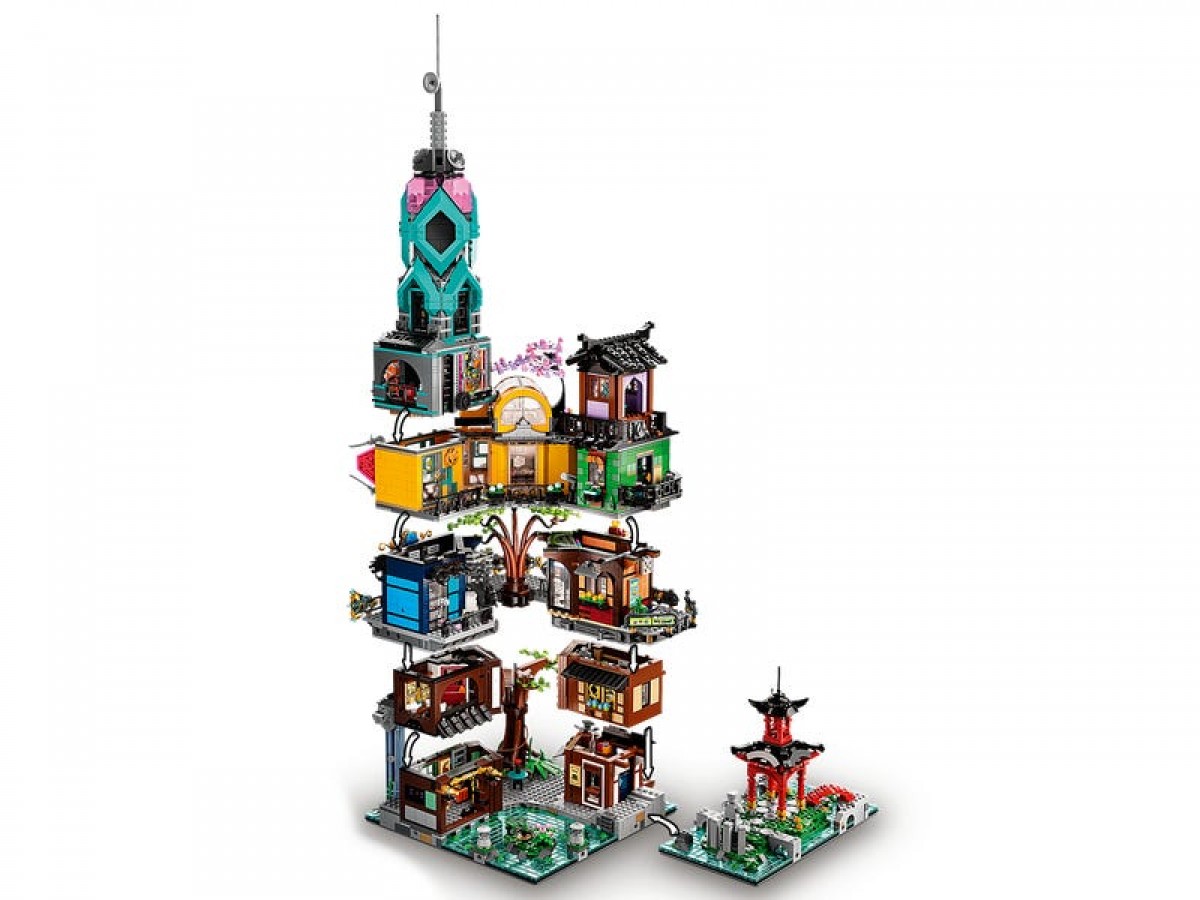
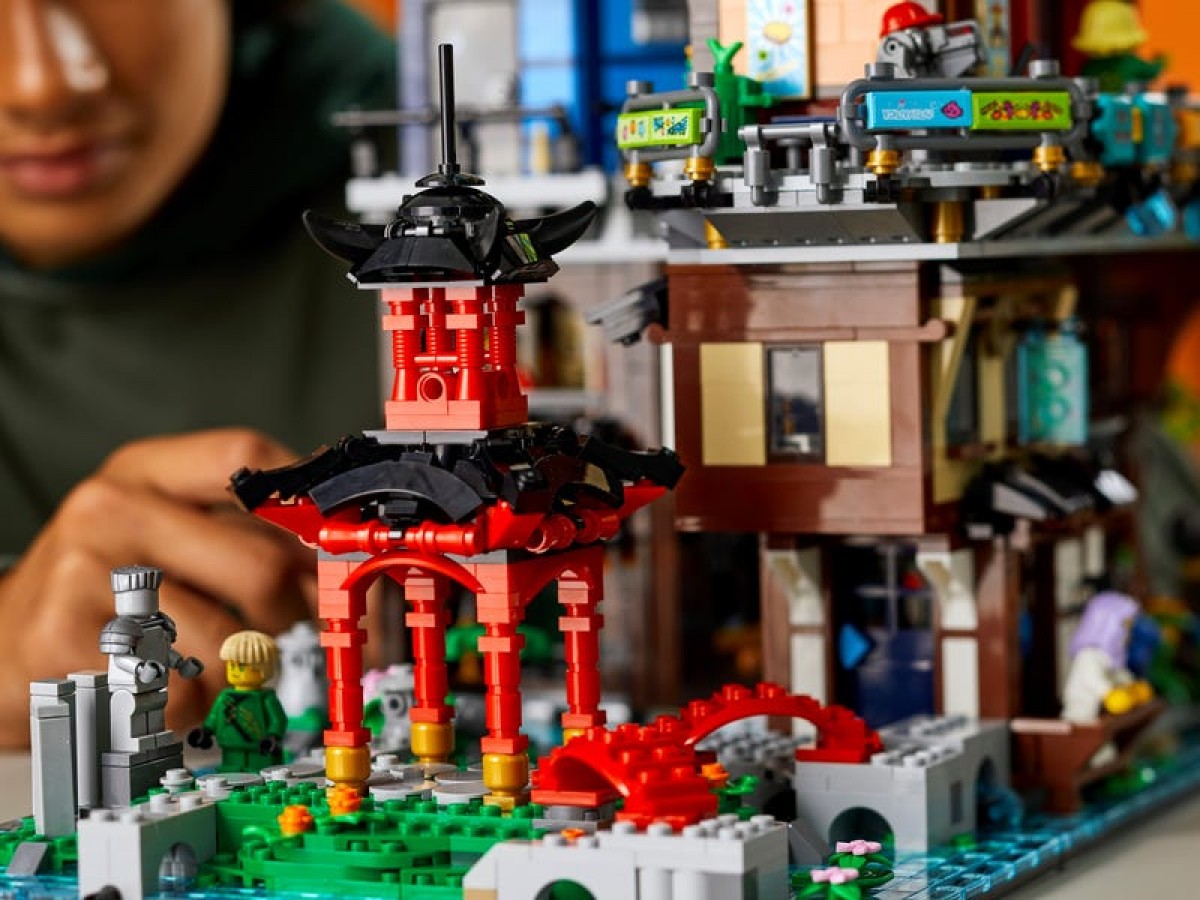
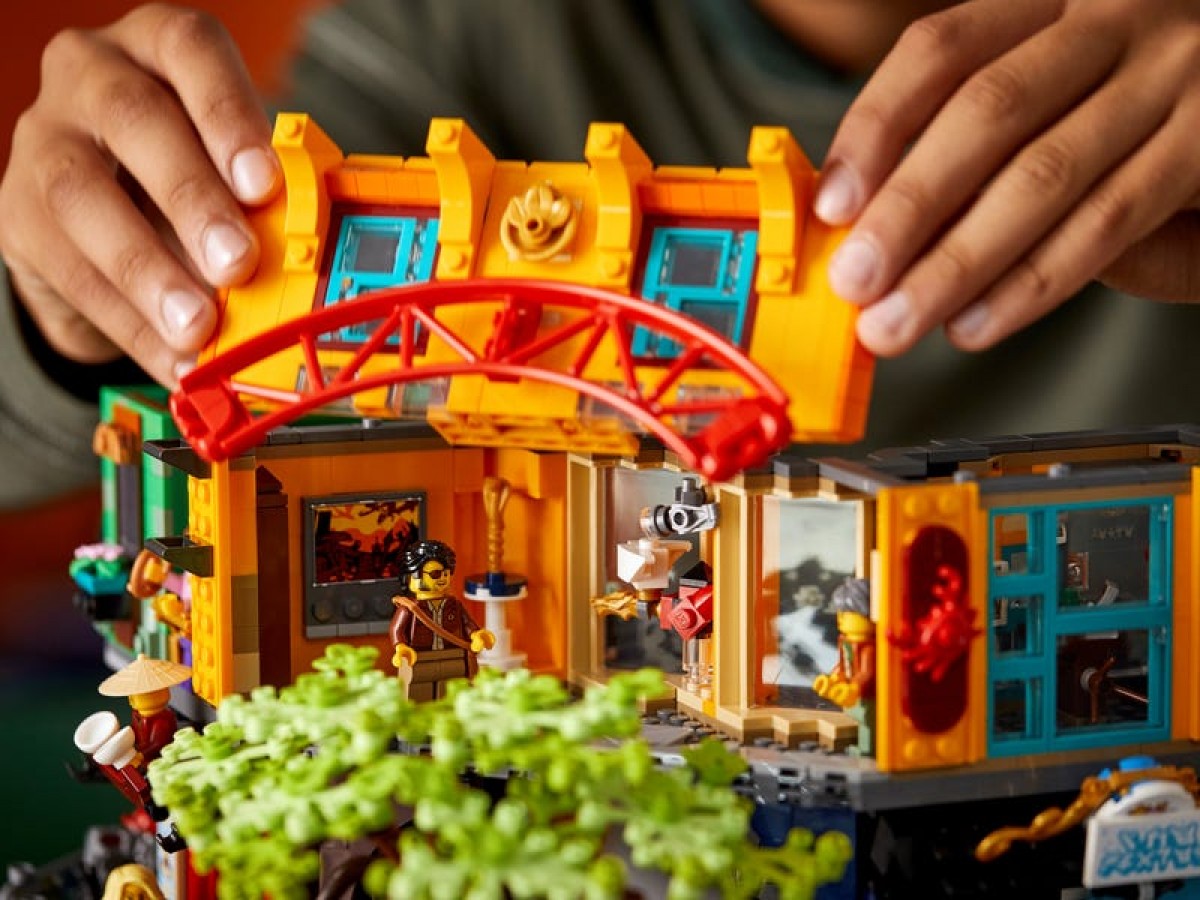
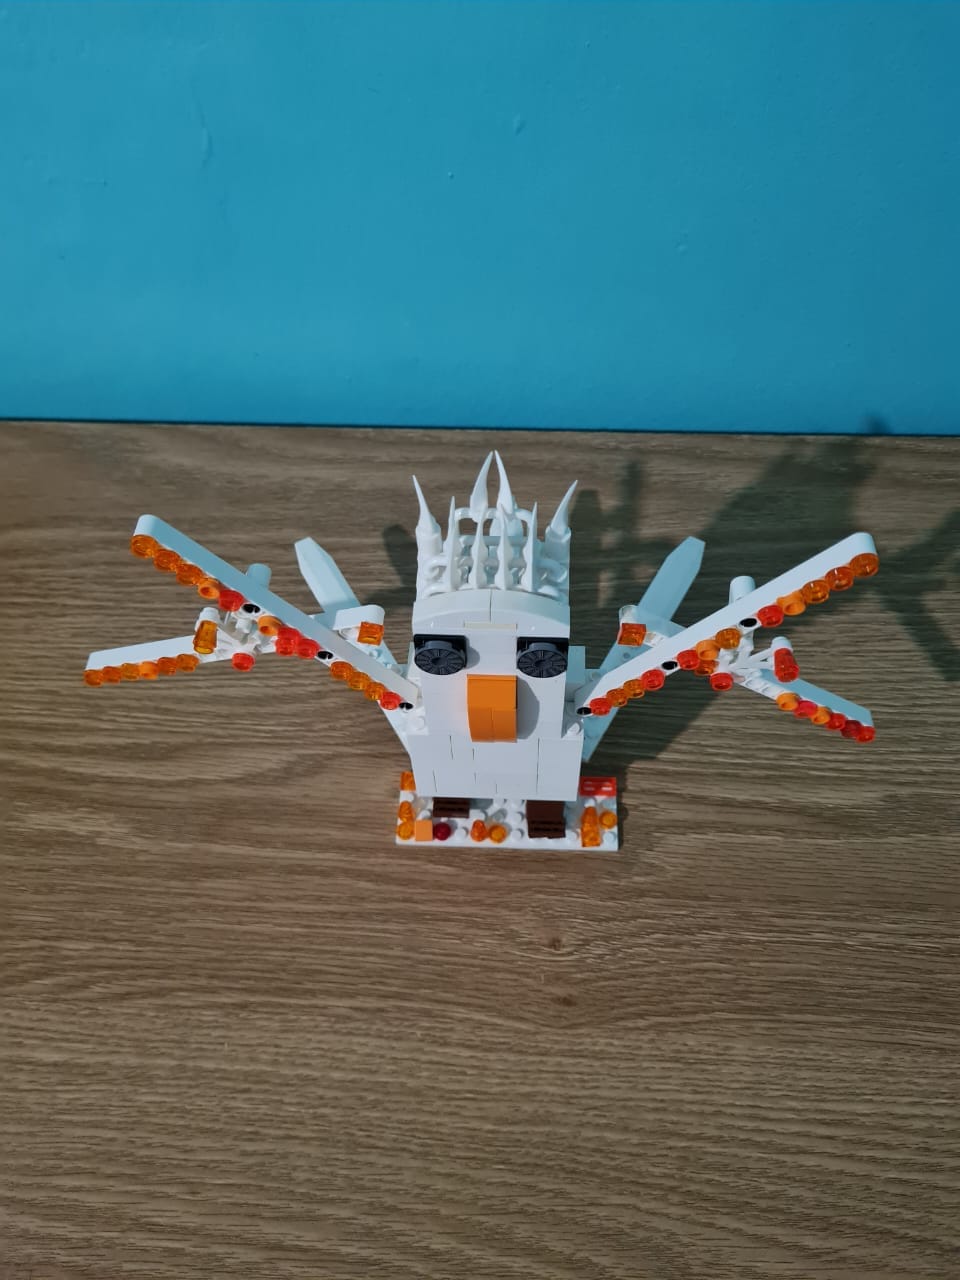
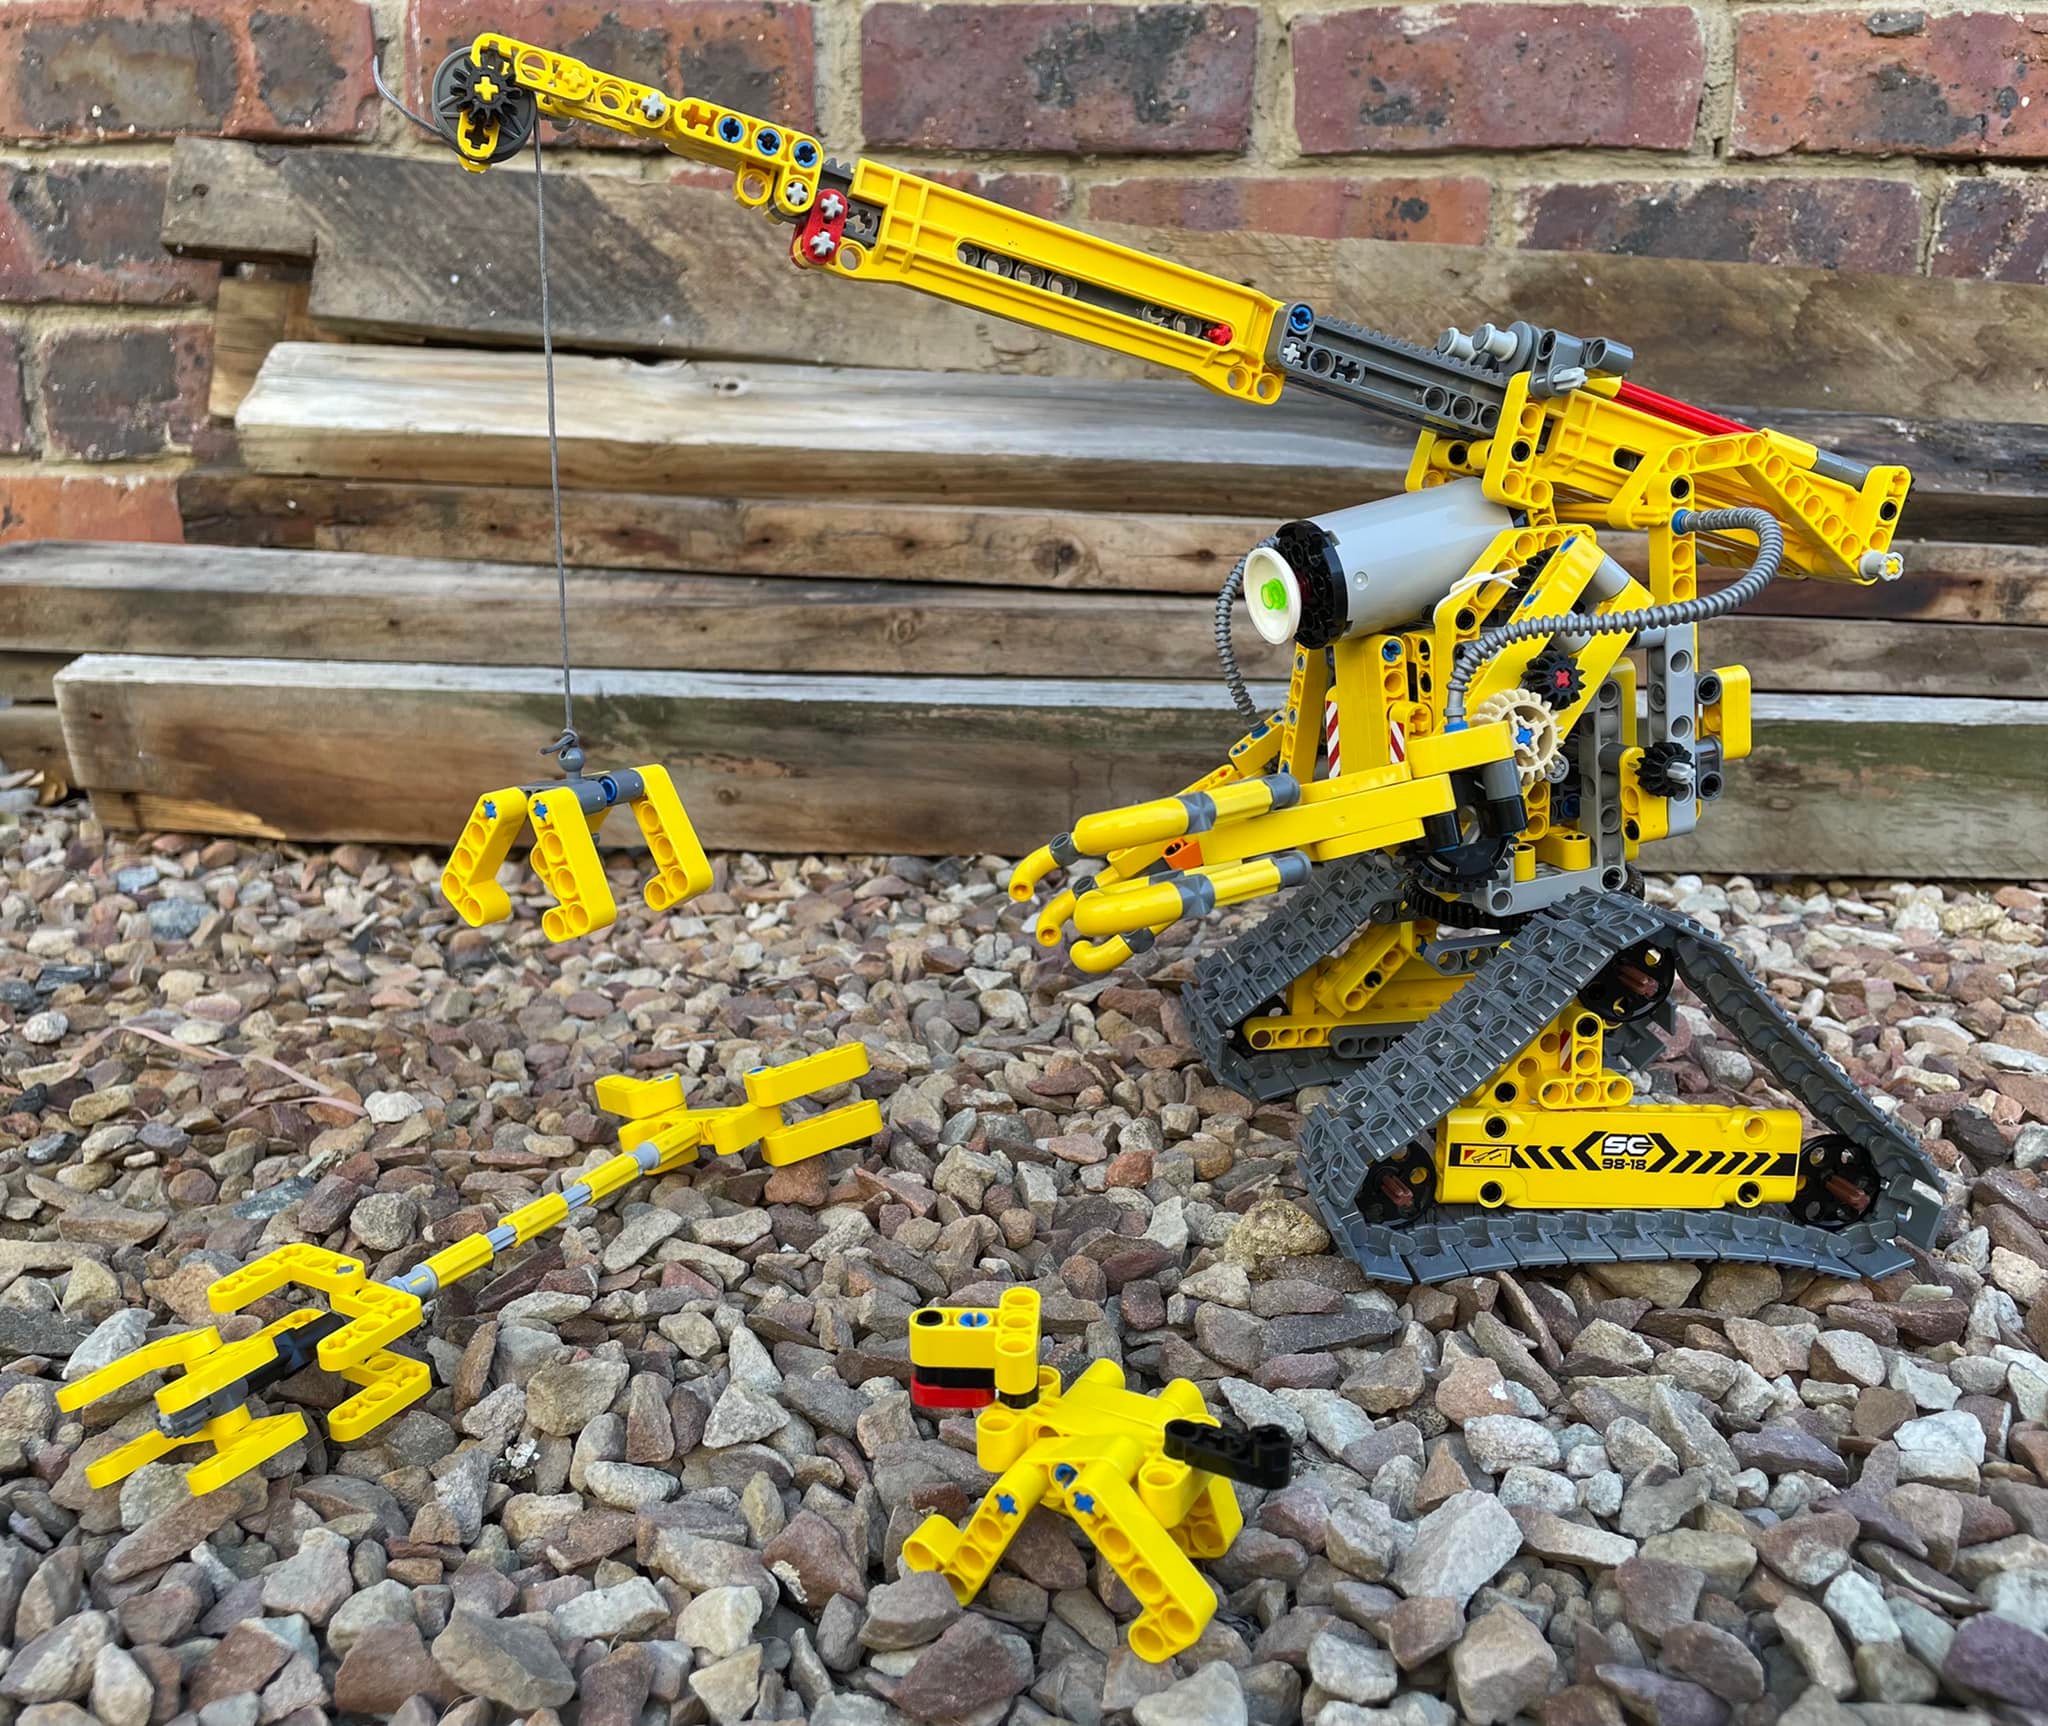
The
NINJAGO® City Gardens is the third in the NINJAGO® City Series, and its 5709
pieces make it the largest NINJAGO® set to-date, all while celebrating 10 years
of the NINJAGO® theme. It’s an enormous build, so without further delay I’m
going to jump right in.
Inside
the main box is a smaller white box, a 32×32 baseplate, a bag of special
elements, and the three Instruction manuals. I forget the exact number of bags,
but it’s around 60.
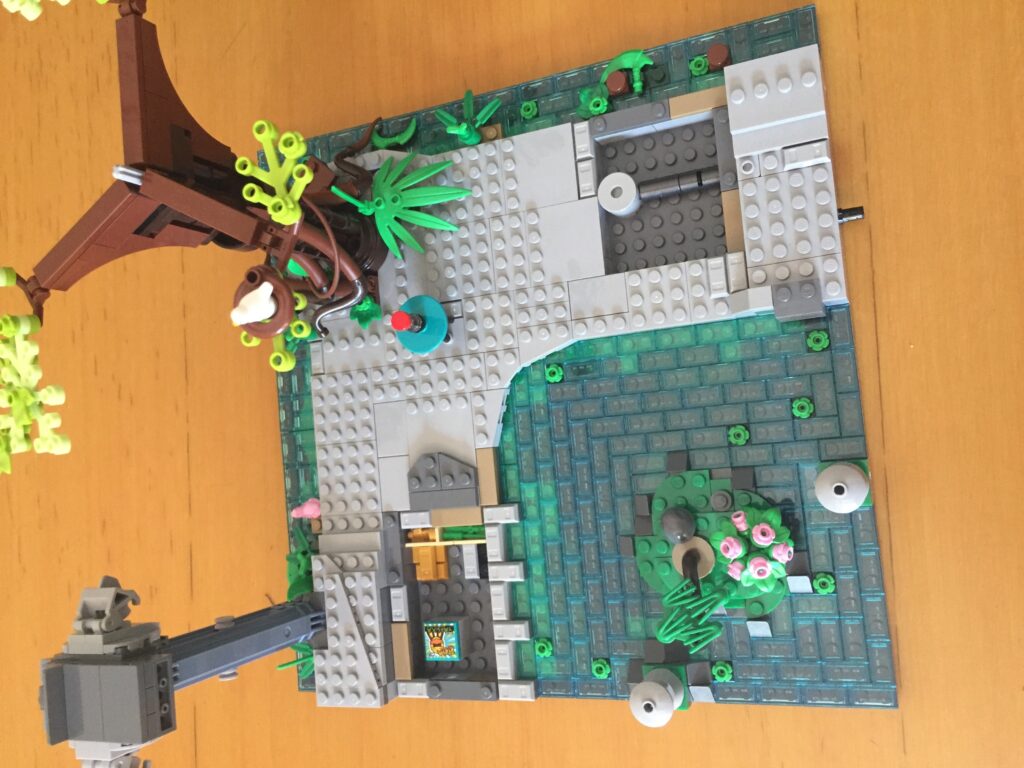
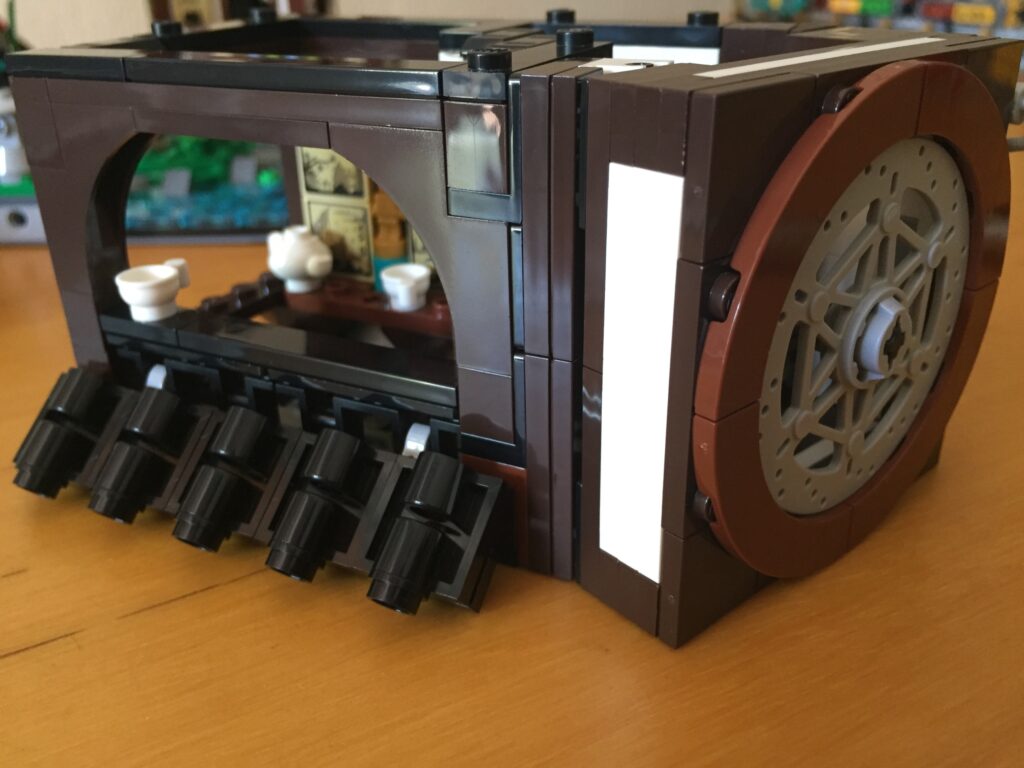
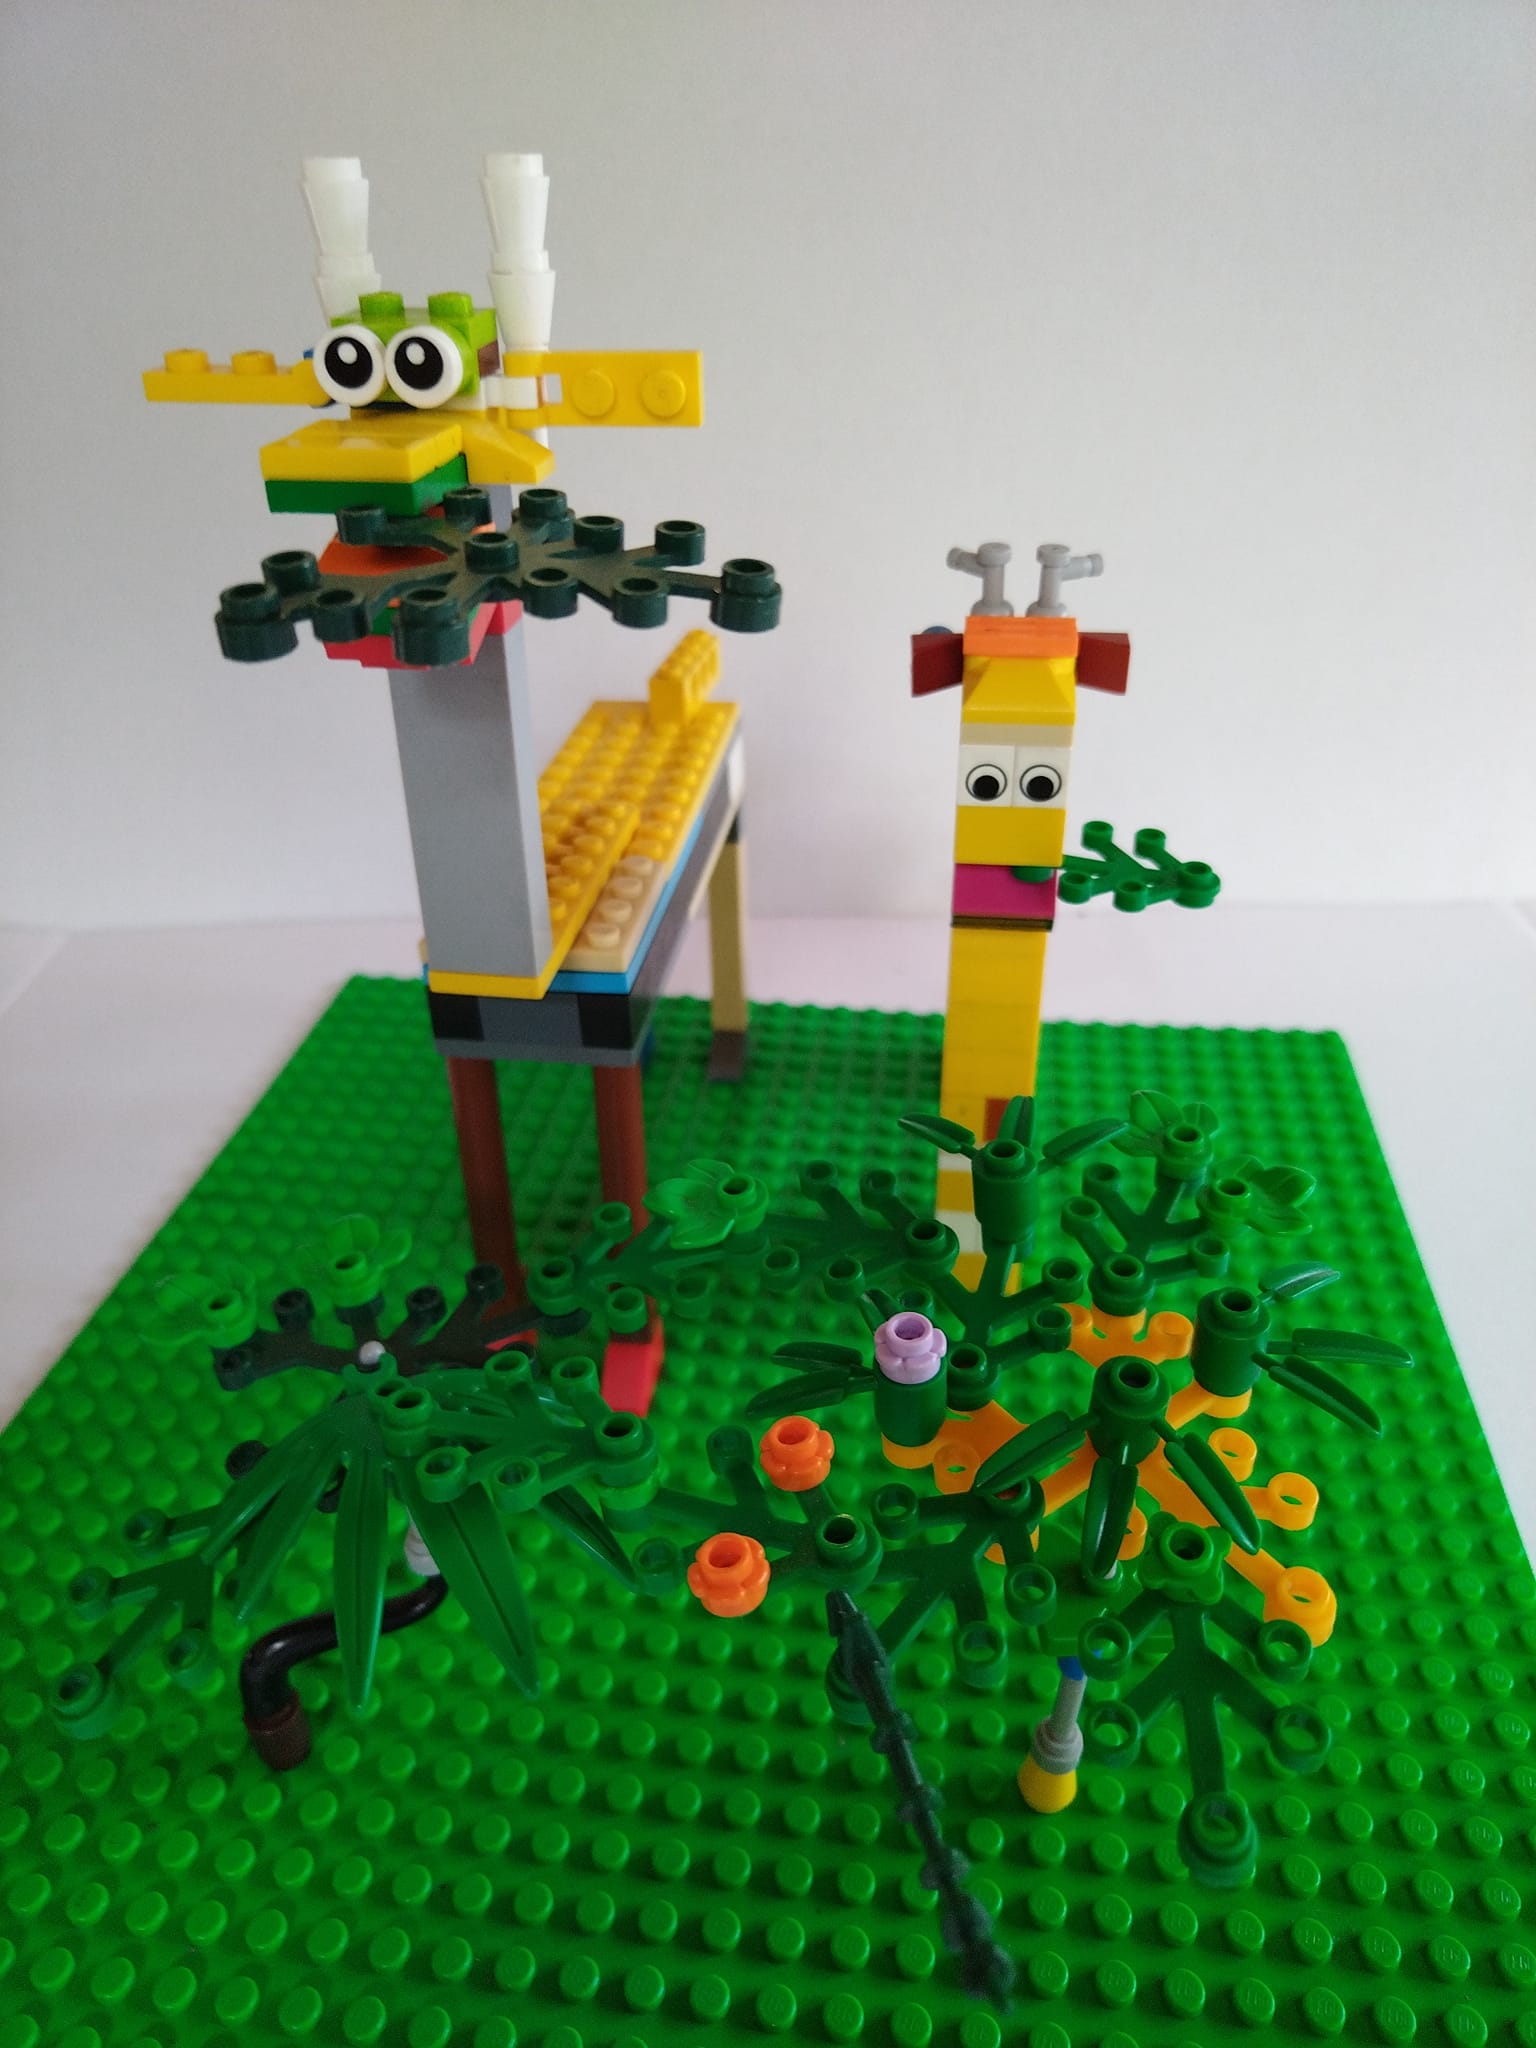
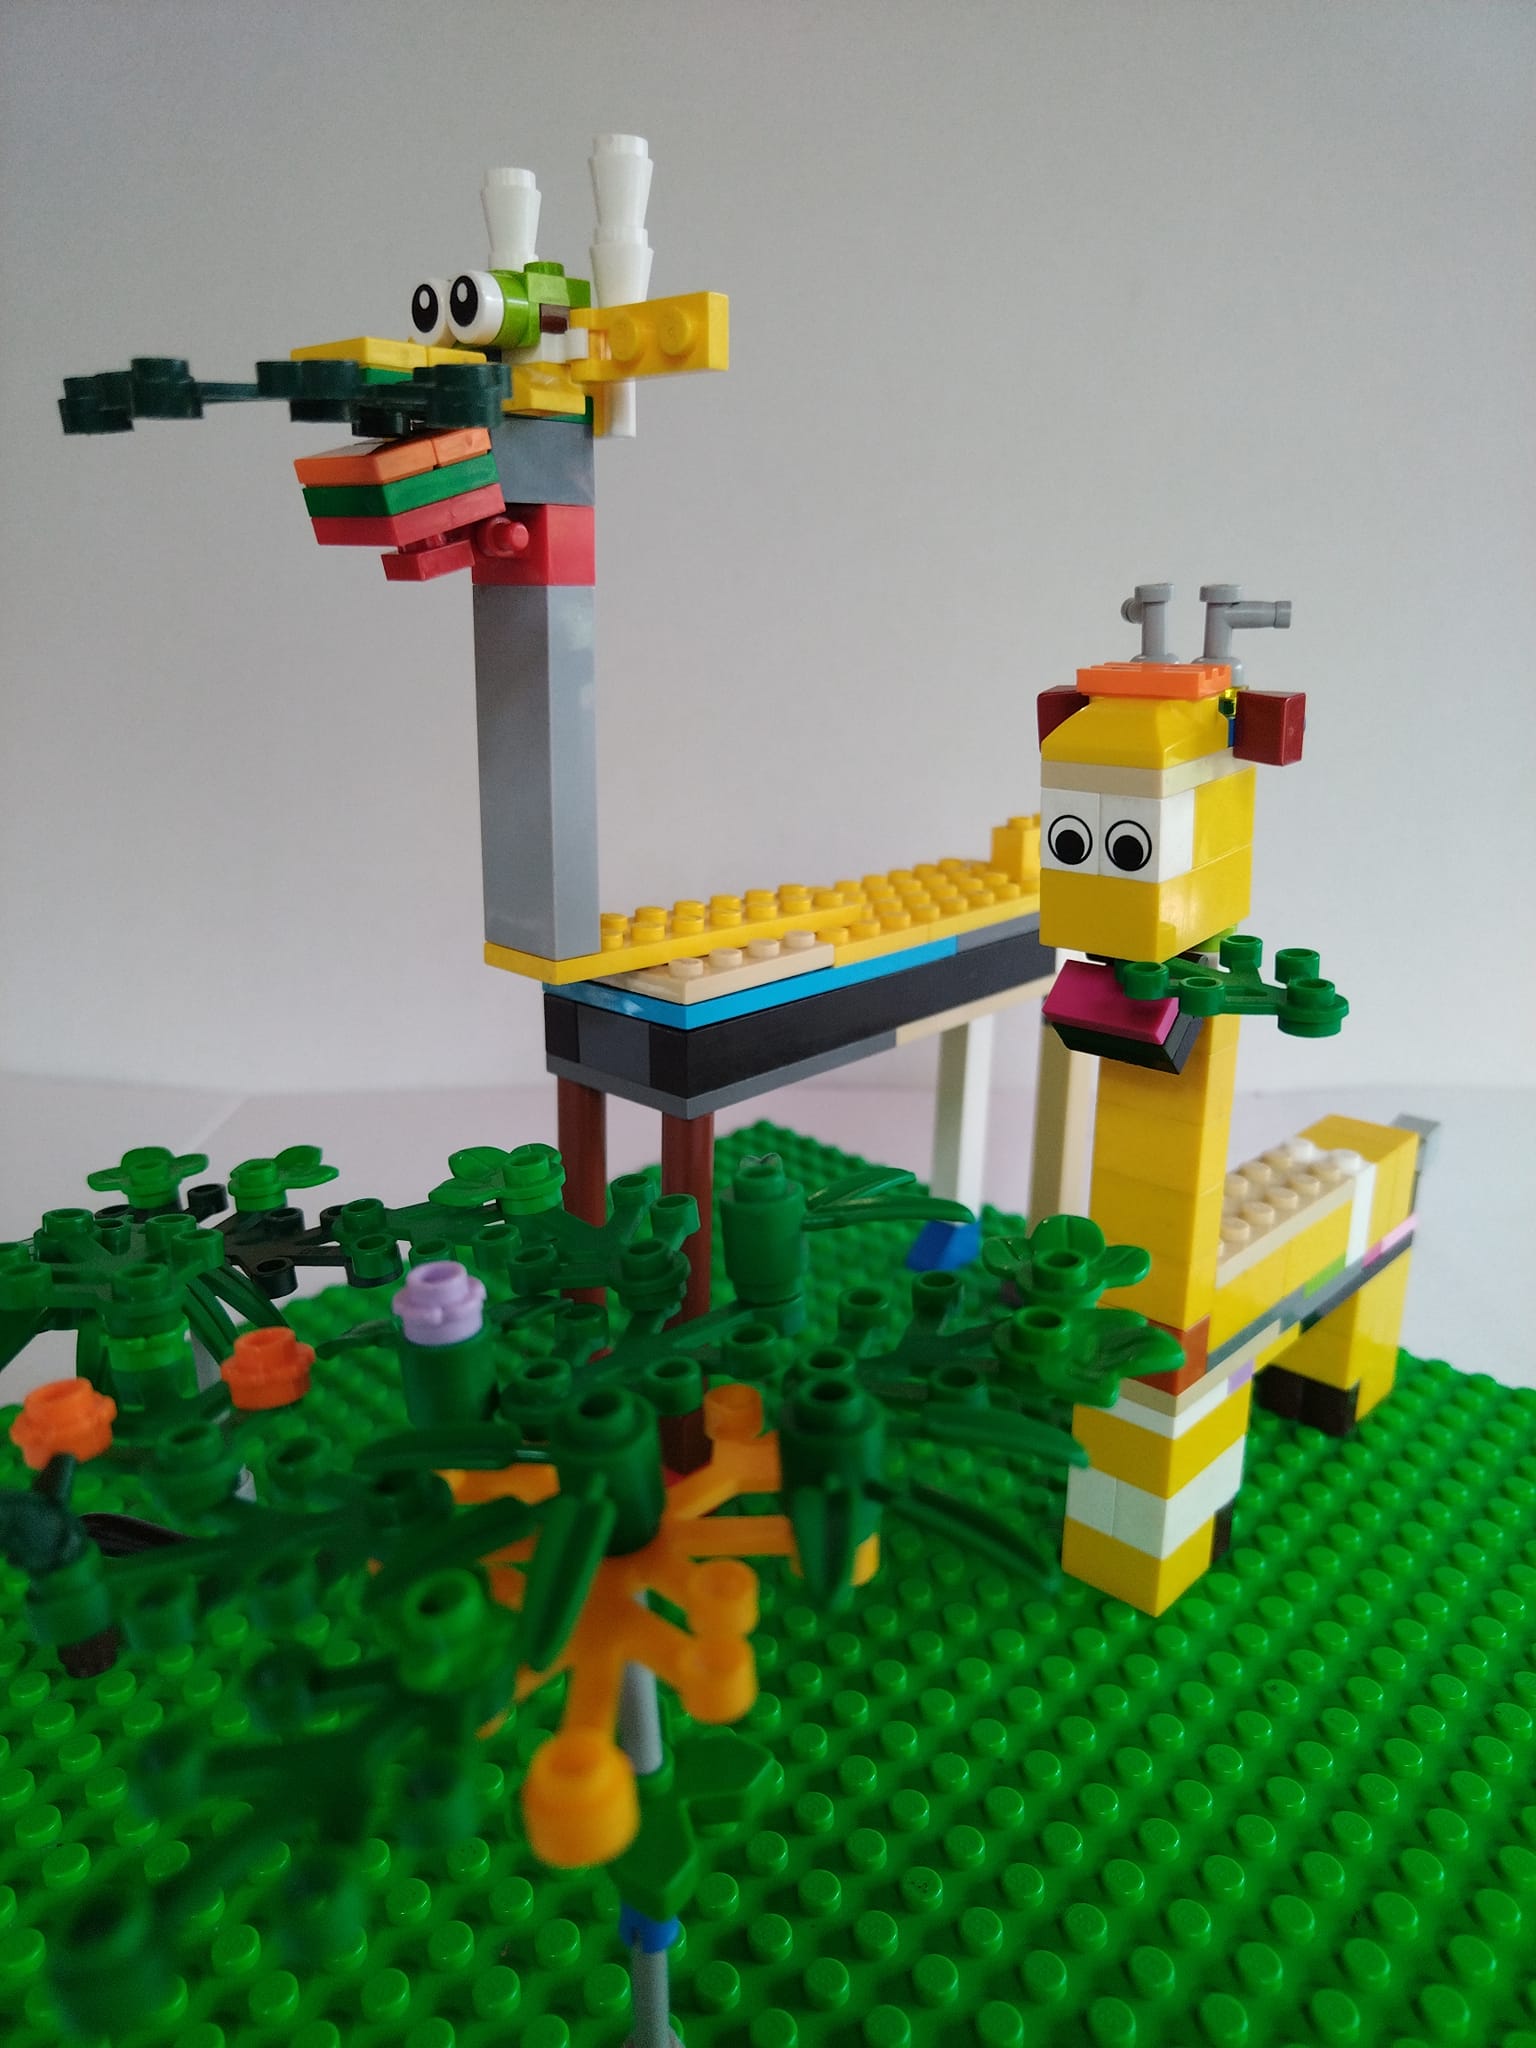
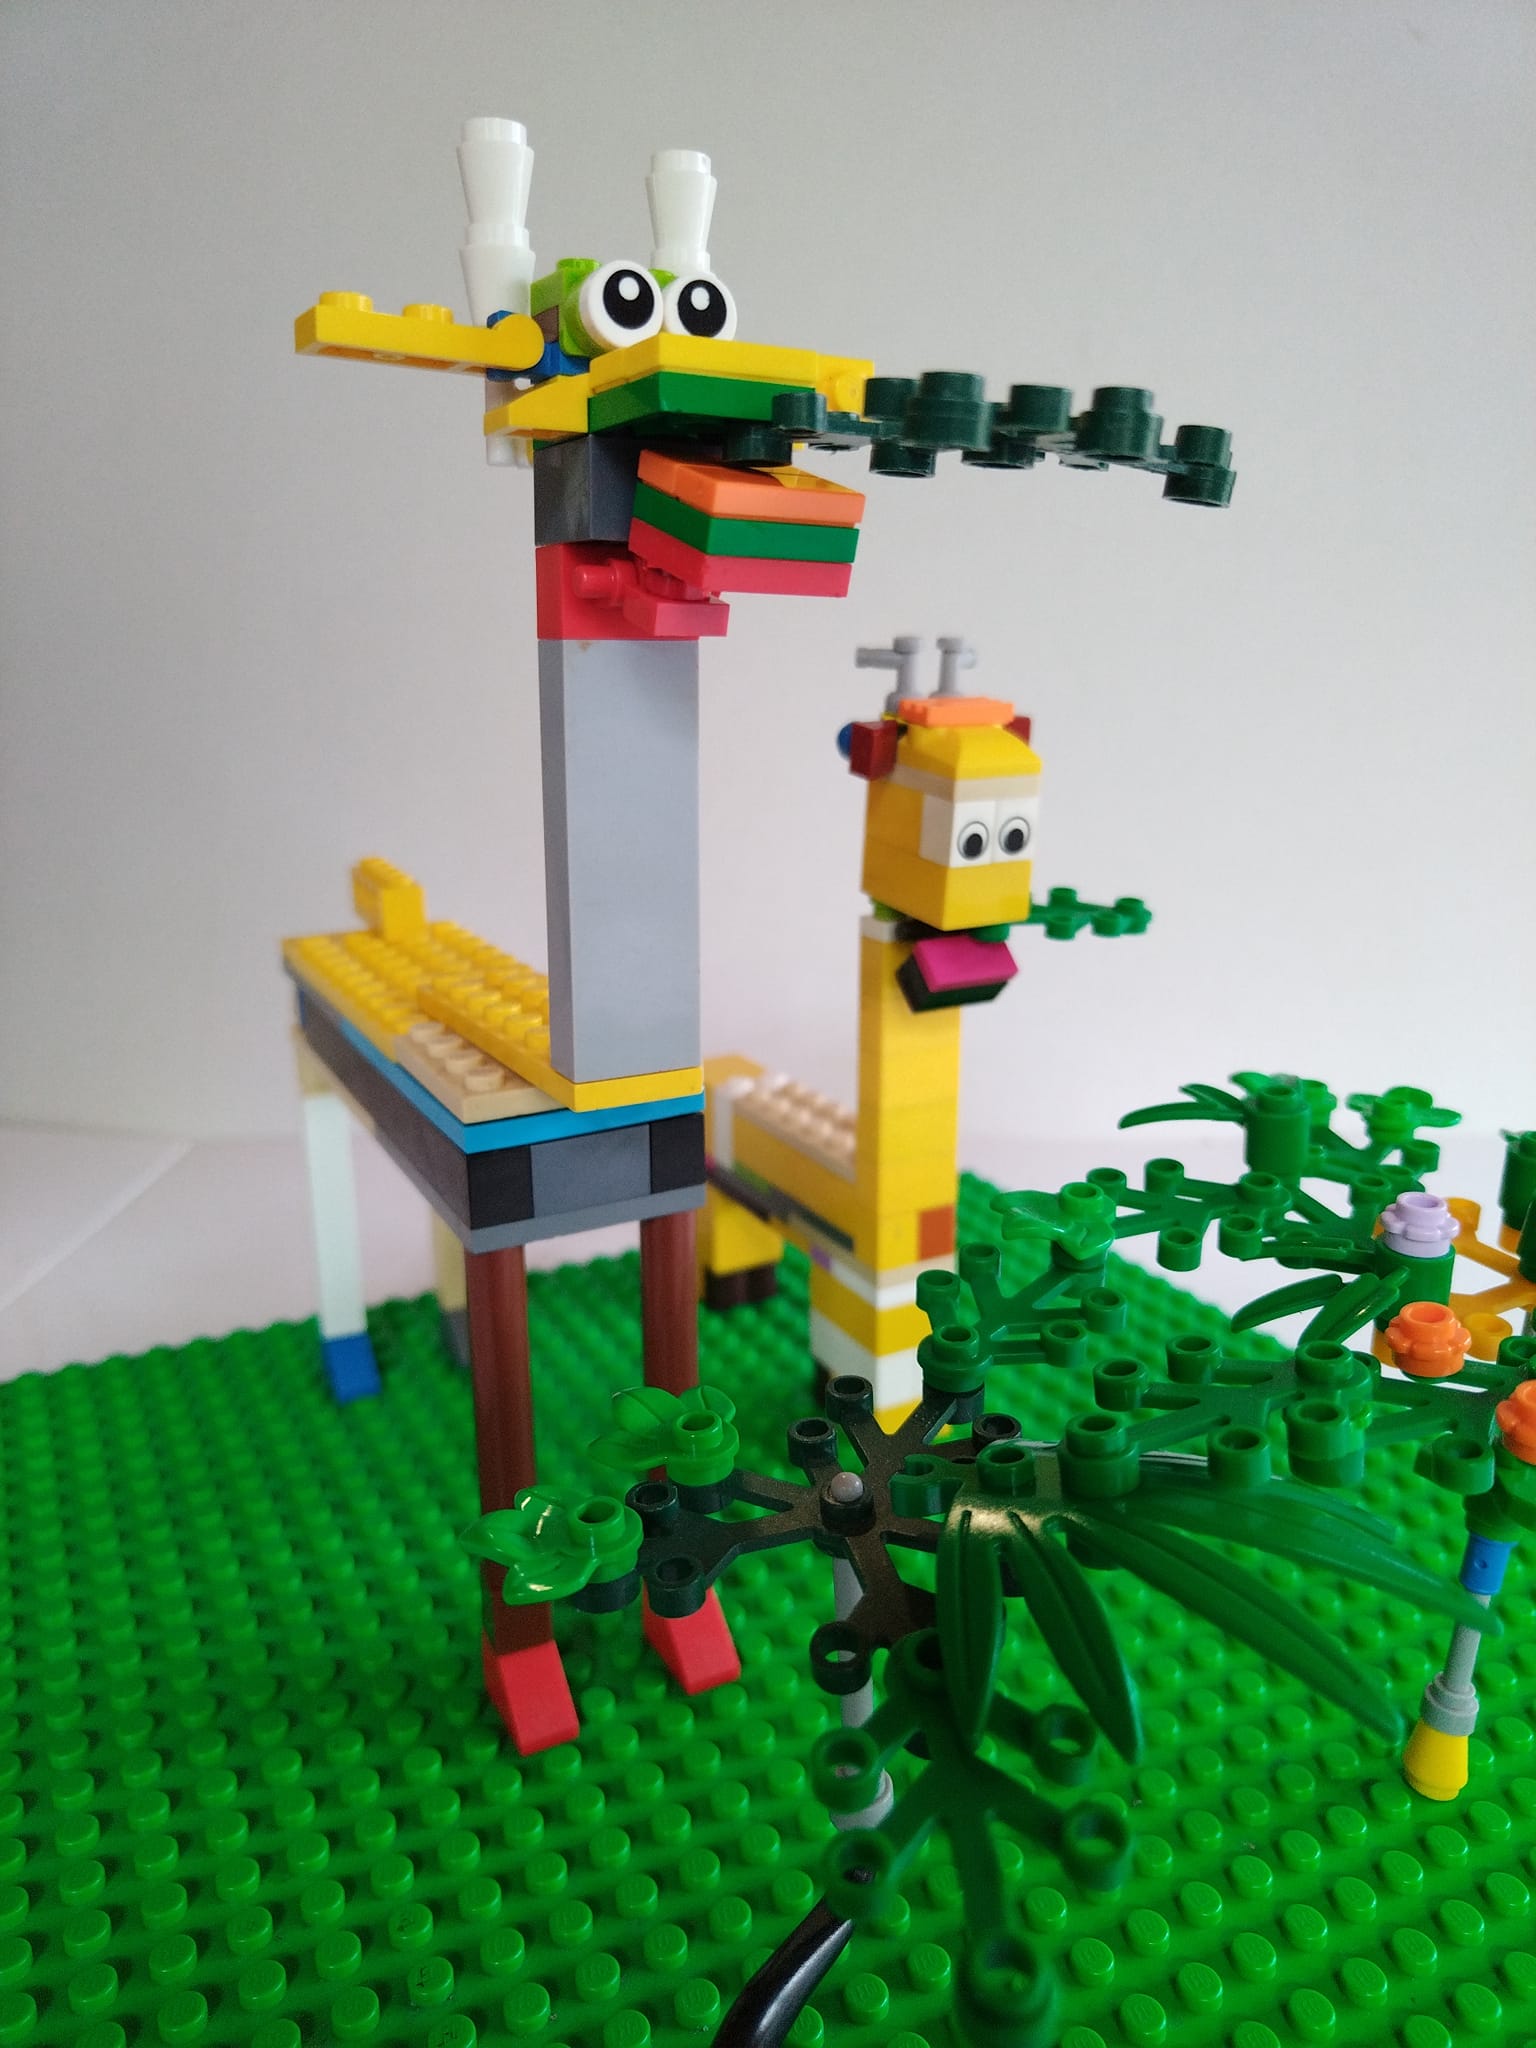
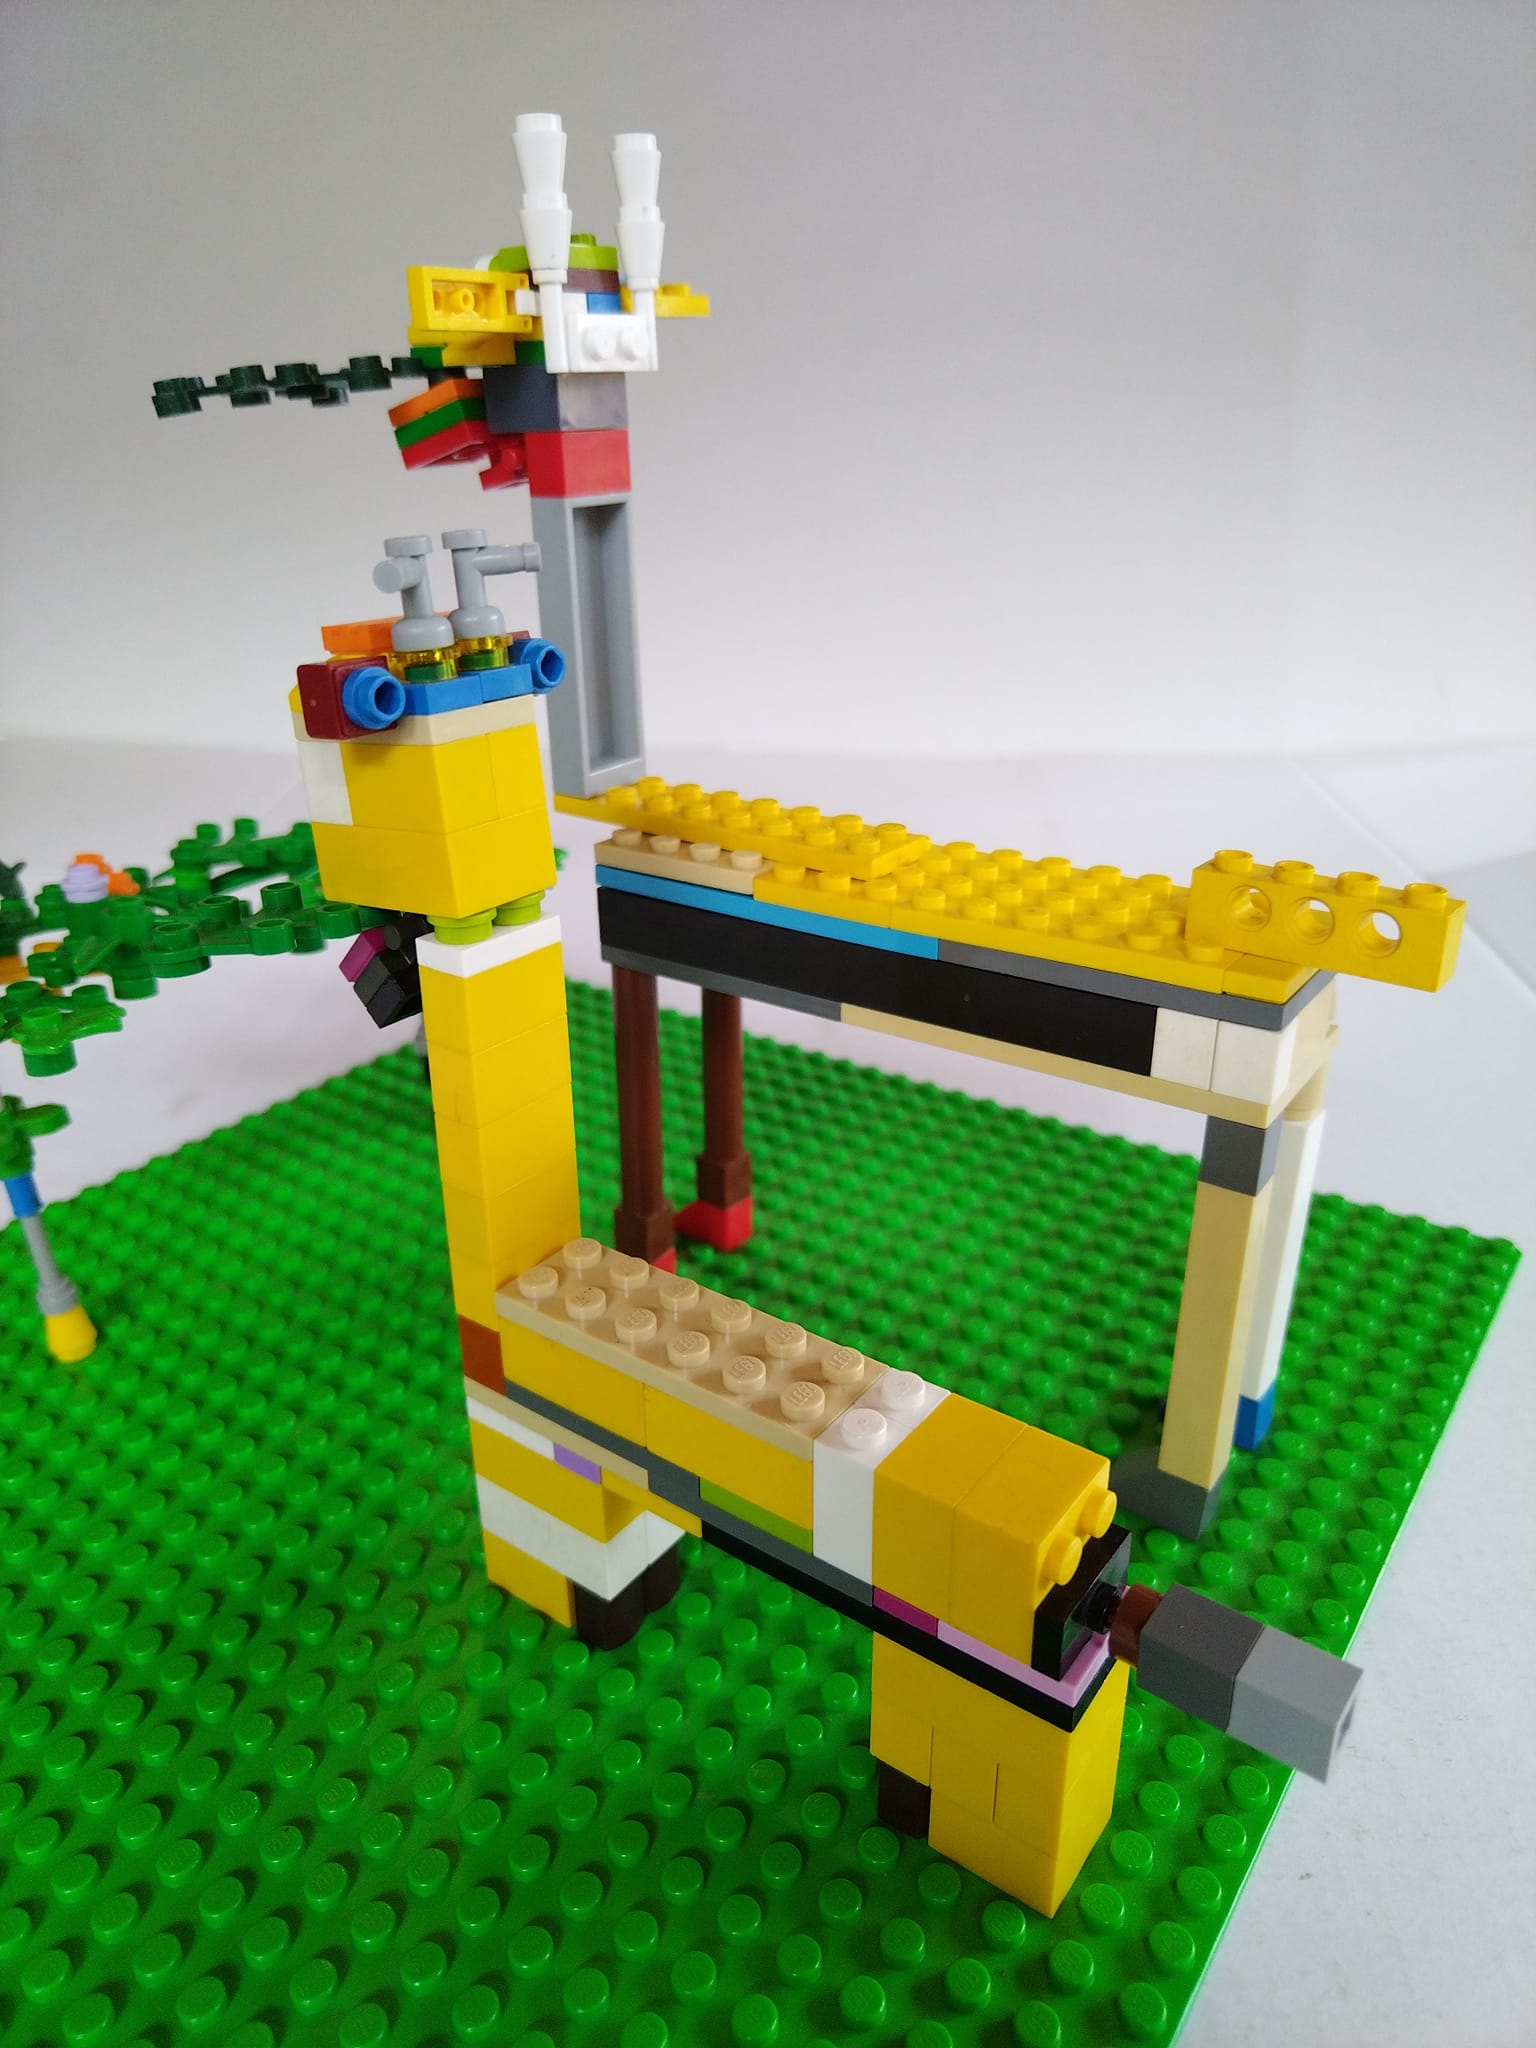
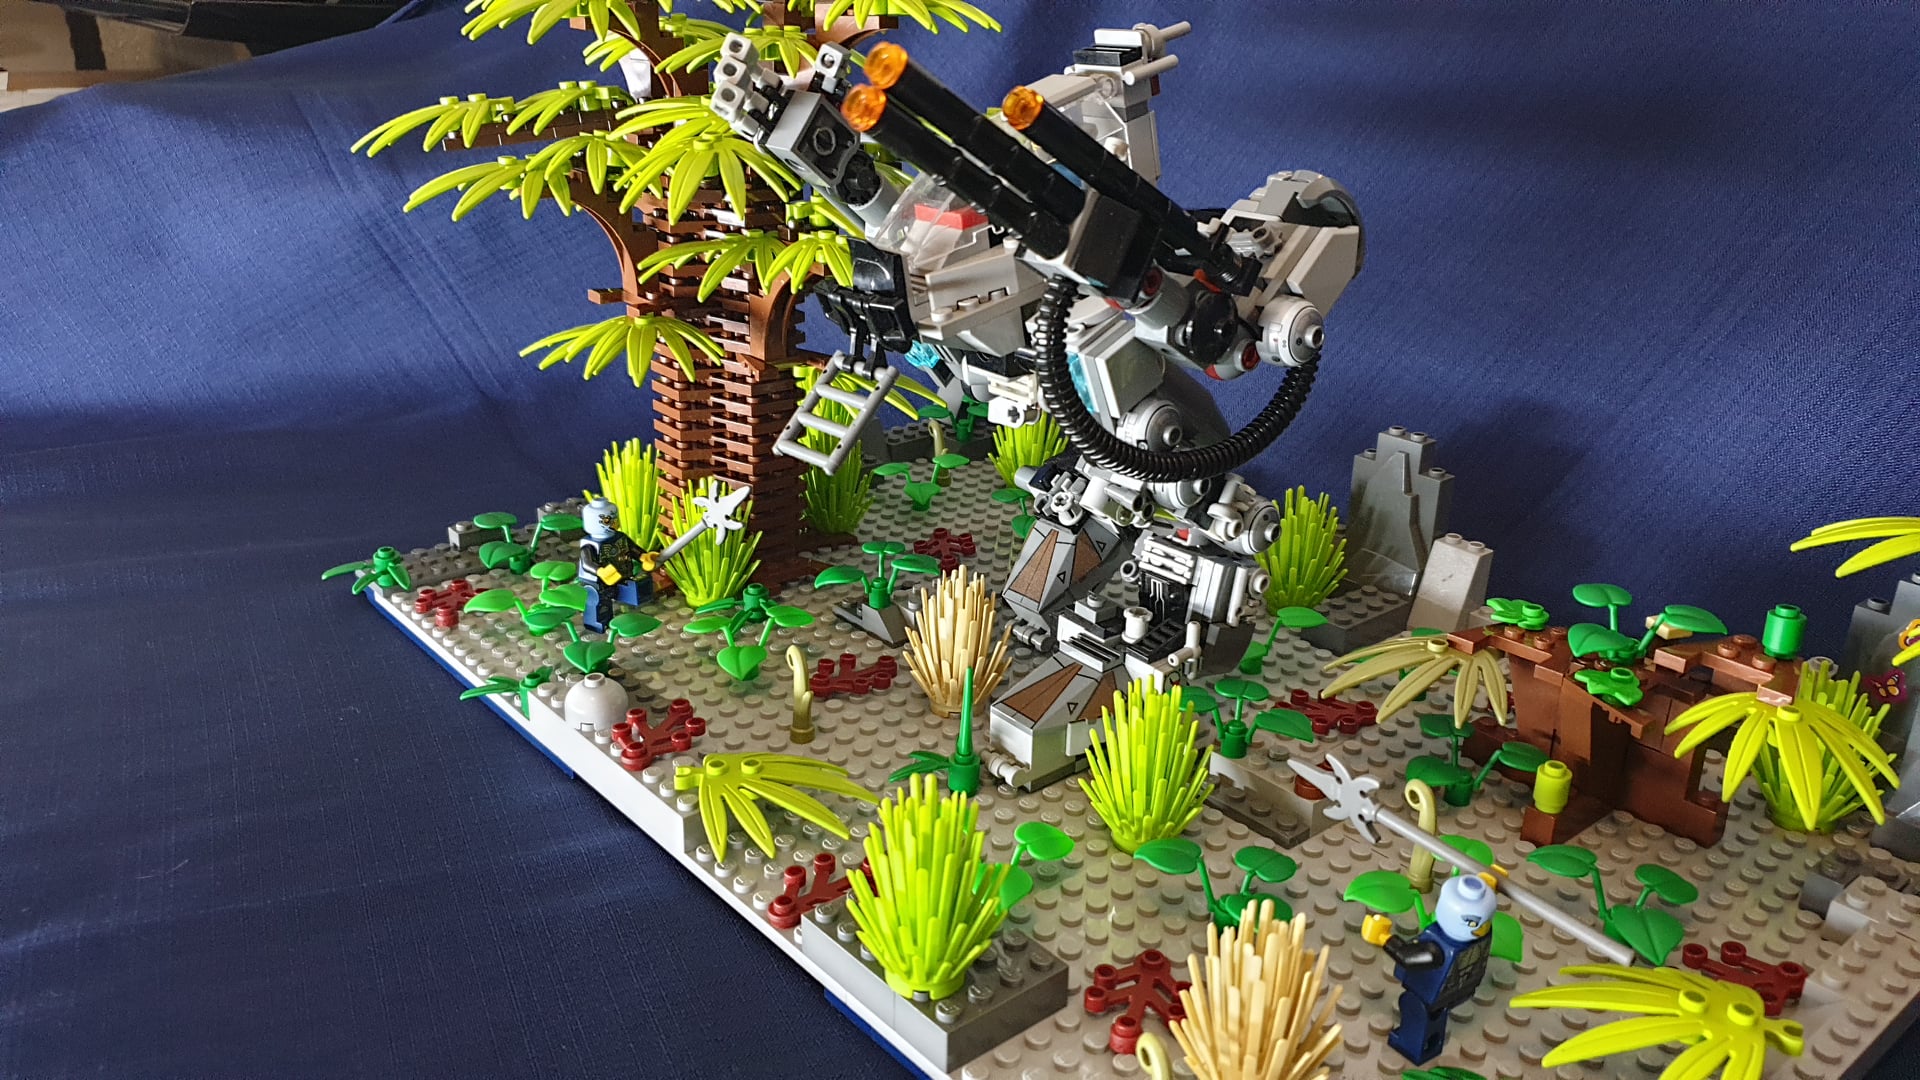
The city is built on 4 levels, with much of it in a modular style, although as the levels go higher, the build comes in larger separable parts. Naturally I’ll start with the base. Light Bluish Grey plates form the majority of the ground floor, while the rest is covered in water. A small Island behind the city adds colour and life. As with the previous two sets, different coloured plates laid under hundreds of 1×2 Trans-Light Blue tiles creates a sense of depth in the water, a brilliant technique that elevates the visual experience of the entire set. The first half of an enormous tree dominates the first level. Without its other half it looks somewhat strange, but it does support the second level. Foliage scattered about also serves to break up the monotony, while the supporting beam comes together satisfyingly for a neon look.
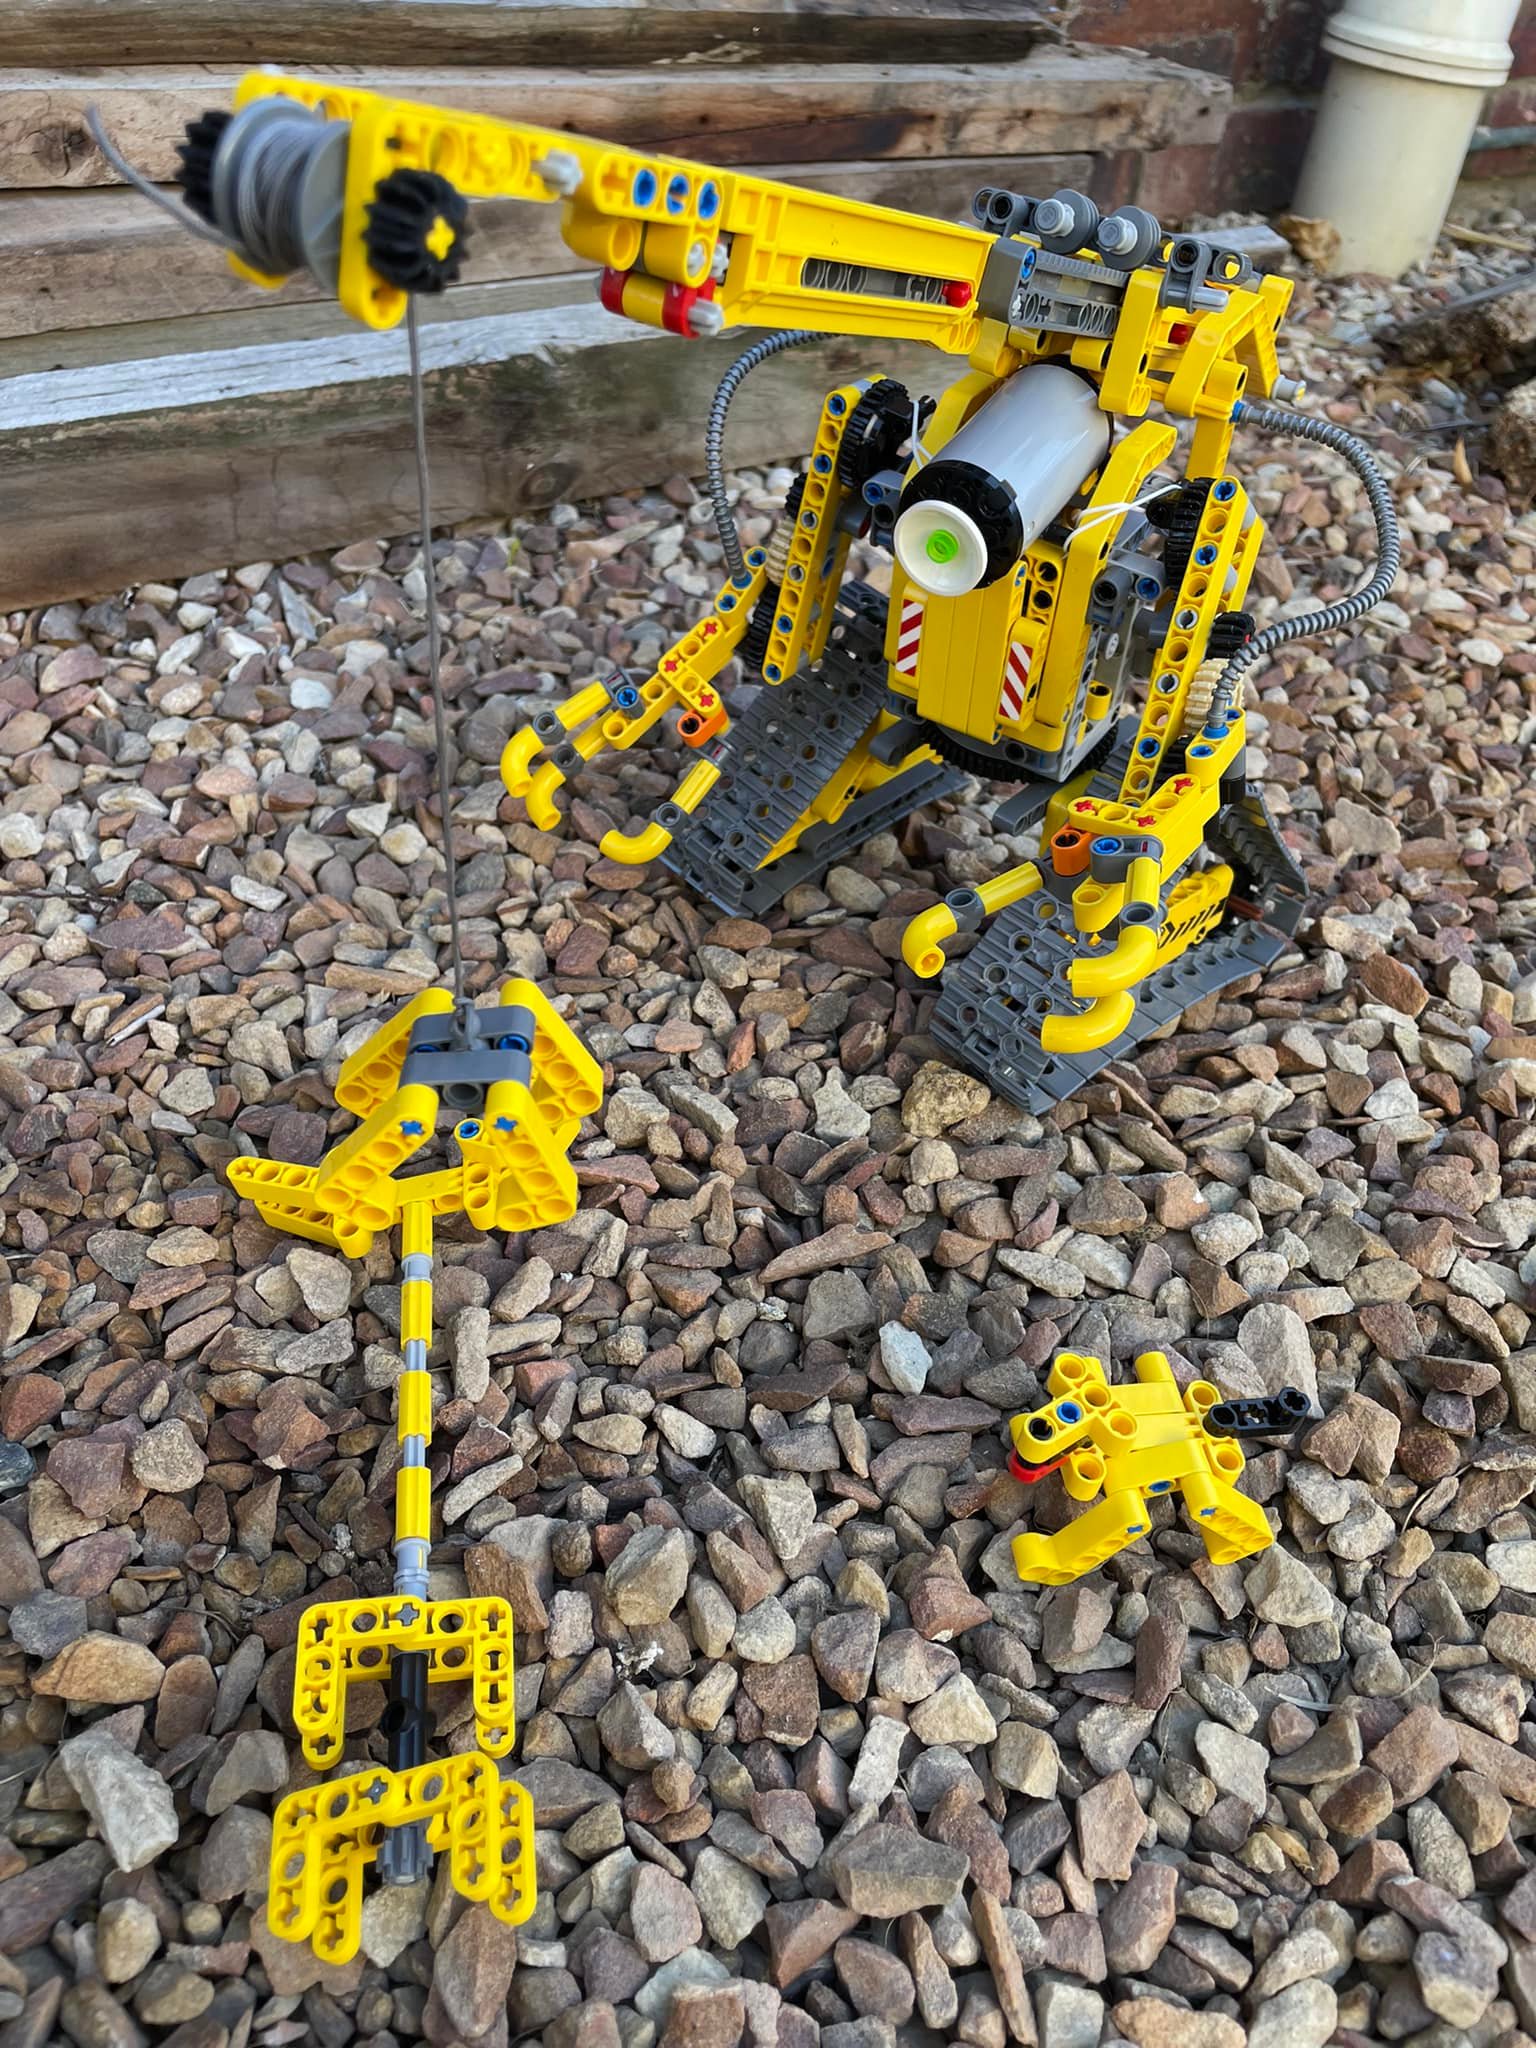
A small basement with a few rare items lies under the first building, Ronin’s shop. Dark Brown and Sand Green combine for an antique feel, which is complemented by clever builds like a scale and a bookcase. A nice technique, repeated for all four buildings on the first level, uses hinges to create one diagonal wall. I like how one side looks out onto the water, making it far more accessible. Across from Ronin’s shop is a small restaurant, perhaps a Ramen shop. This building uses a brighter combination of white and Reddish Brown and features a small balcony facing frontward. The two parts of the newer Book piece are used brilliantly as an awning and a counter. Overall, it’s a small but delightful shop. The room of a NINJAGO® fan sits atop the Ramen shop. This is arguably my favourite build, with a colourful Cole and Kai themed bed along with what appears to be a few micro-scale NINJAGO® sets. I really like the windowsills and curtains for this segment, which work well with the tan colour scheme. 1×3 jumper plates make a lovely traditional awning to complete the building, and a few flower boxes bring some more nature into the build. The building on top of Ronin’s shop is divided into two parts. The larger is a sort of balcony, its walls decorated by paintings or pictures of NINJAGO®. Some teacups and a teapot are nice additions. The rest is separated by a door, and a large round window uses what I assume is an old Bionicle piece. Another great awning design is used, this time serving to cover the shop beneath.
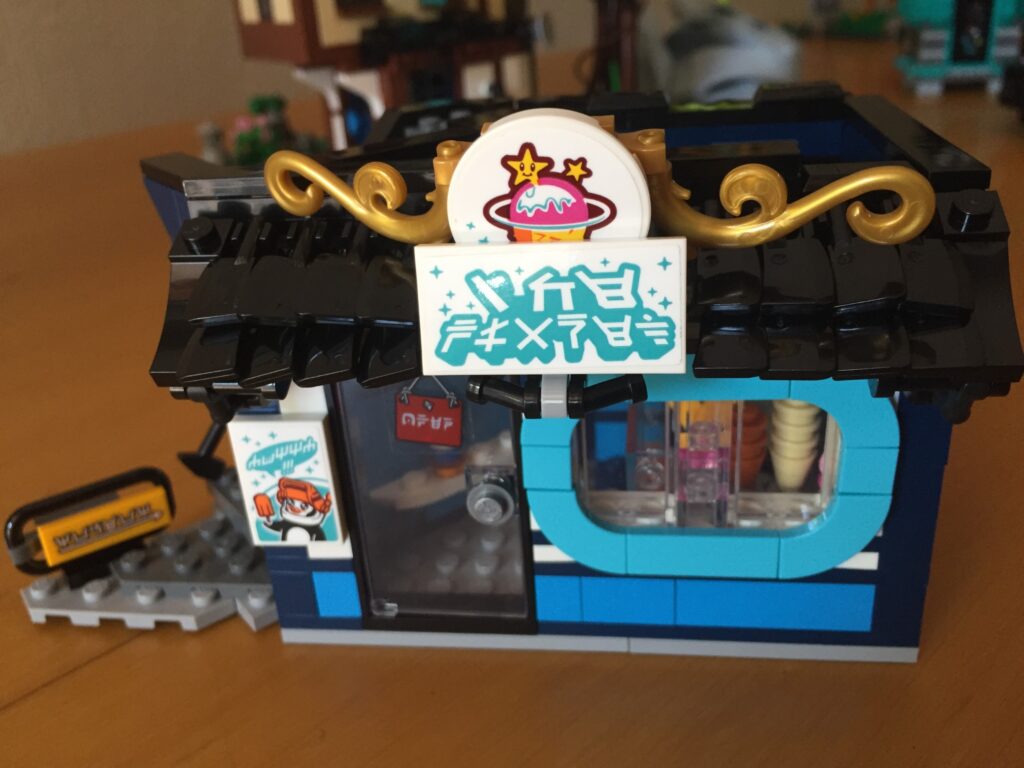
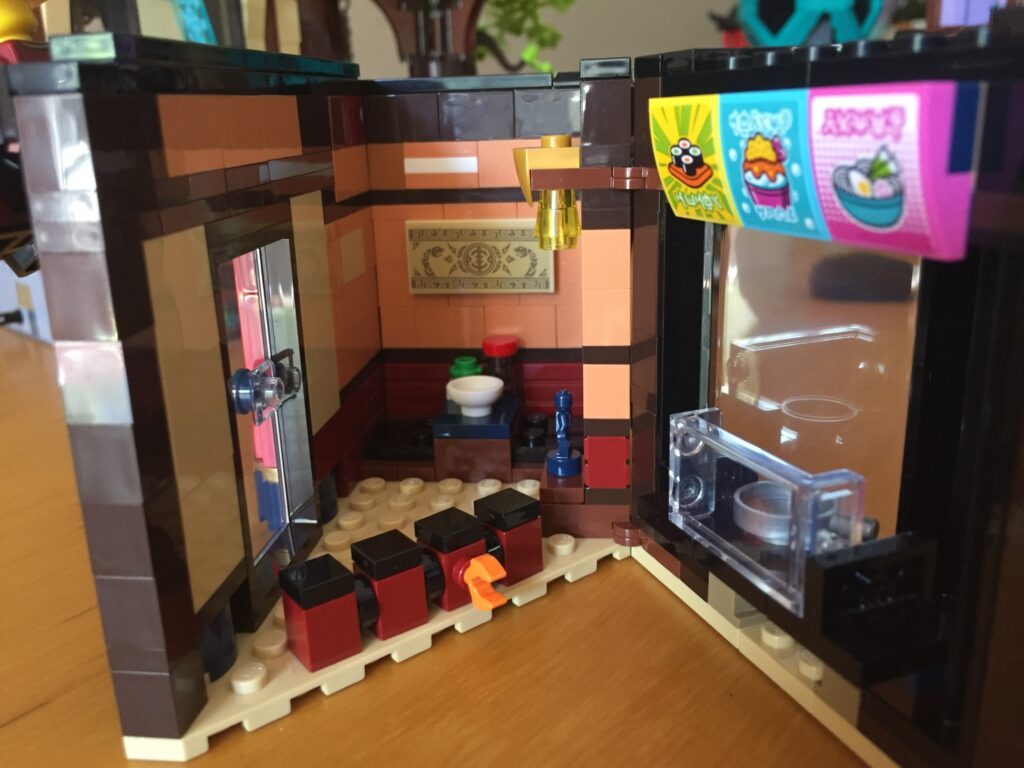
Now, the base for the second floor is built. It’s basic, with some adverts and two intricate builds decorating the railing. A model of Jay’s Desert Storm is integrated into the base and hangs down into the NINJAGO® fan’s room. The next build is another favourite, the Ice cream shop. I believe it’s based on a Classic theme. The interior is simple, yet cheerful, with a few sundae glasses, cones, etc. A rounded window looks out onto the exterior walkway, and the design above takes the cake for the best awning in the set. Several cleaver pieces in Black give a fantastic, tiled effect. There’s a staircase rising to the third level, and a small walkway with some nice details. Next is Chen’s Noodle House, which featured in season 4 of the show. One table is situated inside, with one or two additional details. The kitchen compartment sits by the main window, and swings open for easier access. As always, the exterior is very detailed, and a Minifig is used for the sign. The awning is also a contender for best, this time using sausages with clips on them. Overall, I like the detail, but the colours on this building are my least favourite of the entire set. The upper section of the tree is now finished on level two, its details far larger and more natural than on its base.
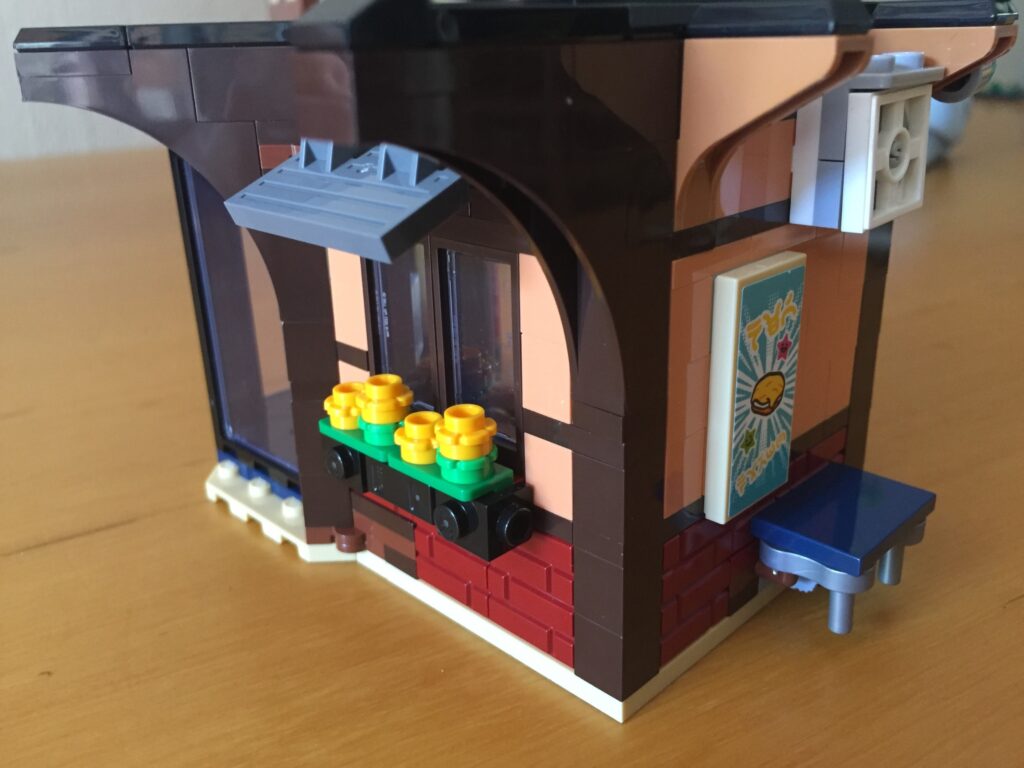
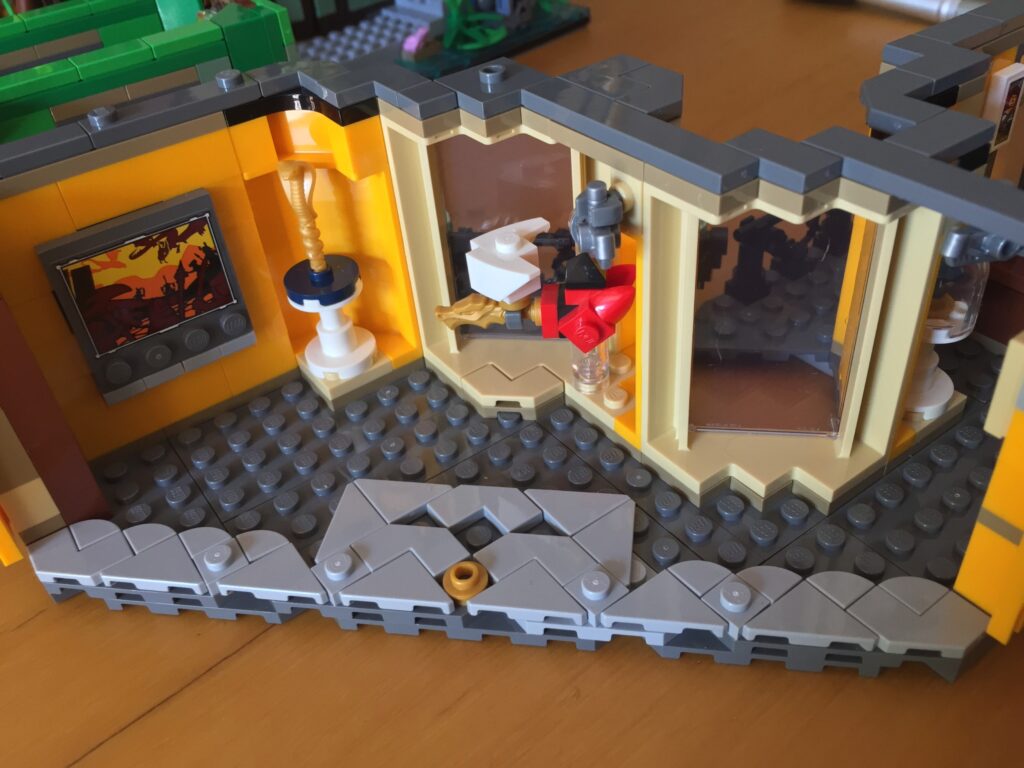
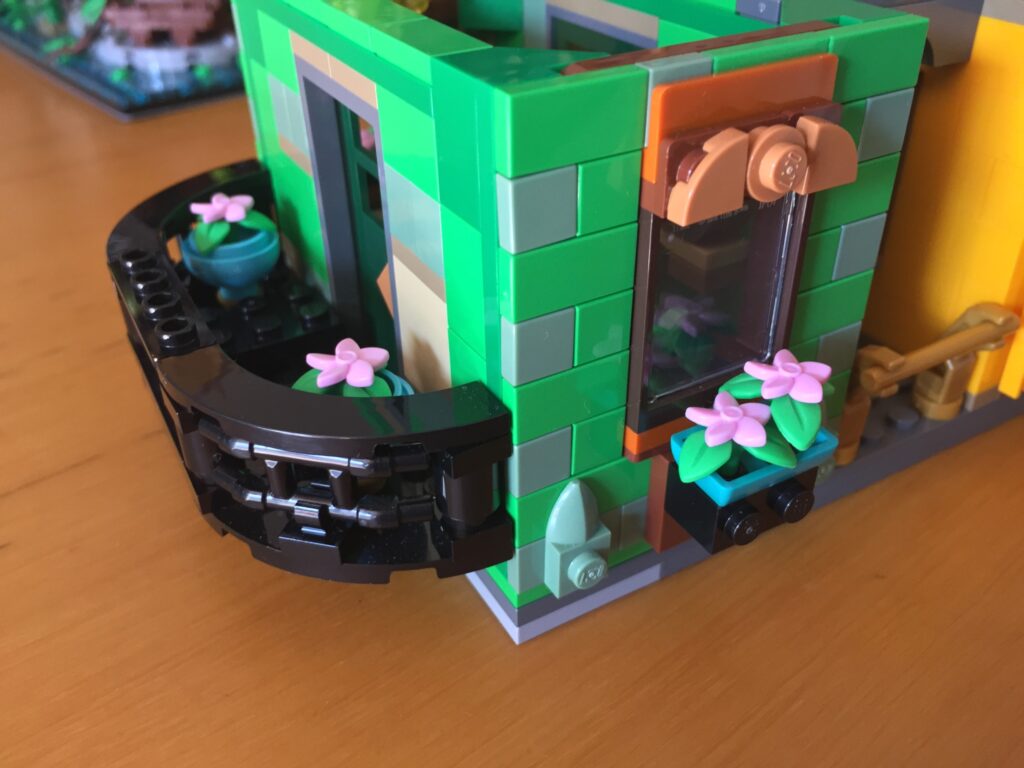
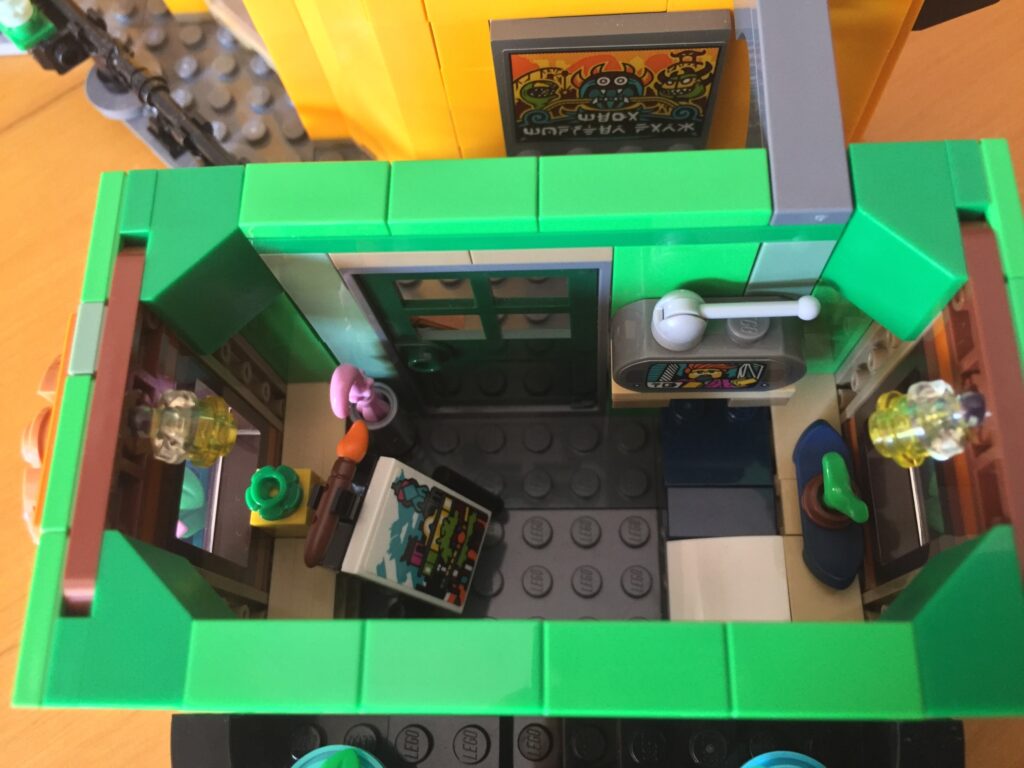
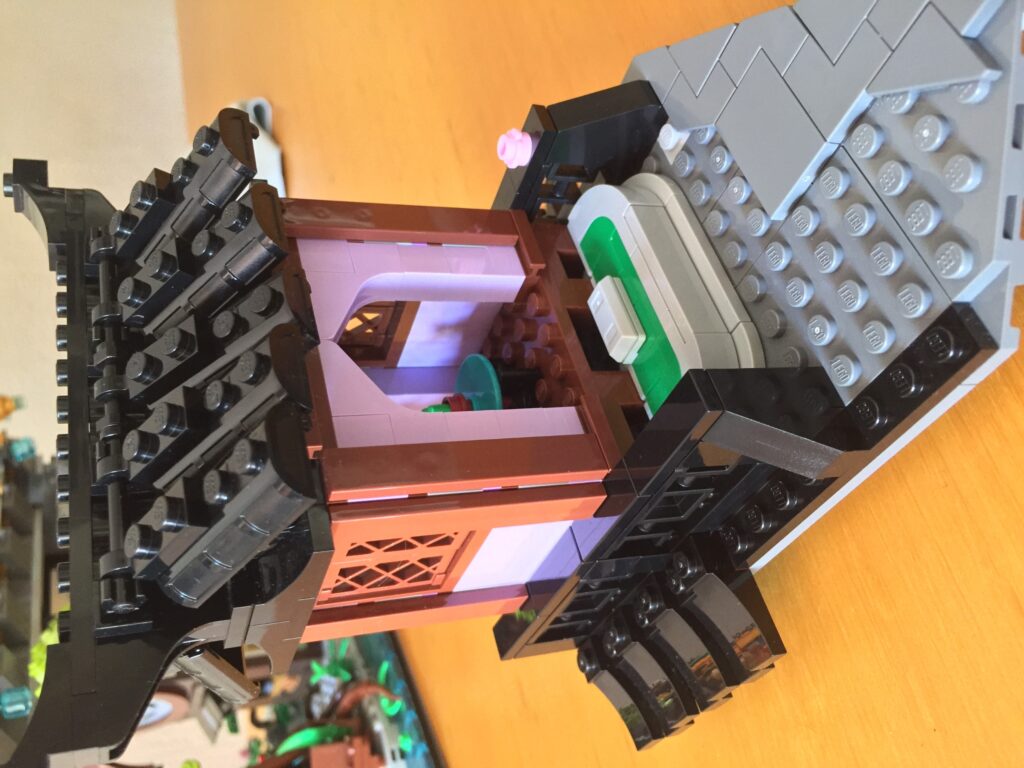
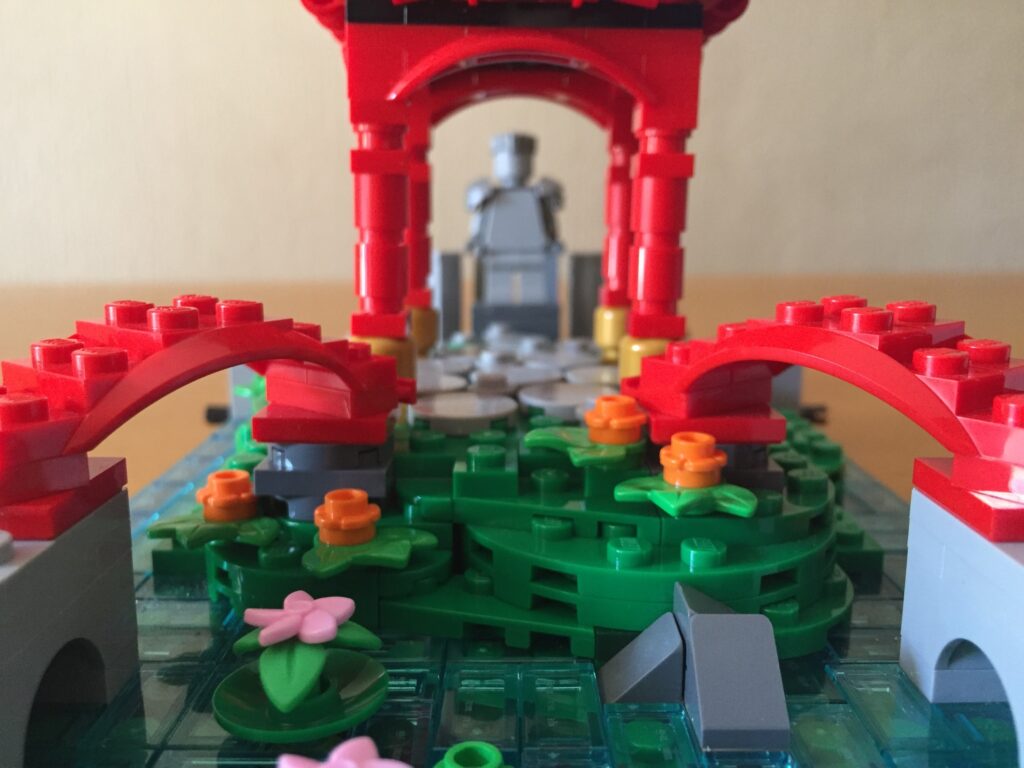
The NINJAGO® museum demands most of the space on the third level, dividing into a gift shop, and the actual museum. The museum itself is fairly similar to the one in the show, with a portrait of Master Yang, a painting of Kai and Nya’s parents, a model of the Destiny’s Bounty, and much more. The centre wall can be easily removed. The exterior detail almost outdoes the interior. The different signs look nice, and the teal windows work well with the bright orange. Around the back, a railed walkway runs from the door of the museum to a small passage between the Museum and an apartment belonging to an artist, which is among my favourite builds. The combination of several shades of green makes it light and pleasant to look at. SNOT techniques build up the front and back walls, which are decorated with plants on either side. A tiny bed and TV occupy half the room, while the other half hosts an easel, upon which a portrait of the City is being painted. Another door opens onto a balcony that cleverly uses angled bar pieces to create a textured railing. So far this might be my favourite level.
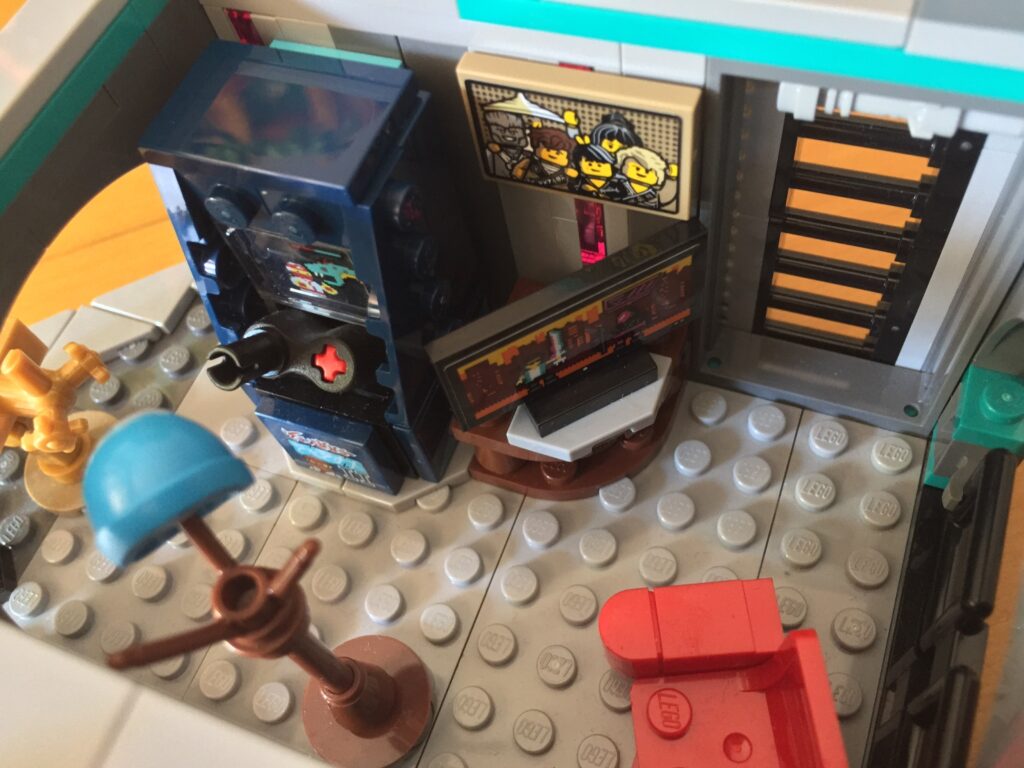
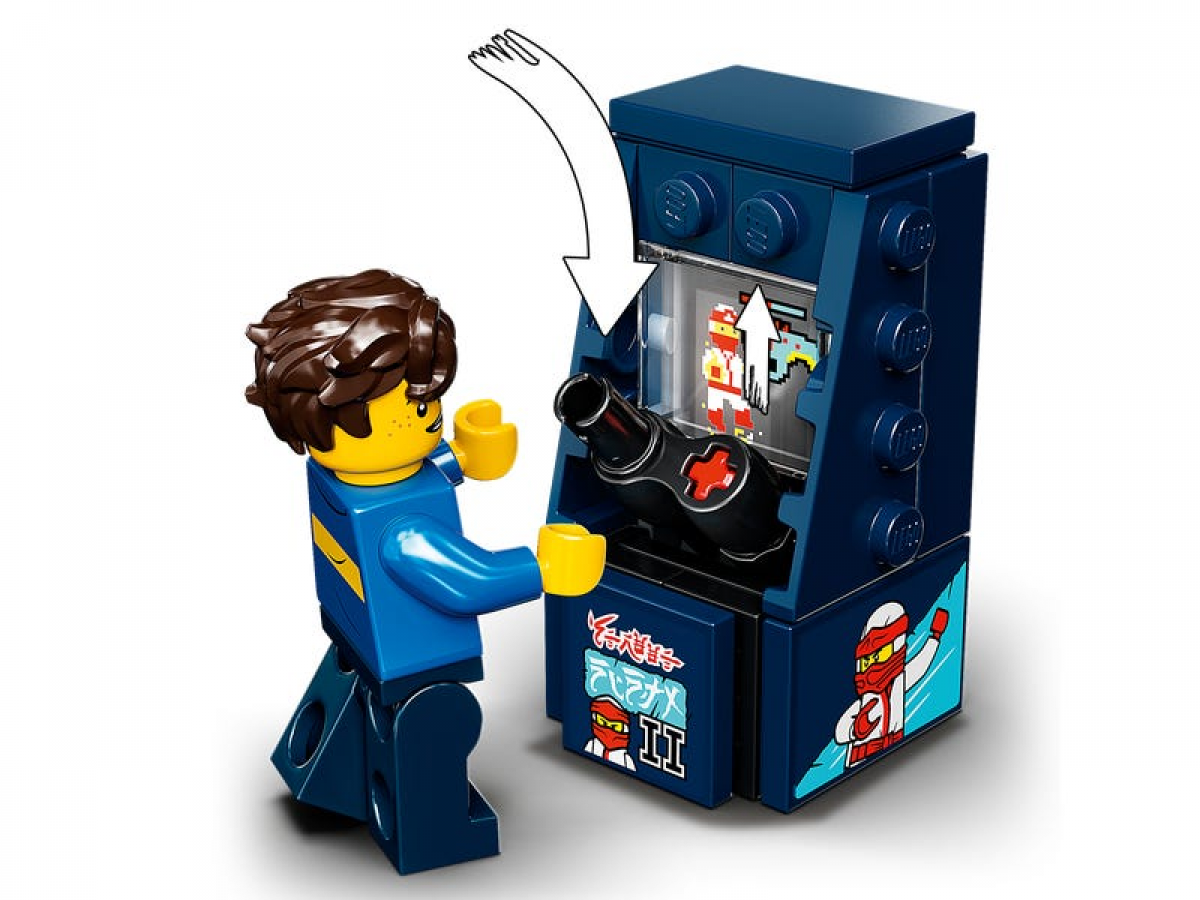
The centre of the fourth and final level completes the Museum, with a rounded skylight. A bright, cheery cherry blossom arcs over it, adding to the ‘Gardens’ theme. On the left is a sort of sanctuary, built in lavender. I’m sure there’s a better term for it, but either way it’s lovely. I’ve spoken a lot about how good the colours throughout each build are and this is no different, with a refreshing mix of Reddish Brown and Lavender. Treasure chest lids make a traditional-looking roof that gradually slants inward. The final part of the city is an arcade for the Ninja along with a tower that serves as a secret control tower. The arcade is simple enough, with an armchair, a TV, a hatstand, and, fittingly, an arcade game. The arcade game is actually interactive, with a 1×2 tile that can be pushed upward as you press on the joystick. The design for it blew my mind. BrickHeadz glasses pieces work as rails, and a bright Koi fish build decorates the outside. There’s also a golden telescope stationed just outside the arcade. The tower above houses some spare posters, and Jay’s Ninja costume, a welcome inclusion. Above it is a small command centre with a central console. It’s not super easy to access, but accessibility is sacrificed for stability. Otherwise, it’s just a high-tech tower that increases the rather impressive height of the set.
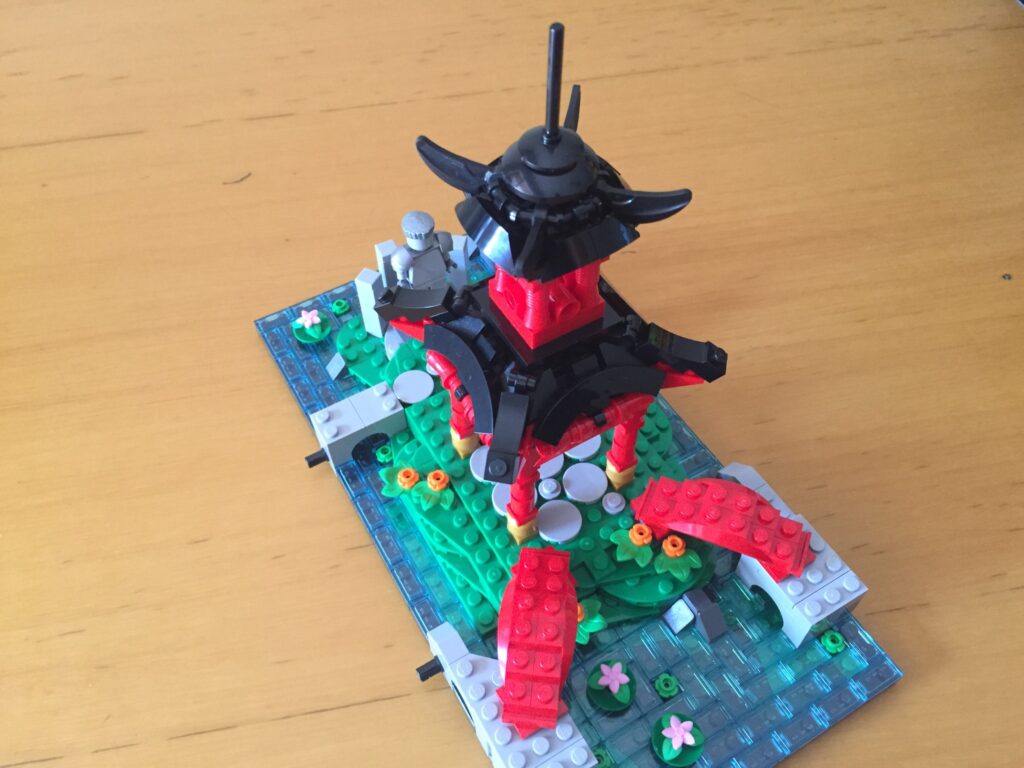
The last, and final part of the set is a small island that connects to the left side. Upon it is a small temple. A minifig is used for the drastically downscaled Titanium Ninja statue. For those who don’t know, in season three, Zane, the Titanium or White Ninja, seemingly died while saving the city and this monument was erected in his honour. Overall, it supports the theme of nature with more water and foliage.
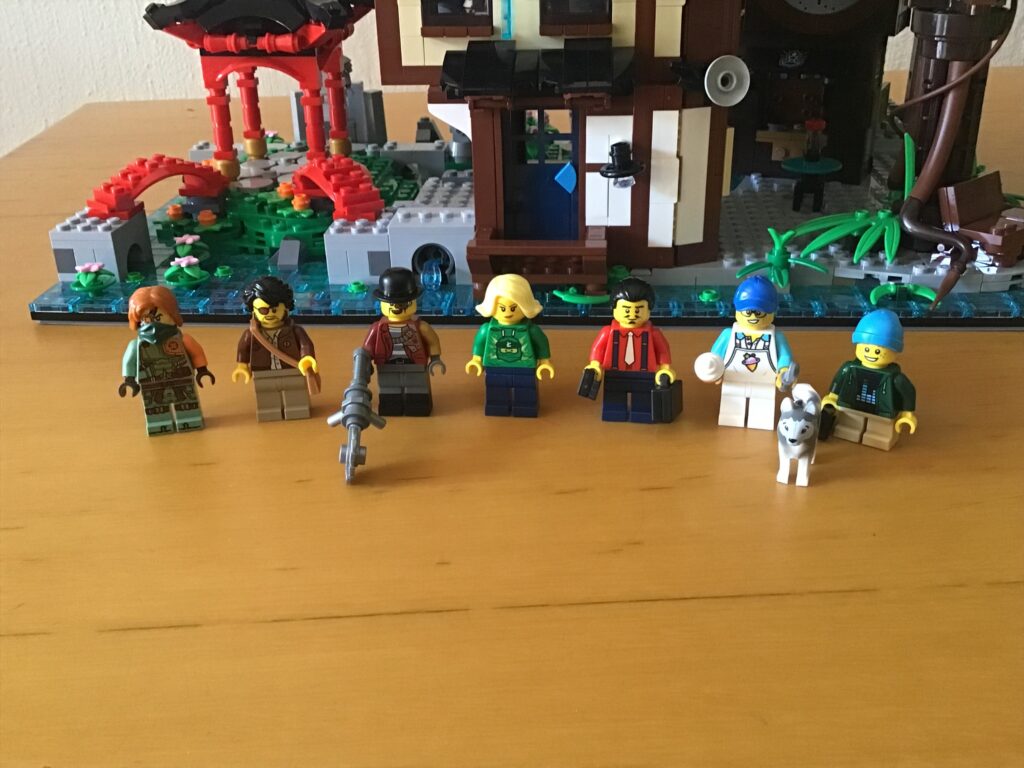
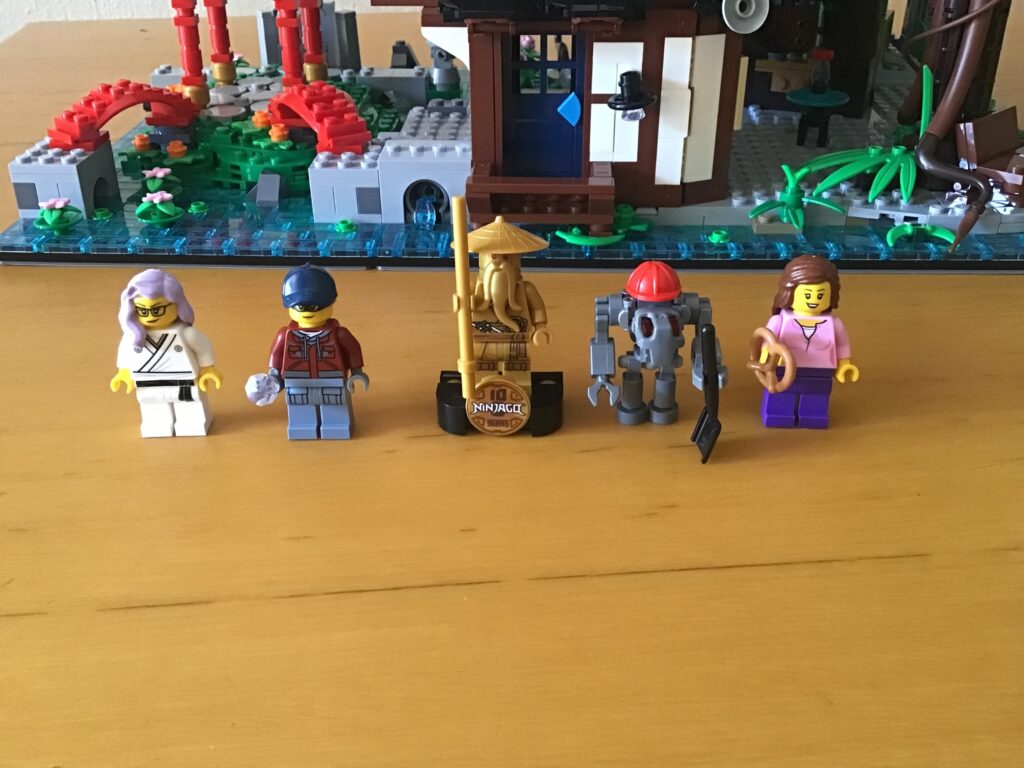
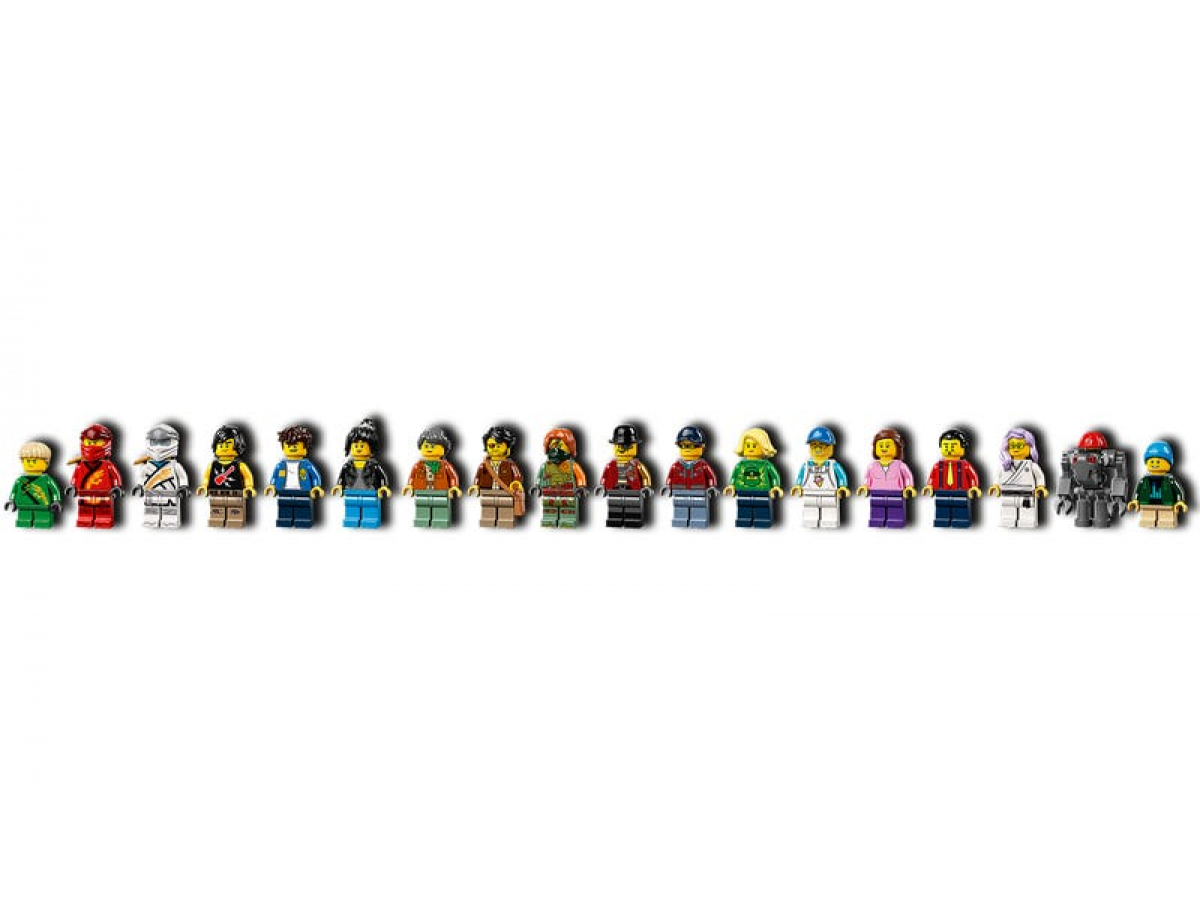
I’ll speak briefly about the nineteen Minifigs, making it simple by dividing them into those I really like and the others I don’t find particularly noteworthy. The five Ninja along with young Lloyd are great. Clutch Powers, Misako, Ronin, The Mechanic, Hai, Kaito, and Tito are some of the better minifigs. The Legacy version of Master Wu is also great. My favourite of the whole set is probably Christina, the NINJAGO® Superfan with a Green Ninja jersey. Mei, Cece and Eileen are still nice minifigs, although I’m not a particular fan. Some clever part uses make up one final character called Scoop, a cleaning robot.
Earlier,
I mentioned my concern at the lack of ‘Gardens’ but having built it, foliage
and plant-life scattered throughout really brings the set to life, while signs,
pipes and ads mean almost no space is unused. It’s an extremely enjoyable build,
the final product a bustling, colourful city. I’ve had it for over a month, and
it still appeals just as much as when I first built it. In terms of build
experience, few sets rival it in my opinion. I believe the build alone is worth
paying for. So many ingenious techniques are scattered throughout every build.
You simply can’t go wrong with it. I like rating the different aspects of a
set, and I think the following scores are fair:
Build: 10/10
Minifigs: 9/10
Packaging: 10/10
Playability: 9/10
Value: 10/10
All-round it’s a lively and pleasant display. I’d say one of the few drawbacks is that the compact spaces can make it difficult to access and position Minifigures if desired, but at the same time, having most buildings closed means dusting this set is much easier than you might imagine. You don’t have to like NINJAGO® to enjoy the set, you don’t even really have to like LEGO®. It’s a truly awesome set and is certainly the highlight of my collection.
Review by Brett Thomas (SAFOLs Members, CapeLUG Members)
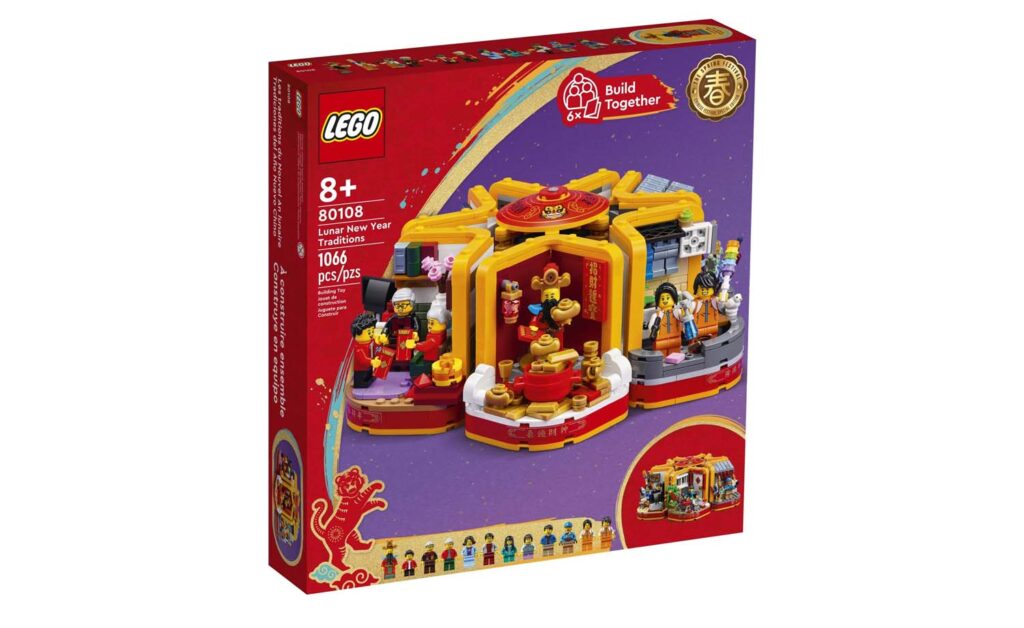
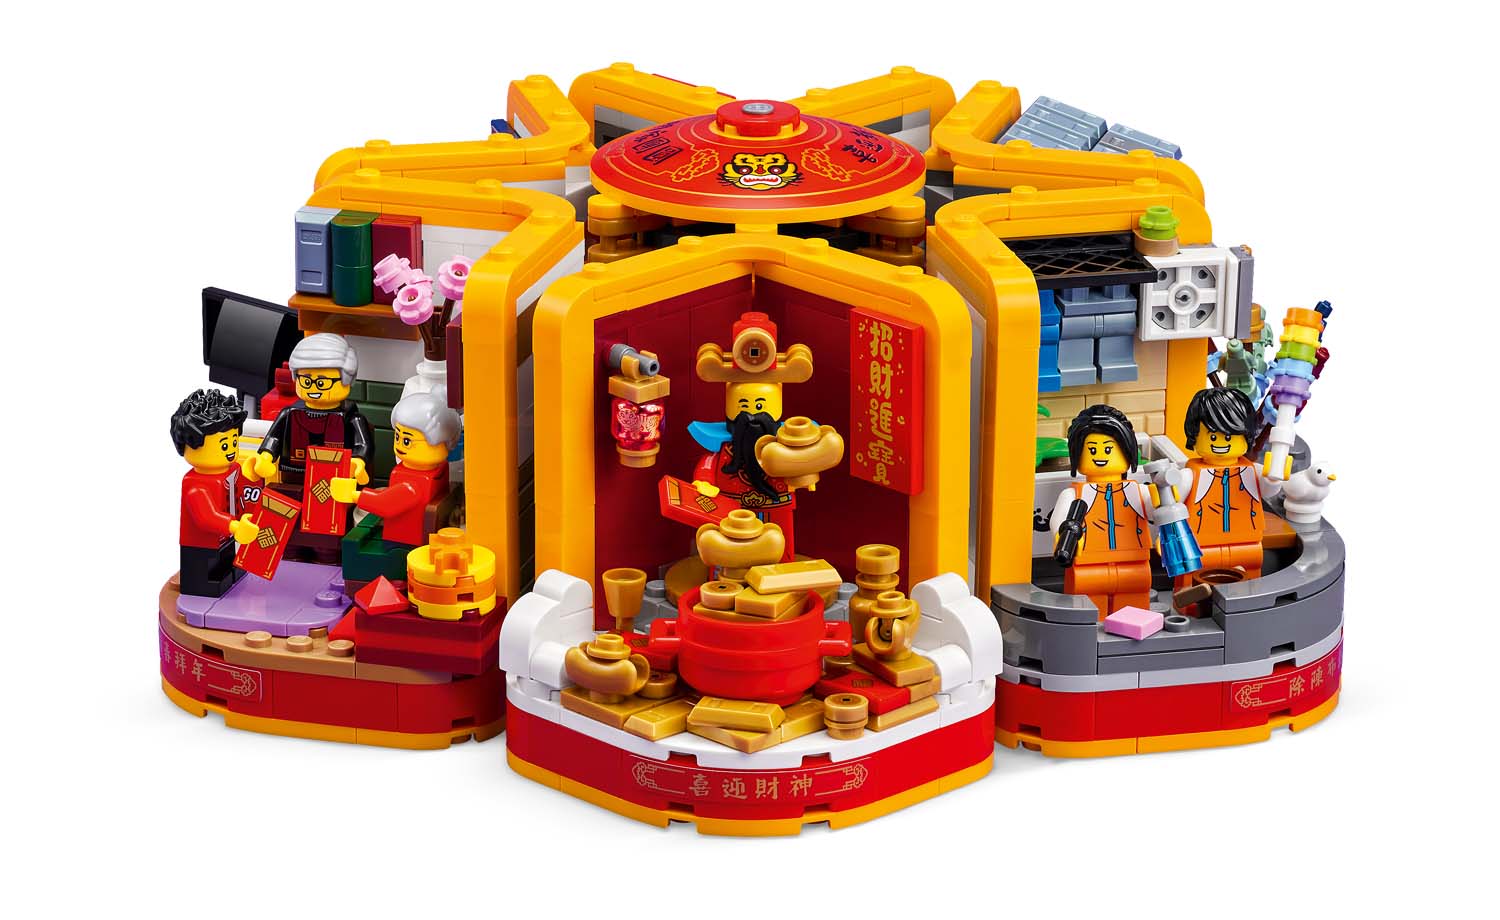
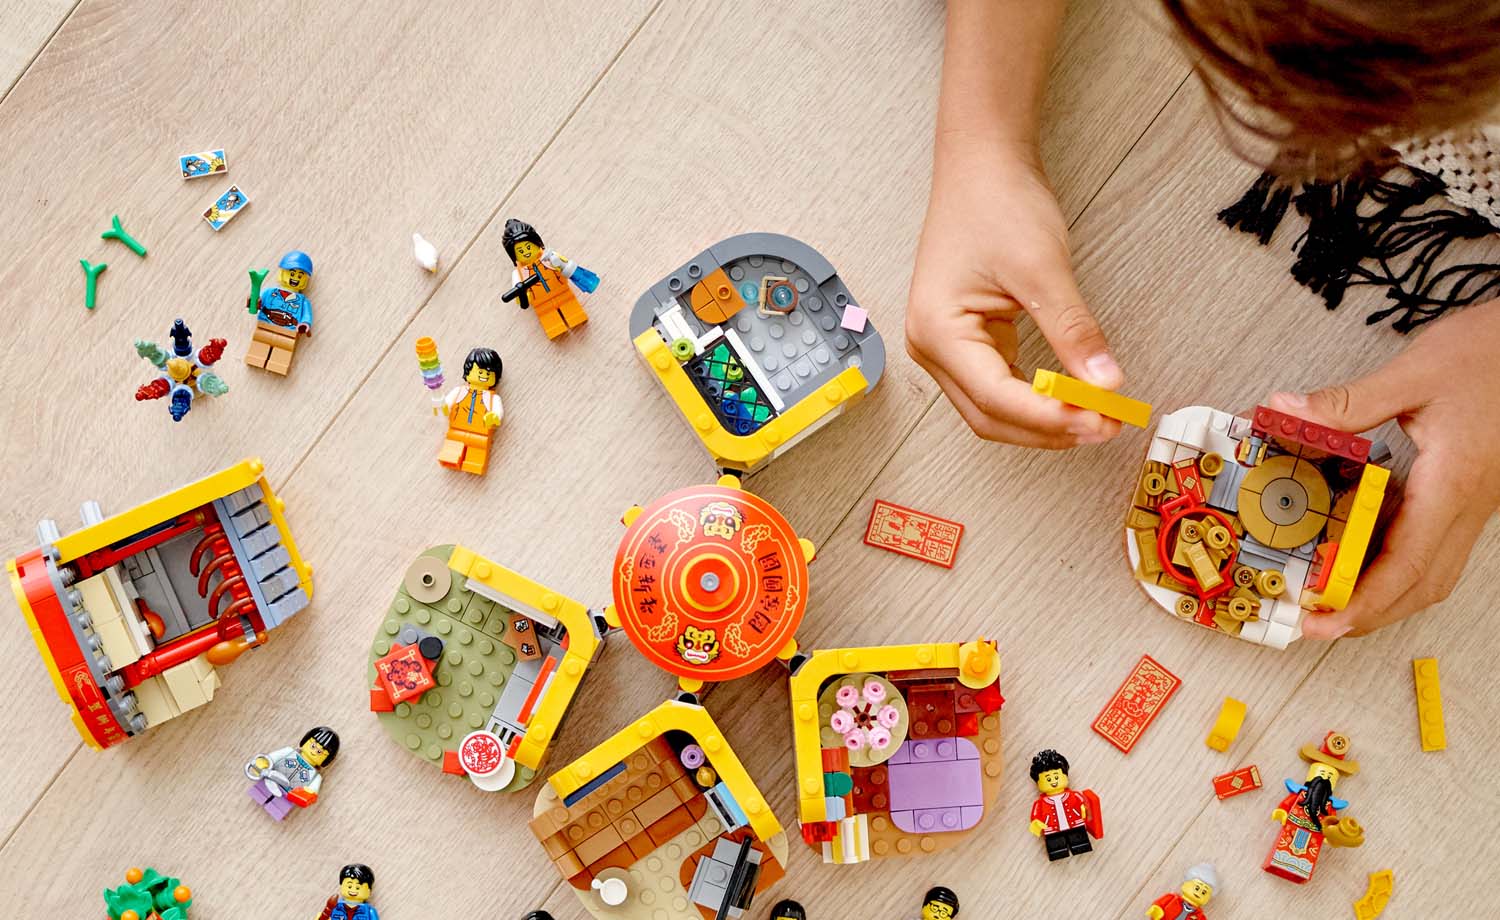
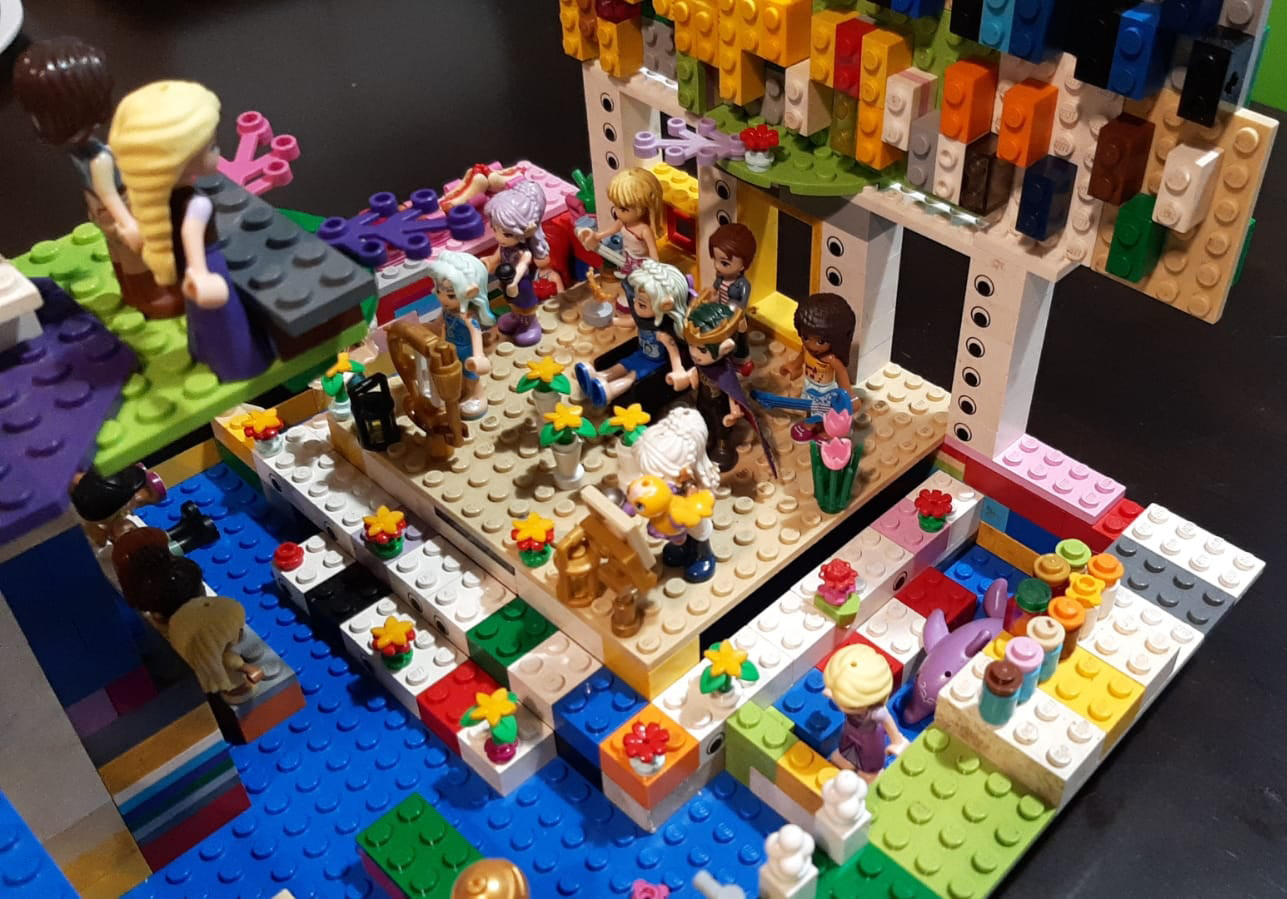
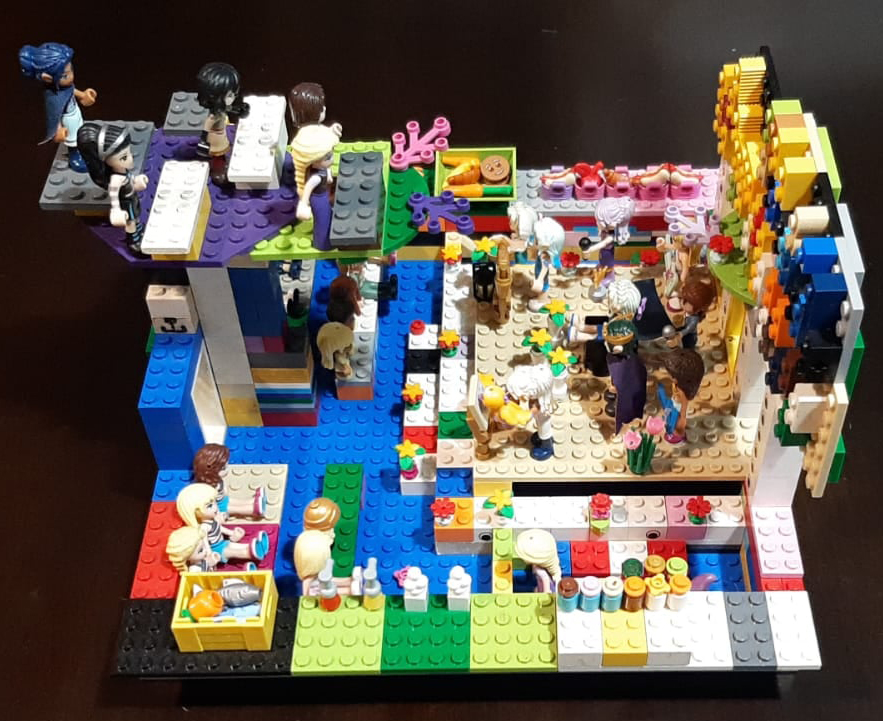
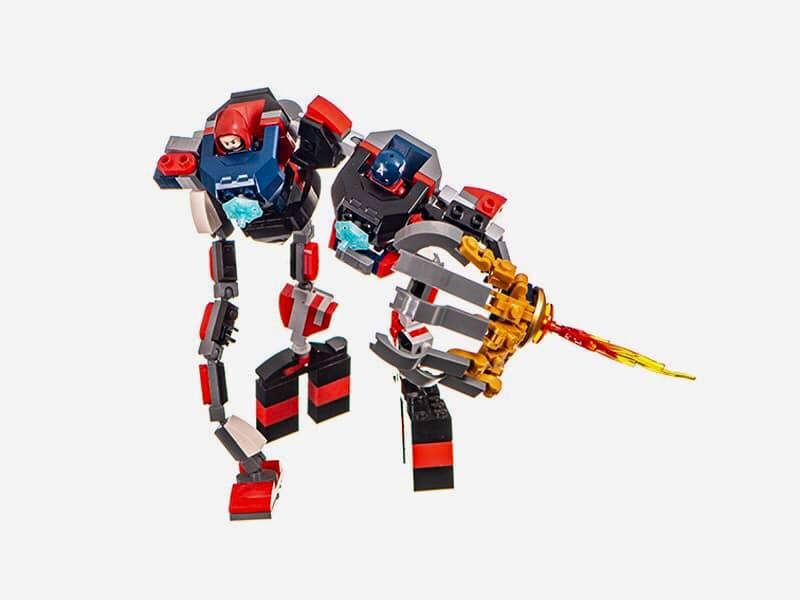
I would like to start with why I wanted this set (which I
was lucky enough to receive as a birthday present). I am a huge fan and
collector of the Lego minifigure. I am always looking for unique figures and
creative ways to display these. I have built some of my own habitats for my
minifigures and so this set immediately caught my eye as it ticks all the above
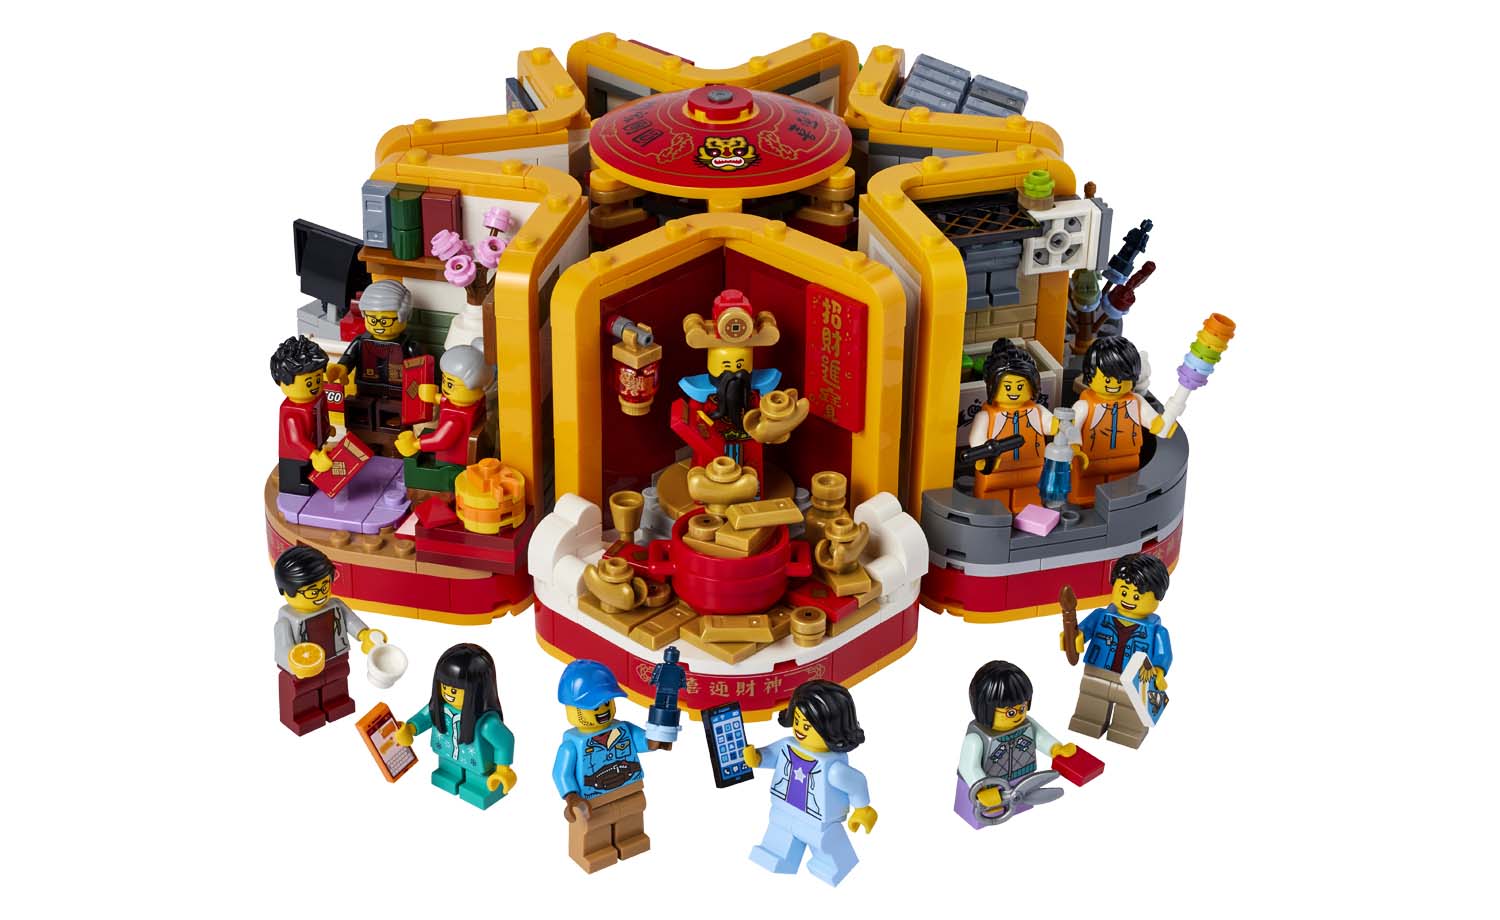
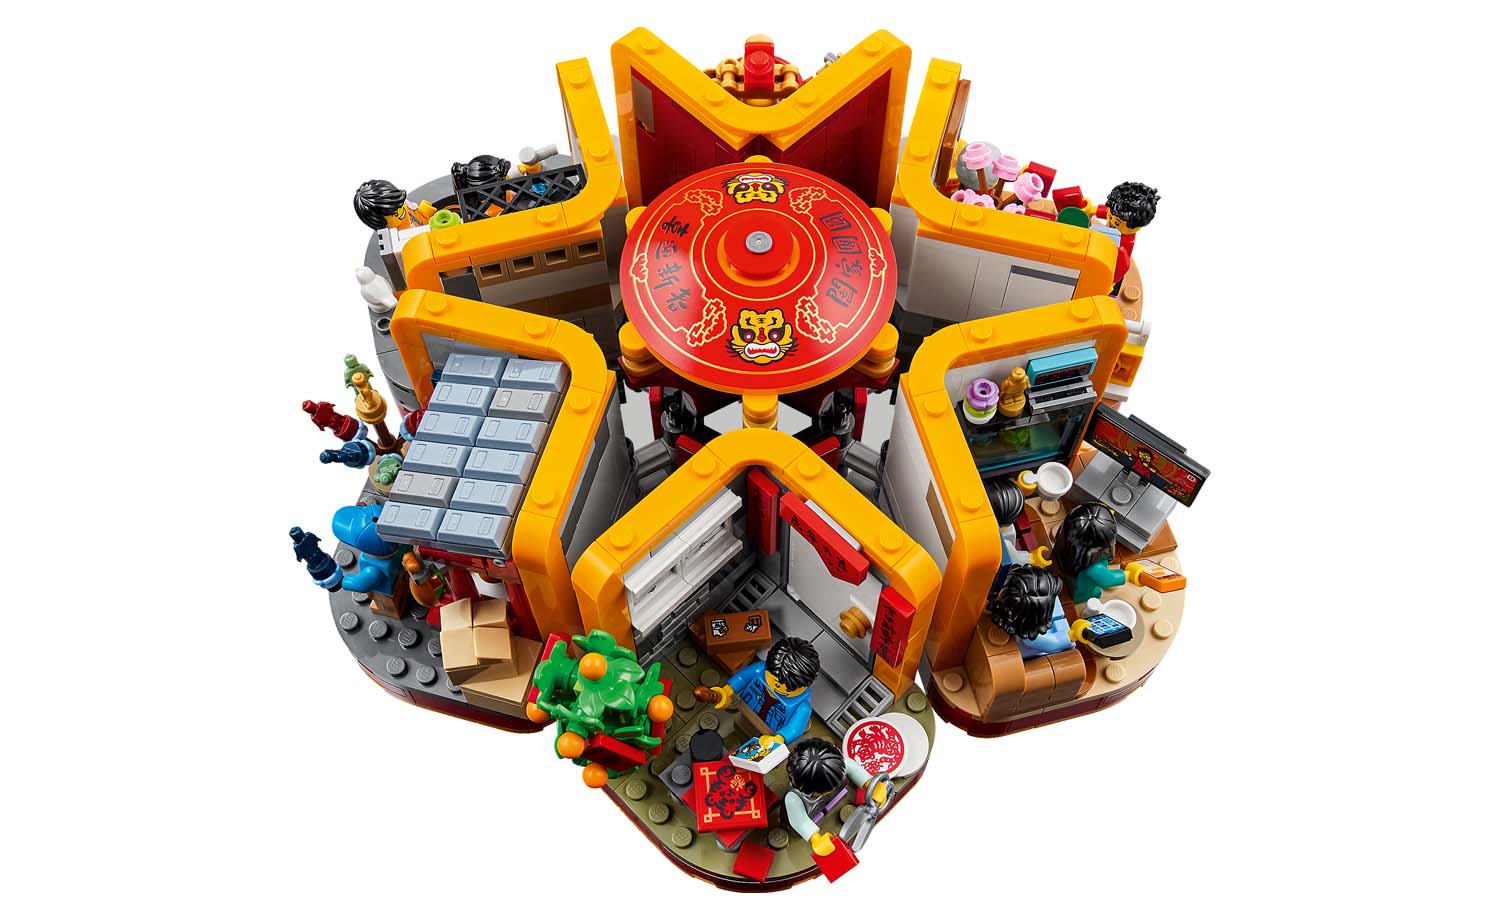
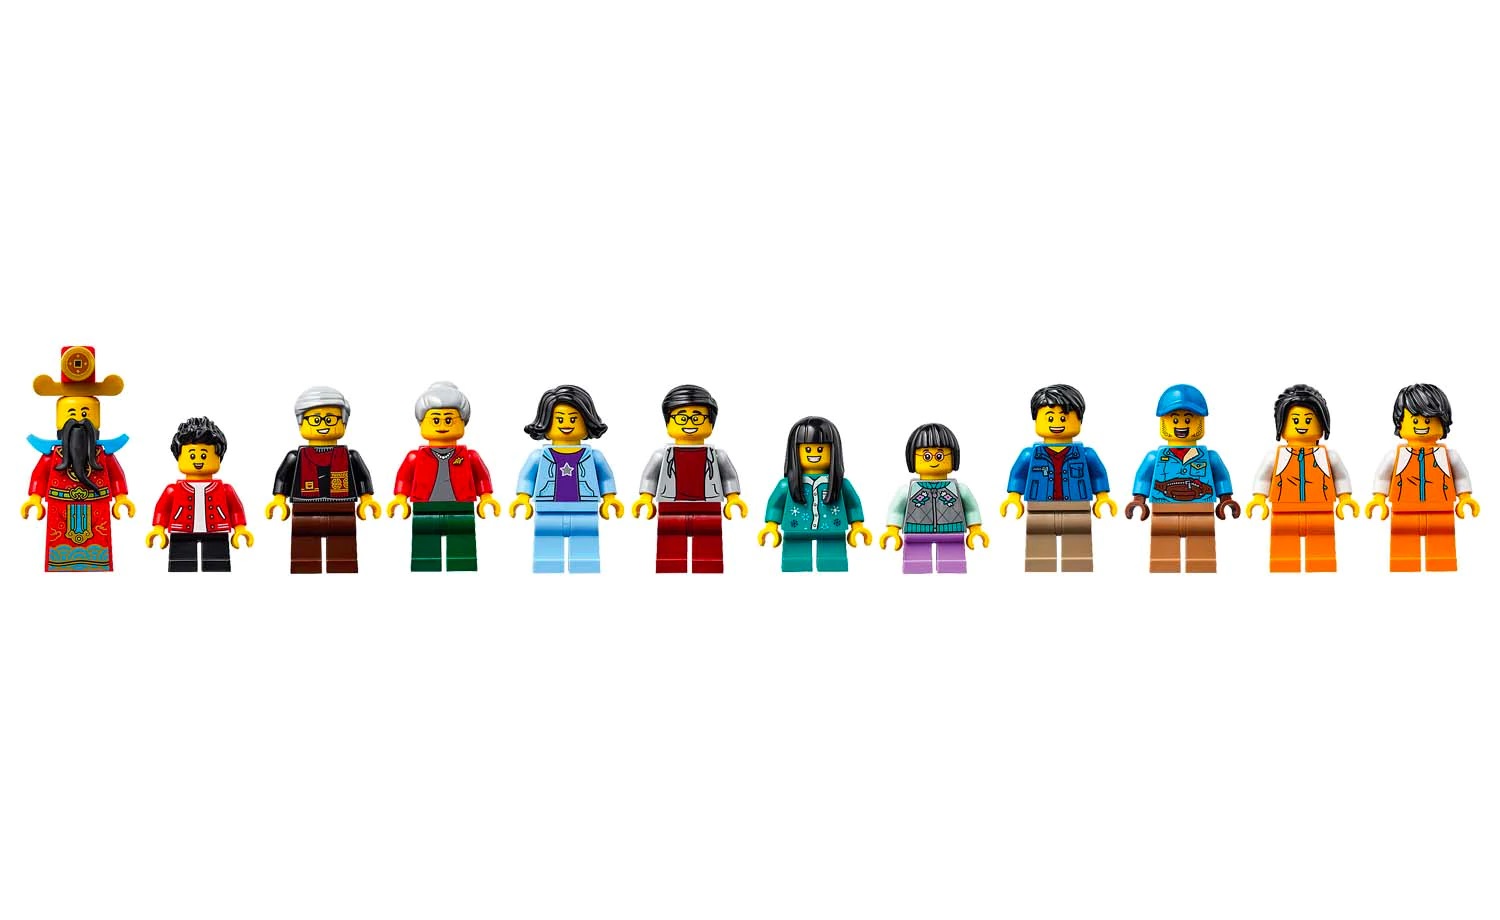
boxes. It contains 12 minifigures and 6 mini built habitats as well as a
central core to join the mini builds
The box is aligned to those in this theme and the front has
a large picture of the final build as well as a picture of each minifigure. The
rear of the box shows an alternate completed build structure as well as some
enlarged pictures of the mini builds.
Inside the box are 7 bags (1 for each mini build and the
central core) 6 instruction booklets and 2 sticker sheets. The instruction
booklets are separated so that different family members can build these at the
same time. The central core build is included in book 1 with the first scene.
Each scene depicts an activity related to the Chinese New
Year, I will describe each one and the minifigures in each below.
The central core uses technic parts to connect to all 6
scenes. It has a printed round top with New year Mandrin printing and some
stickered tiles representing each scene (These are hidden in the final build.)
The rear of each scene has 2 technic axle connectors to join to the core, only
1 is used to join and the other gives some stability when lifting the final
build. Each scene is built on a 9×9 base with 3 rounded corners. Each scene has
a sticker in Mandarin that relates to the scene.
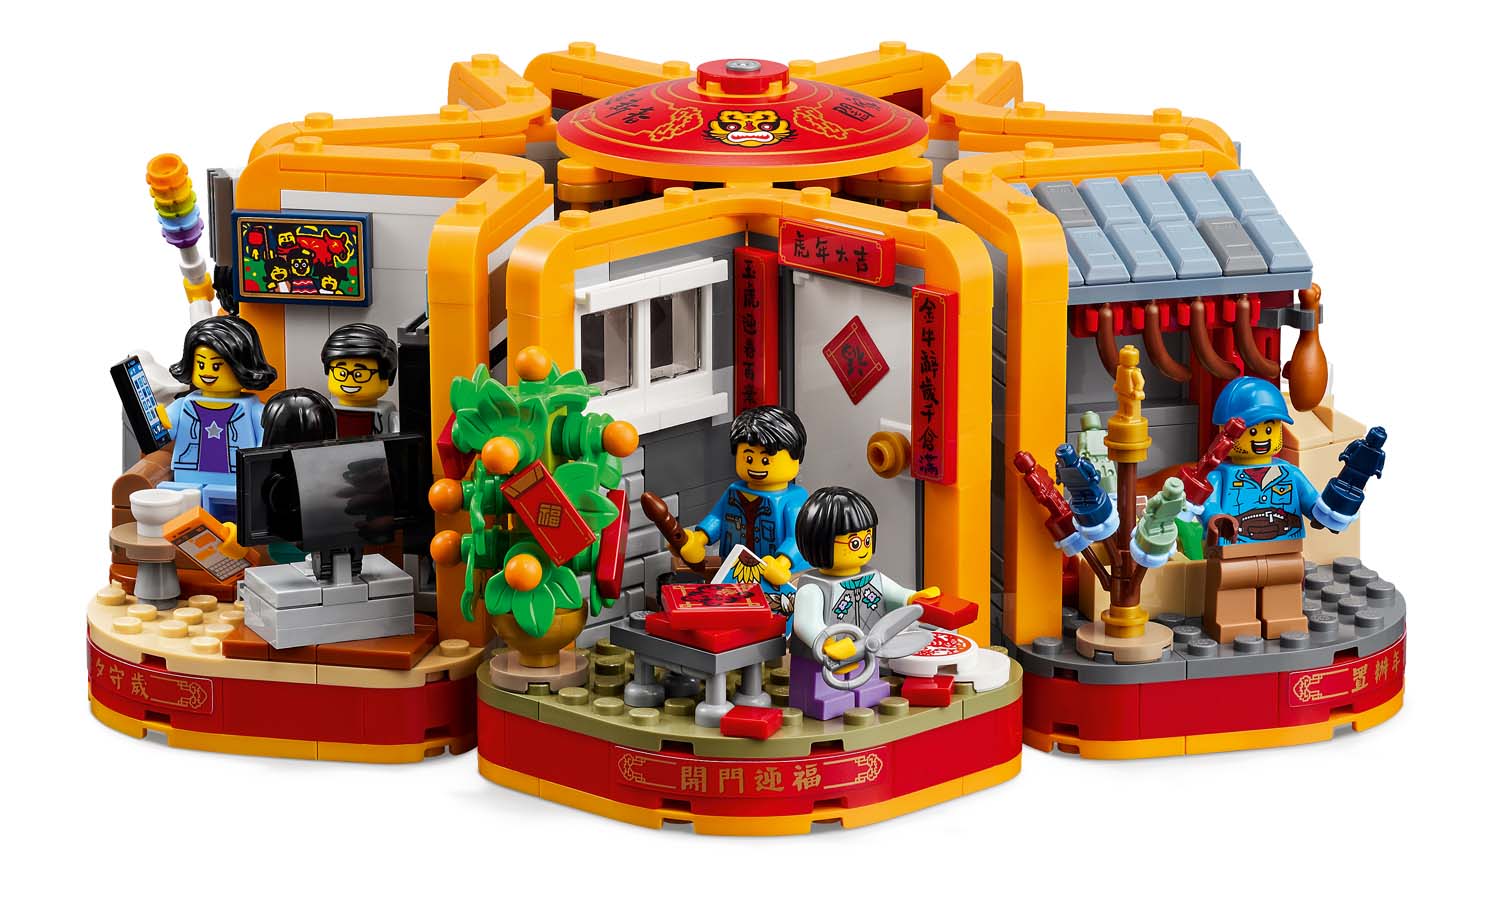
The 6 different scenes are spring cleaning, food shopping,
making good luck decorations, staying up to ring in the new year. Visiting
grandparents and the god of prosperity.
Spring Cleaning
In this scene there are 2 minifigures dusting and cleaning
the windows of an apartment. It is a full scene with some washing an aircon and
a white bird. I like the feather duster build using coloured flower parts and
the squeegee using T-bar. Both minifigure are dressed in orange overalls and
the torso is a new print
Food Shopping
This shows a Chinese street vendor and his stall. He is
selling food and toys on sticks. The toys are depicted by micro statuettes in 4
different colours. The roof of the stall uses ingot pieces, which is a cool way
to depict tiles. We also get a new colour ingot in sand blue. The vendors torso
has a printed belt and “moon bag” which is new in this set
Making Good Luck Decorations
This scene has an adult and a child making decorations. This
scene is packed with details, a mandarin tree holding the final decorations
(depicted with a red 1×2 printed tile) a parcel on the doorstep (which per
Jay’s brick blog review has the IATA code BLL on it, which is for Billund
airport. Some Lego perhaps?) and a small table with a red stickered parcel. The
young gild has a quilted jacket torso which is also a new print. The door is
surrounded by 3 printed red 1×3 and 4 tiles.
Staying Up To Ring In The New Year
This scene shows a family of 3 watching television just
before the new year. There is a stickered digital clock showing the time as
23:59. This scene has a couch, the television (Stickered) a small table and a
really cool small aquarium. The father is holding a printed orange/mandarin
round tile which is also new.
Visiting Grandparents
This scene shows a child and 2 grandparents they all have
the same red printed tile from the making decorations scene. This scene is also
packed with details, a picture depicting a tiger (sticker) to align with the
year of the tiger, a vase with pink flowers, a bookshelf with 3 books (creative
use of the sand blue ingot here also) and a few presents among which is a Lego
bag (sticker). The grandparents are sitting on 2 chair parts and there is a
lilac carpet. The grandfather has a neat torso with a printed scarf
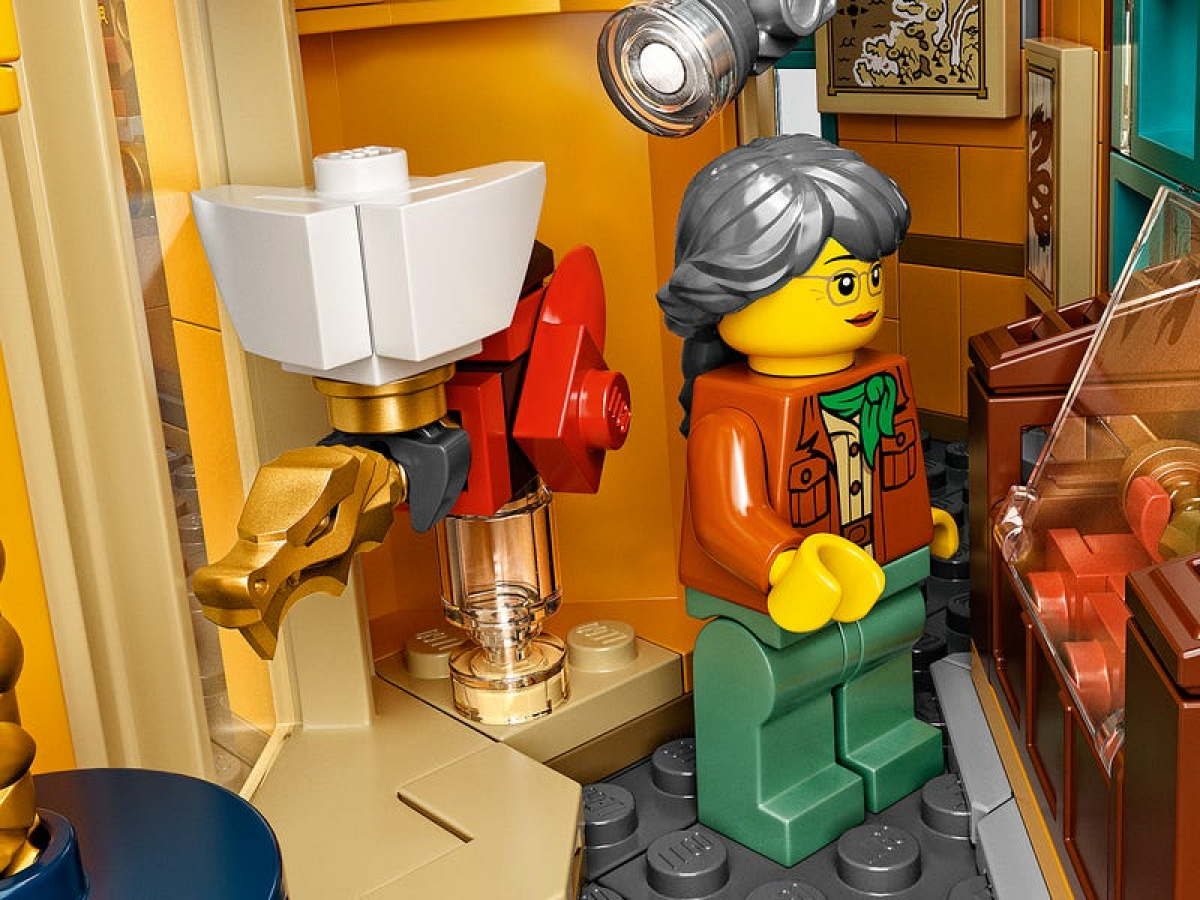
The God of Prosperity
The final scene depicts Choy San, the God OF Prosperity. The
figure has a new torso print and uses a sloped skirt piece to depict a robe.
This is also a new print in this set. The head has a wink and a smile. The scene
shows gold ingots and “yuanbao” (ancient Chinses ingots resembling a boat with
a lump in the middle) These are done using a gold hotdog bun with a gold stud,
there is also a large red pot. There is a printed lamp showing a tiger and a
printed 2×4 red tile as decoration.
Alternative display
There are some exposed studs on the top of the walls of each
scene which allows you to stack these in a pyramid format with 3 on the bottom,
2 on the next level and 1 on the top. The benefit of this is allowing all 6
scenes to be viewed without moving the display. I found this stacking methos to
be flimsy and not stable. If you chose to use this, you would need to build
some kind of support behind the display
Overall
This set is only found at LCS stores and retails for R 1 299.00, it consists of 1066 pieces and includes 12 minifigures. There is a lot of detail crammed into each scene and a few techniques you could use in other builds. The builds could be done by the whole family together. There is a good quantity and variety of minifigures which could also be used in other Lego displays. This will make a interesting display piece. I would recommend this set.
Reviewed by Chris McGee (SAFOLs Member, jhbLUG Member)
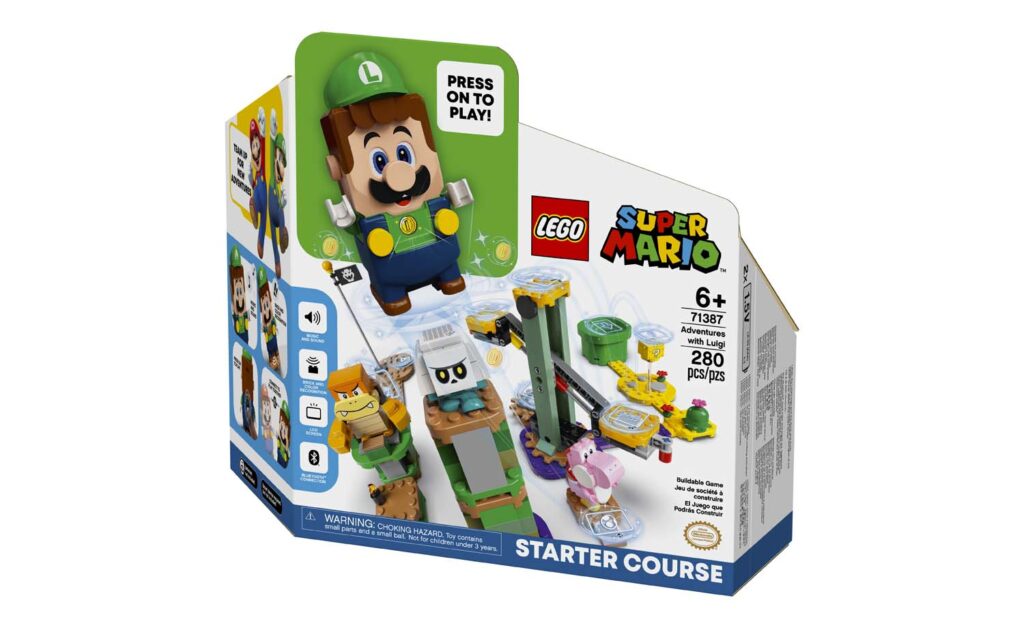
Introduction:
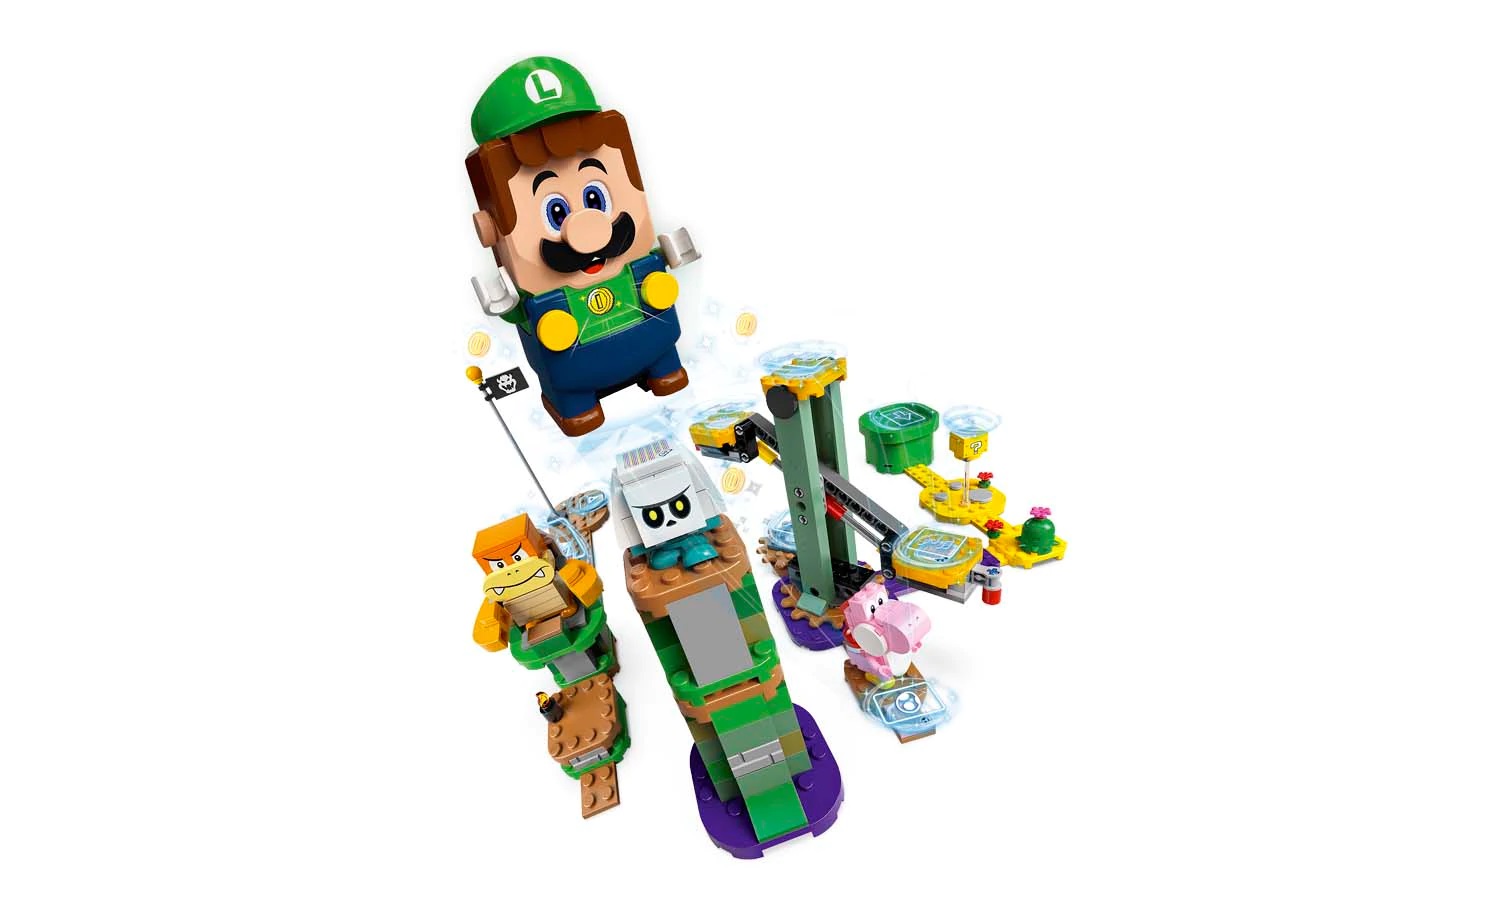
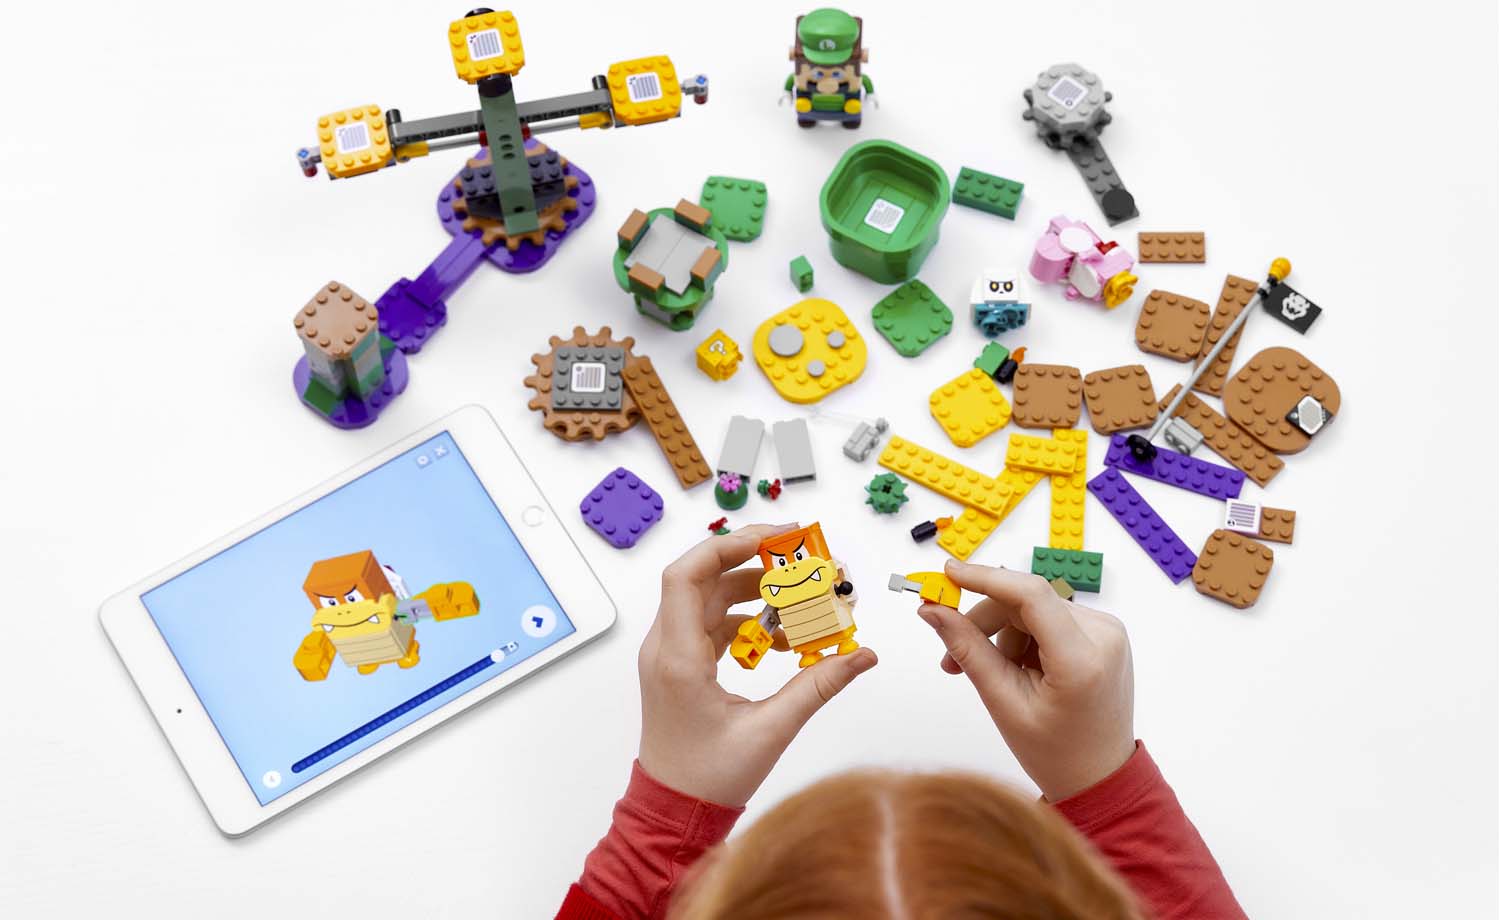
So it has been a while since my review of the Mario Starter Course set and a lot has happened, both in the theme and at LEGO® but seeing the Luigi starter course being released, I put it on the to-do list from a review perspective. Although I was positive about the Mario starter course, I was concerned about the longevity of the theme and the play system but with the introduction of the Luigi figure, it shows that the theme has had some legs on it. Also as a side note, I haven’t covered the mobile application in this review, but you can refer to the review of the Mario starter pack if you would like some insights.
The
Figure:
In my opinion, the Mario figure was one of the most creative technology items LEGO® has produced in recent history. With the likes of the augmented reality themes coming and going without much staying power, for LEGO® to bring out a new starter set, embracing the old technology as well as bringing in some new co-operative features shows a lot of positives towards the initial Mario starter set.
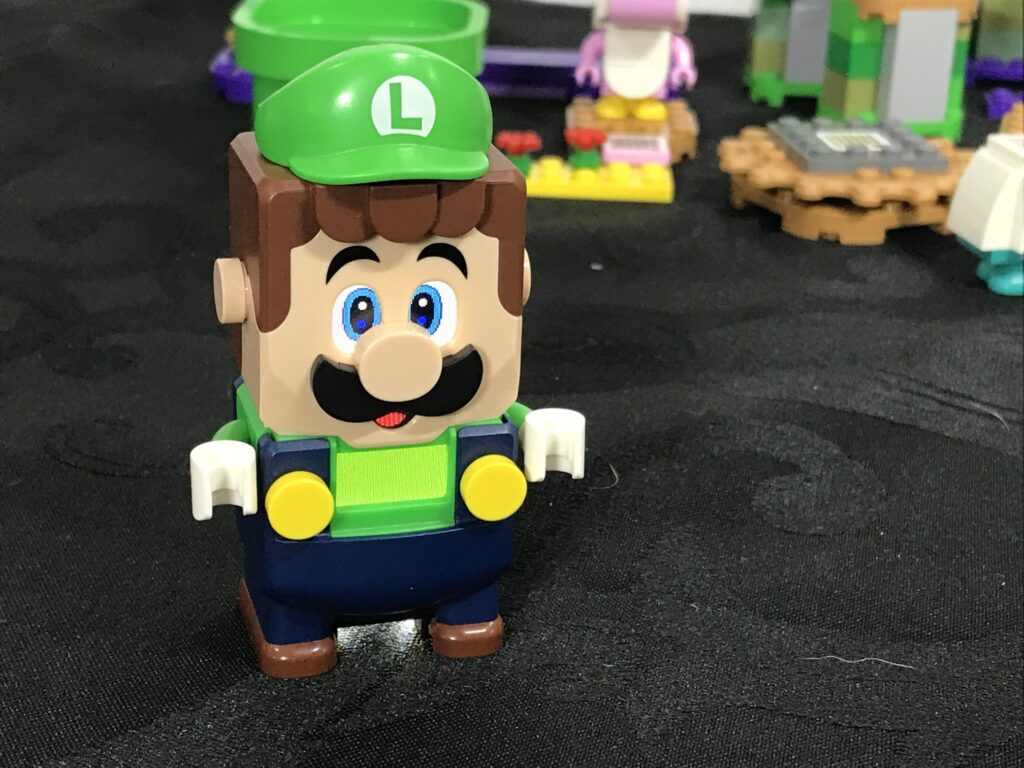
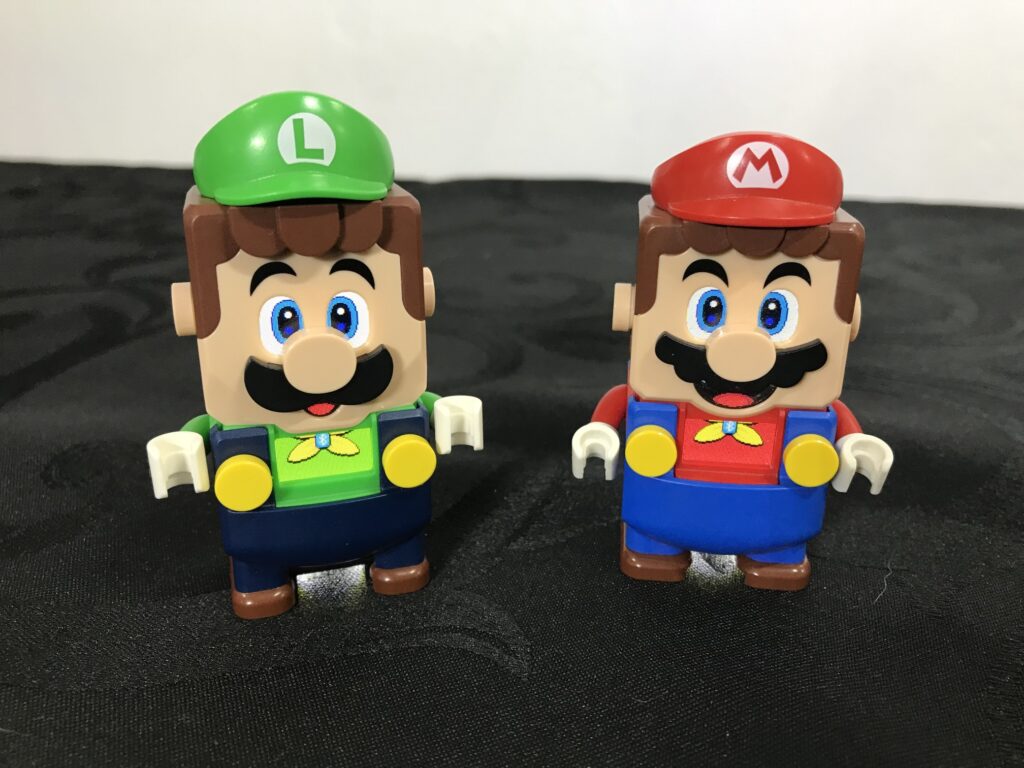
The Luigi figure itself is very similar to Mario,
having the same shape and ability to use the power up packs (suits and the
cap), although also being slightly taller and the features elongated to give
the impression that he is slenderer than Mario as reflected in the games. One
disappointment I had was that the printed “L” on the cap was printed slightly
off center, and hopefully is an isolated incident.
The functionality and usage of the figure remains the
same as the Mario and updates come through the mobile application which will
allows for the same functionality across both Luigi and Mario. One of the great
aspects though is that the voice as well as the recorded lines are different to
Mario giving you a semi-authentic play experience.
Best feature that has come with the Luigi introduction would have to be the new co-op feature. Essentially, you can use both Luigi and Mario in unison and actually play a 2-player game mode (Note: Mario figure not included in this set). The 2 figures can be paired using the Bluetooth functionality and now you can build a larger course or have multiple routes and play alongside your friend. A bonus to this is that Mario and Luigi also have talking points such as saying “Hi” to each other.
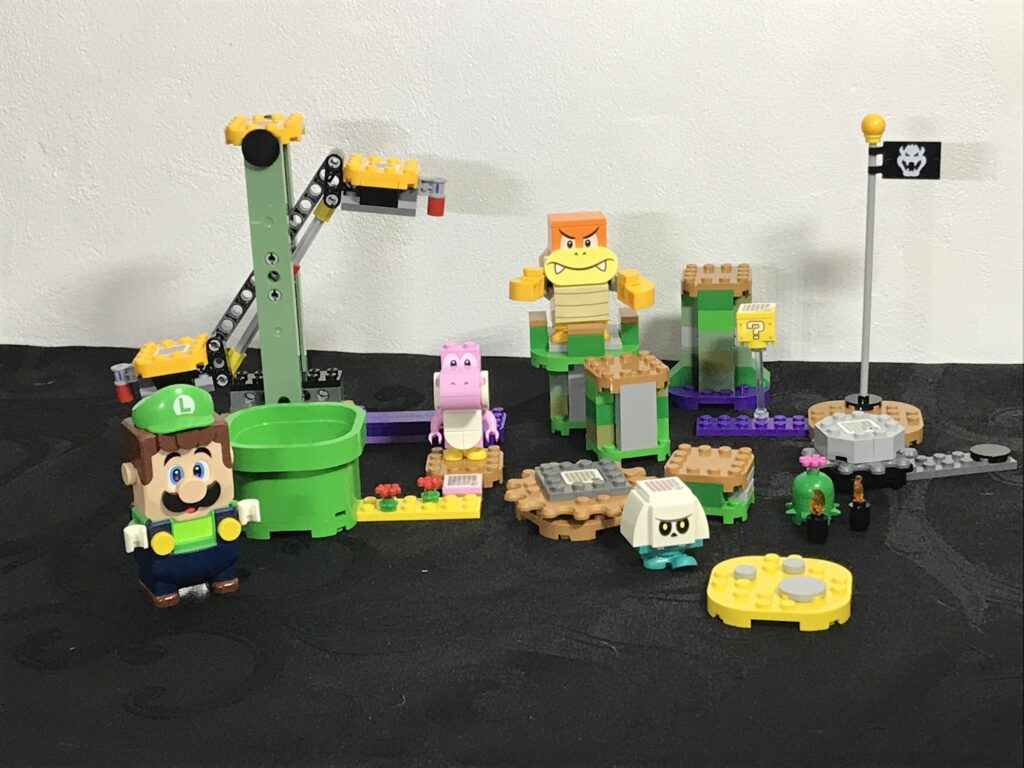
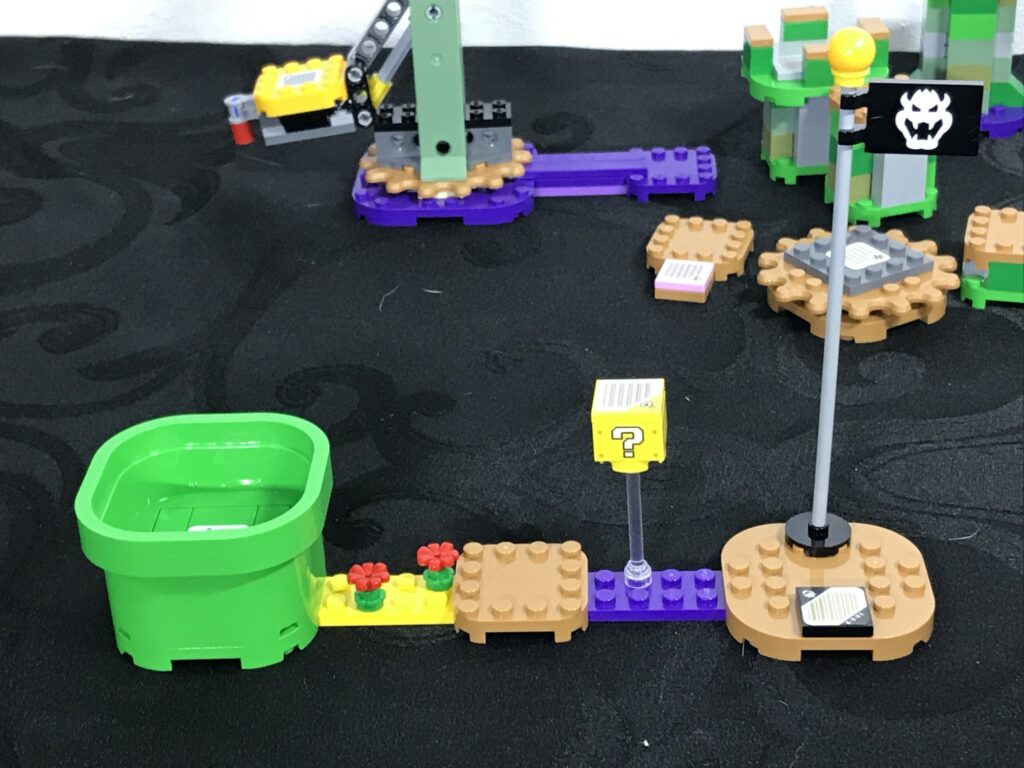
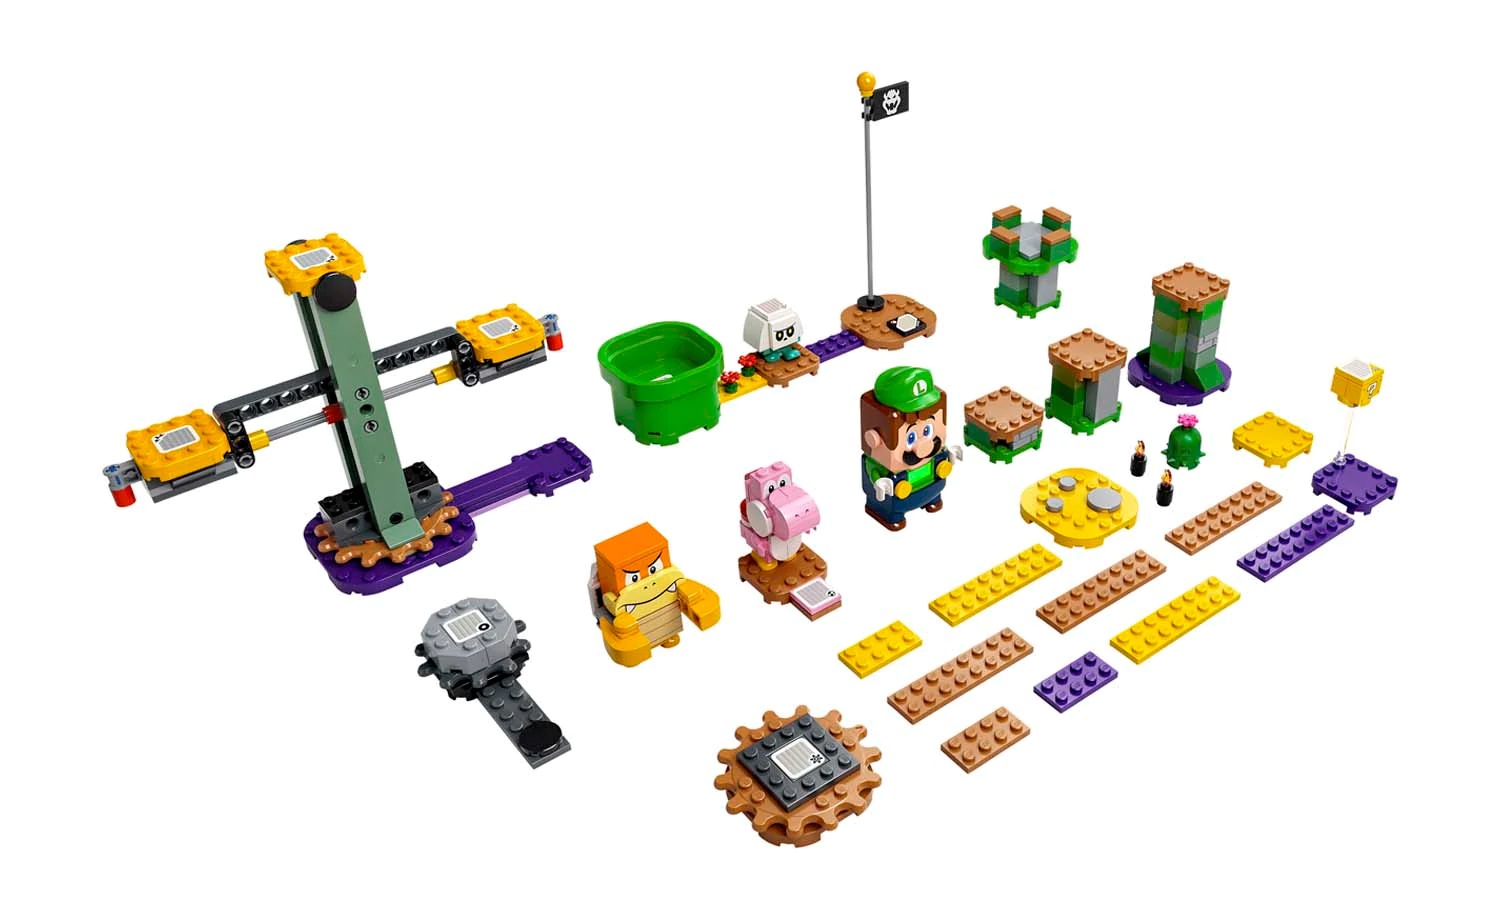
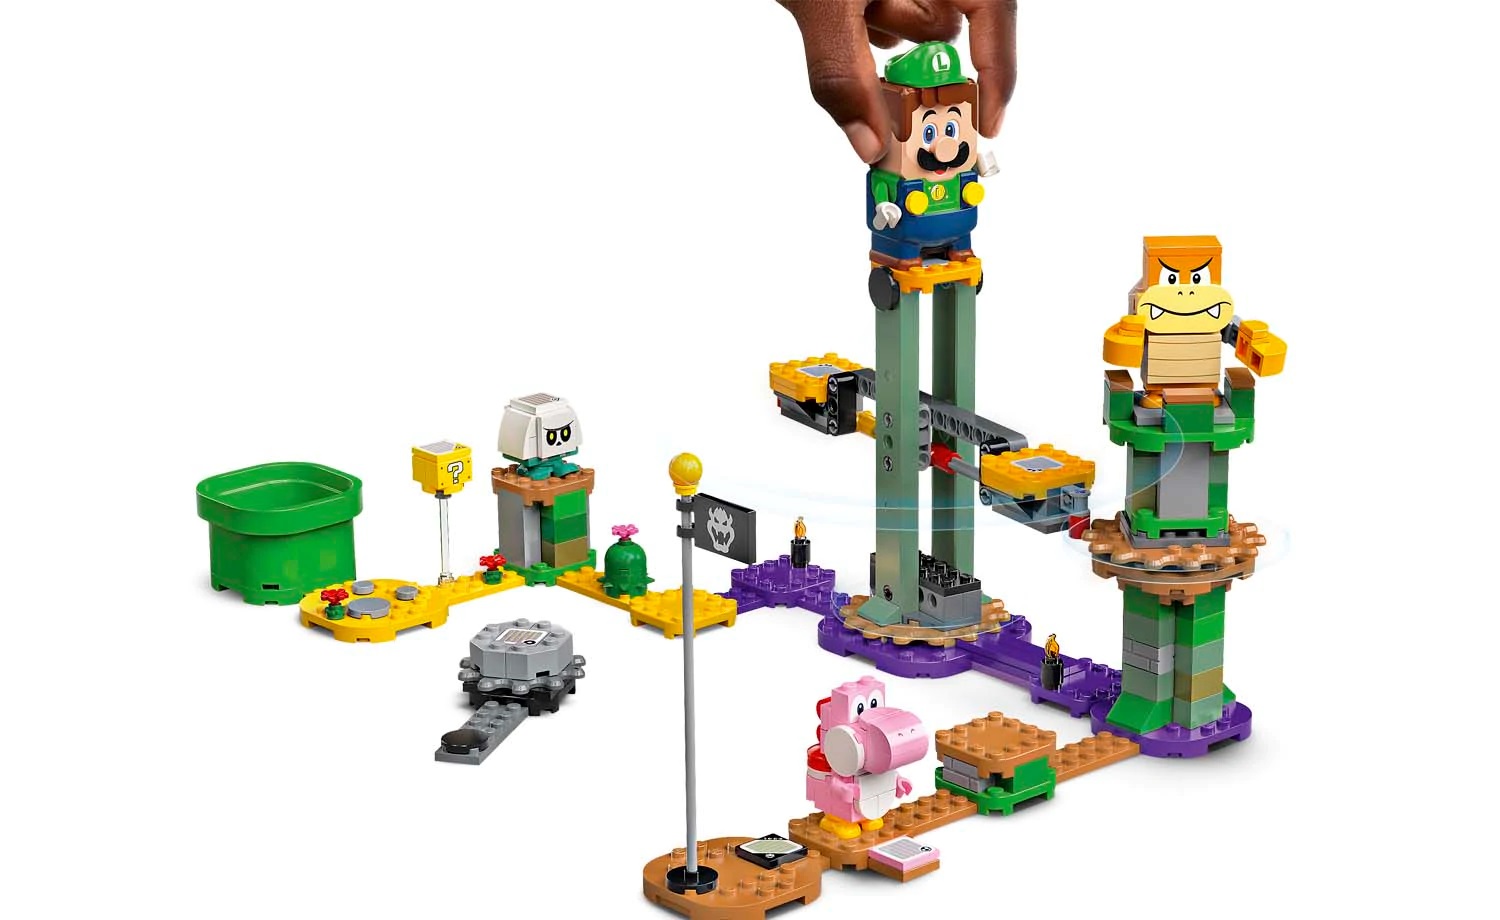
The Builds and Course:
So I noticed when building the set, that a large portion of builds were made to be more geared towards the course building system versus focusing on small modules, rather than the original Mario starter set which did try and guide the course a bit more.
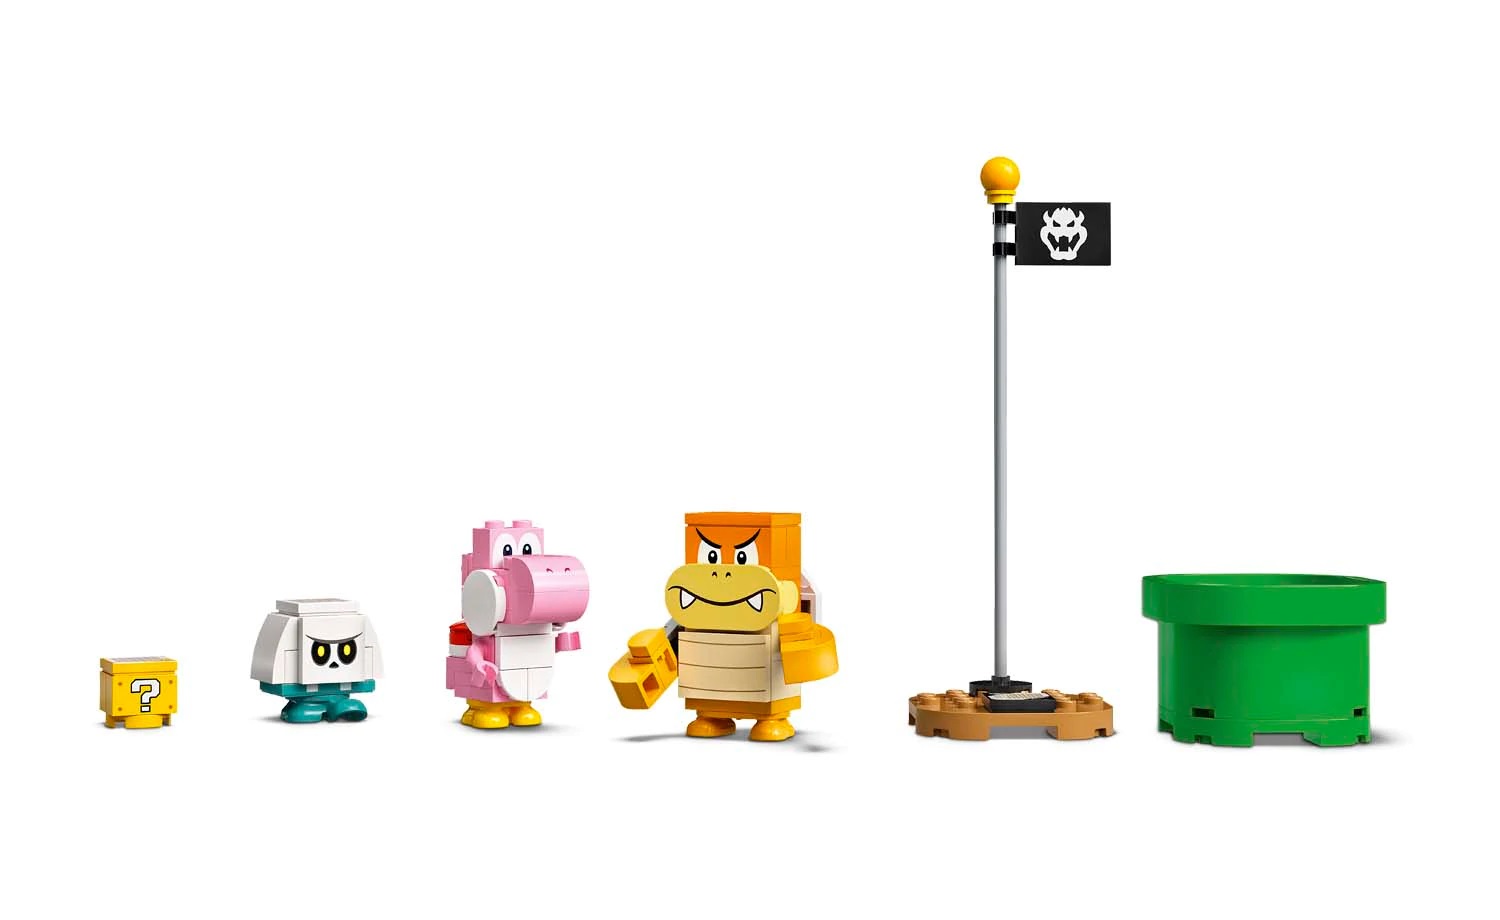
The set also comes with extra plates for joining the different platforms and does allow for more intuitive creativity in the play and course building. It does also come with the starting pipe as well as the end flag which seem to be almost identical to the original starter set which I feel should be the case given this is also meant to be a starter course, and the inclusion of a single question mark block is a handy addition.
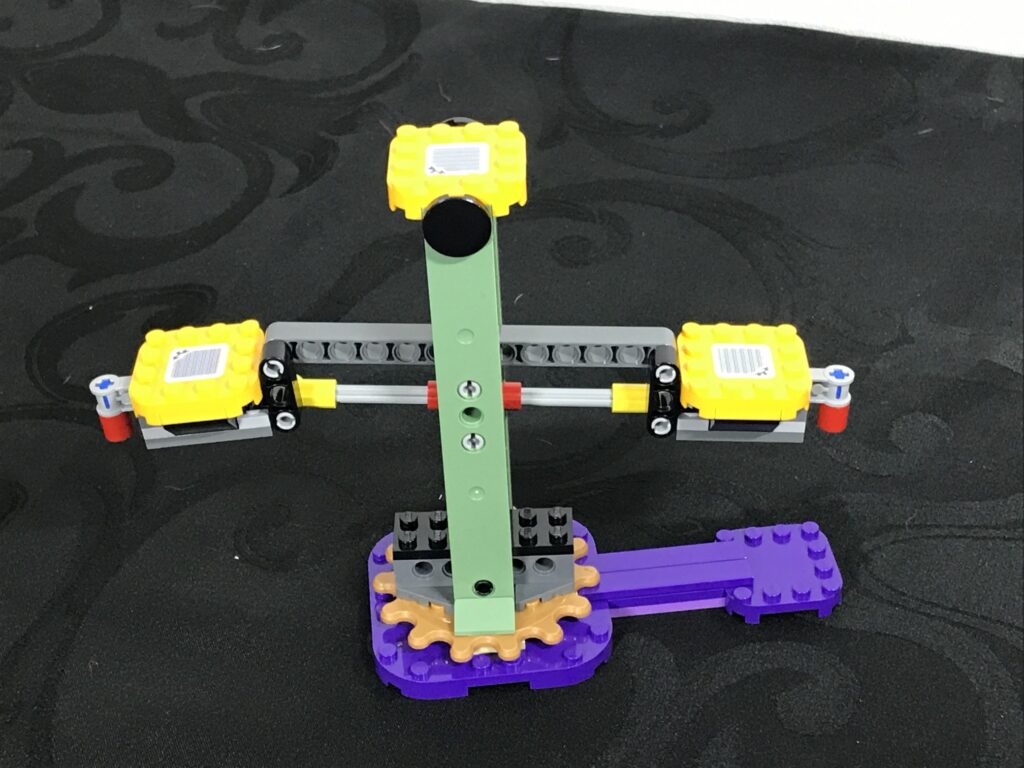
The core play function in the set comes from the inclusion of 3 characters and a rotatable see-saw build which is quite interesting.
The use of the “splat” gear modified plates which come
in the separate platforms allows you to spin your Luigi (or Mario) to earn
coins, but then also connect to and spin the rotating see-saw. You can also use
the figure on the see-saw itself and earn coins by bouncing from either side.
However, this was clearly built to be done in a co-op mode with 2 of the
figures playing in tandem effectively teetering from side to side on the
see-saw, or one figure spinning the platform and another figure busy on the
see-saw. Playing in co-op with this build was a lot of fun trying to maximise
the coin collecting.
The Characters:
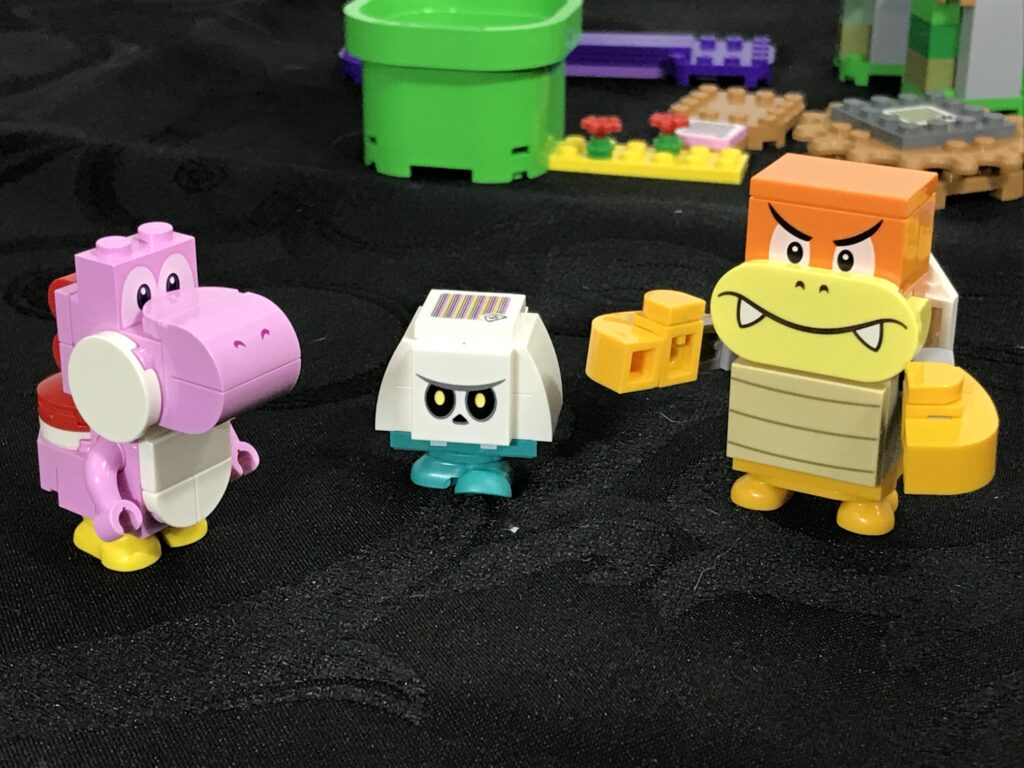
Alongside Luigi, the set includes a Pink Yoshi, as well as 2 enemies to battle, being a Bone Gumba (in a walking pose) and Boom Boom, one of the many koopalings.
I am appreciative of the inclusion of the Pink Yoshi here as the original starter set did lack some additional aspects to the interactions available. It is a solid build although pretty much the same as the Green Yoshi which has been available from the first wave of sets. The printing of the eyes could have been more opaque though. The Boom Boom is a welcome inclusion and is a well thought out build giving the right shaping of the head and fists as well as nicely articulable arms using the mini-ball joints. The Bone Gumba is also very welcome since we did see more (and probably too many) regular Gumbas in previous sets.
I have heard of people who don’t enjoy the brick-built
characters and would have preferred new moulds, and it is the same debate which
happens with the different dinosaurs that LEGO® release. I can see that side of
the argument, but for me, these brick-built versions really do give a great
aesthetic to the course building system, and I do think that the designers have
done a good job with them.
The Verdict:
This is a better value starter set with some extra
interaction, an additional character when compared with the original with an
additional 50 pieces and 280 pieces in total versus 230 pieces. The cost of the
set is clearly down to the Luigi figure as the technology factor influences.
However, as I said in the prior review, the technology really is great and
worth the price of admission in the set.
But I am not sure if getting this set alongside the original version (if you have it) would be needed. If you are like me and need the Luigi to be alongside Mario and enjoy the new co-op features then the set more than attends to your needs and ticked all of my personal boxes (with some annoyances on production quality as mentioned through the review) But if you are happy with Mario or are not a fan of the course building system of play or fairly simplistic builds, it may be just more of the same…
Released October
1 2021, this set includes 1,074 pieces.
The Gig
Just about all sets released under the LEGO® Ideas banner come from fan
designers uploading their creations and getting 10,000 votes. In recent years,
contests have offered a unique way to gather fan-created content. After a few
smaller projects have been transformed into GWPs (gifts with purchase), this set
is the first to be released after being featured in a LEGO® Ideas Contest. Back
in 2020 LEGO® Ideas ran the ‘Music to Our Ears’ contest. This contest required
fans to create a music-themed build. Fans could vote for their favourites as
well as the possibility of one of the finalists becoming a future LEGO® set.
One such entry was the legendary Fender Stratocaster project designed by
Slovakian fan designer Tomáš Letenay. It did not win one of the contest’s top
prizes however was chosen to become the 37th LEGO® Ideas set.
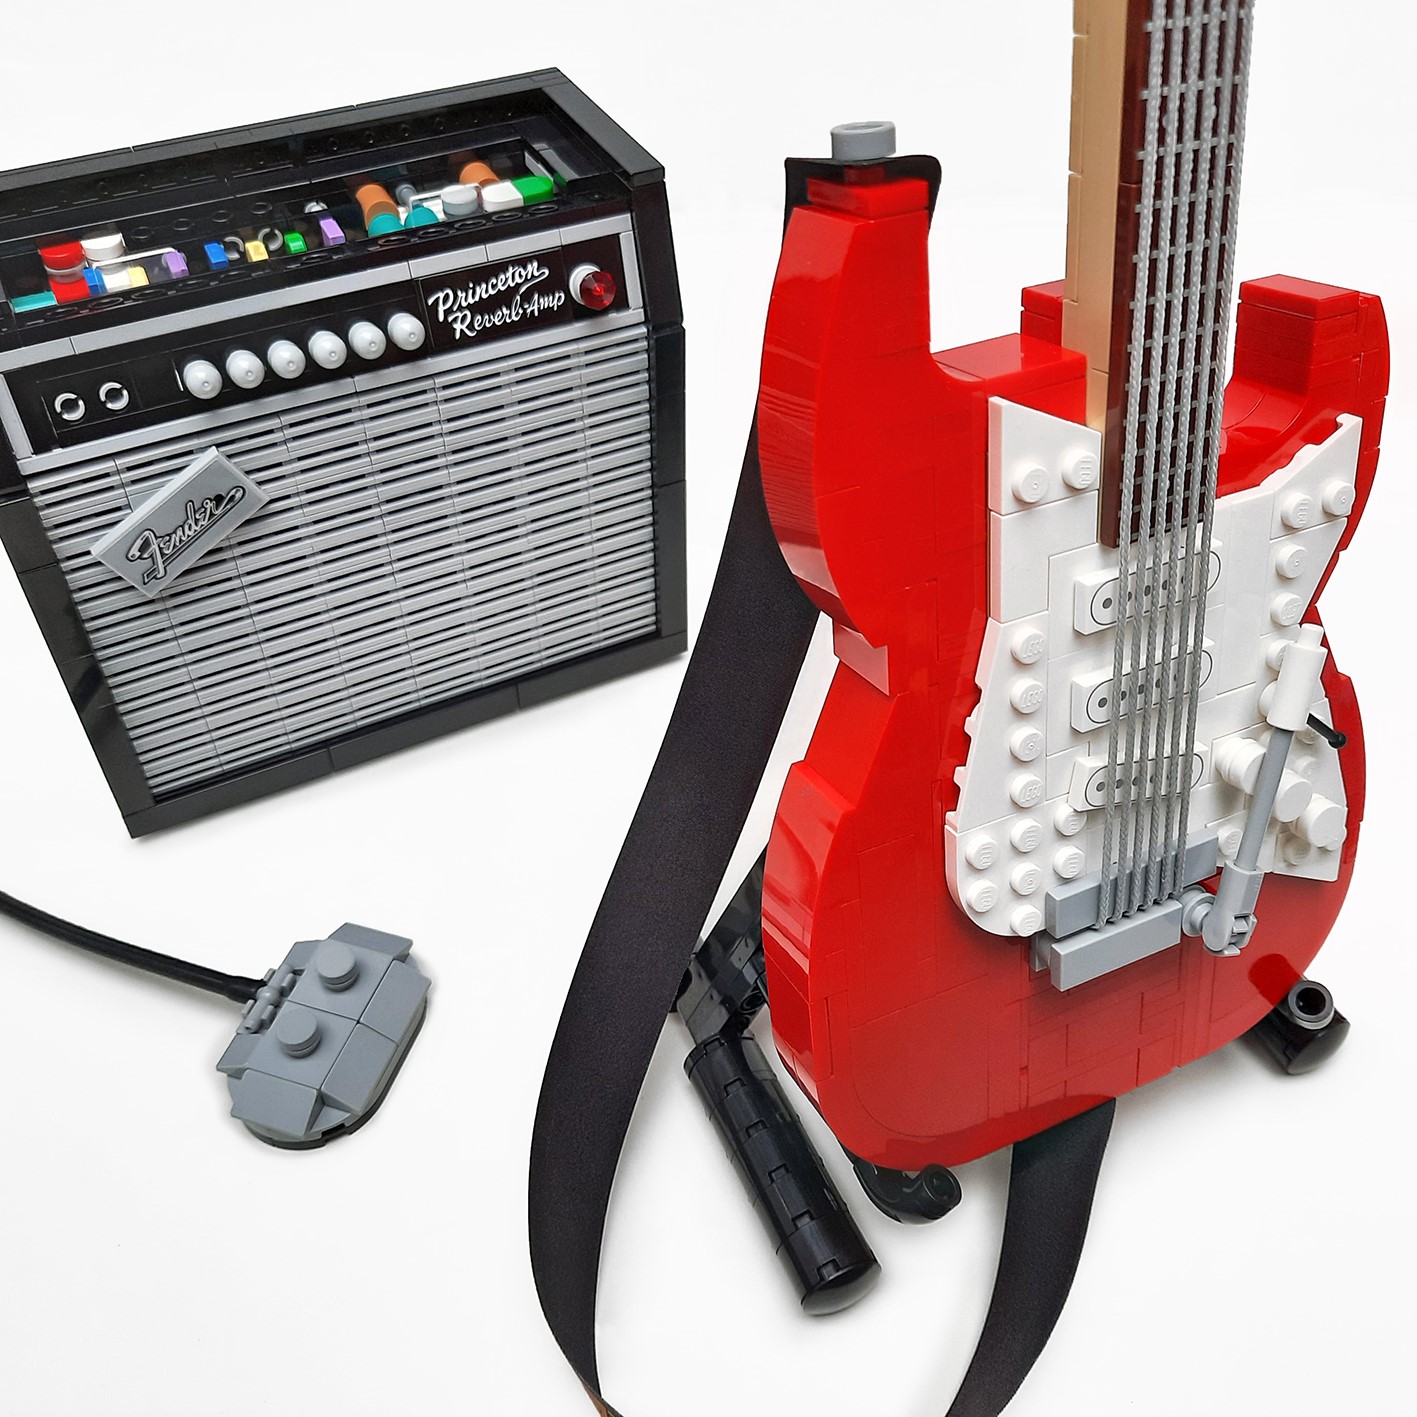
The Fender Stratocaster was created back in 1952 and became an instant classic, everybody needed a ‘Strat’. Known for its distinctive shape, double cutaway, extended horn and contoured back, the timeless design has led to nearly 60 years of market dominance for the Stratocaster – and that’s exactly the kind of legacy that makes it a perfect fit for the LEGO® Group, particularly the +18 Adult theme.
The Good, the Bad and
the Build
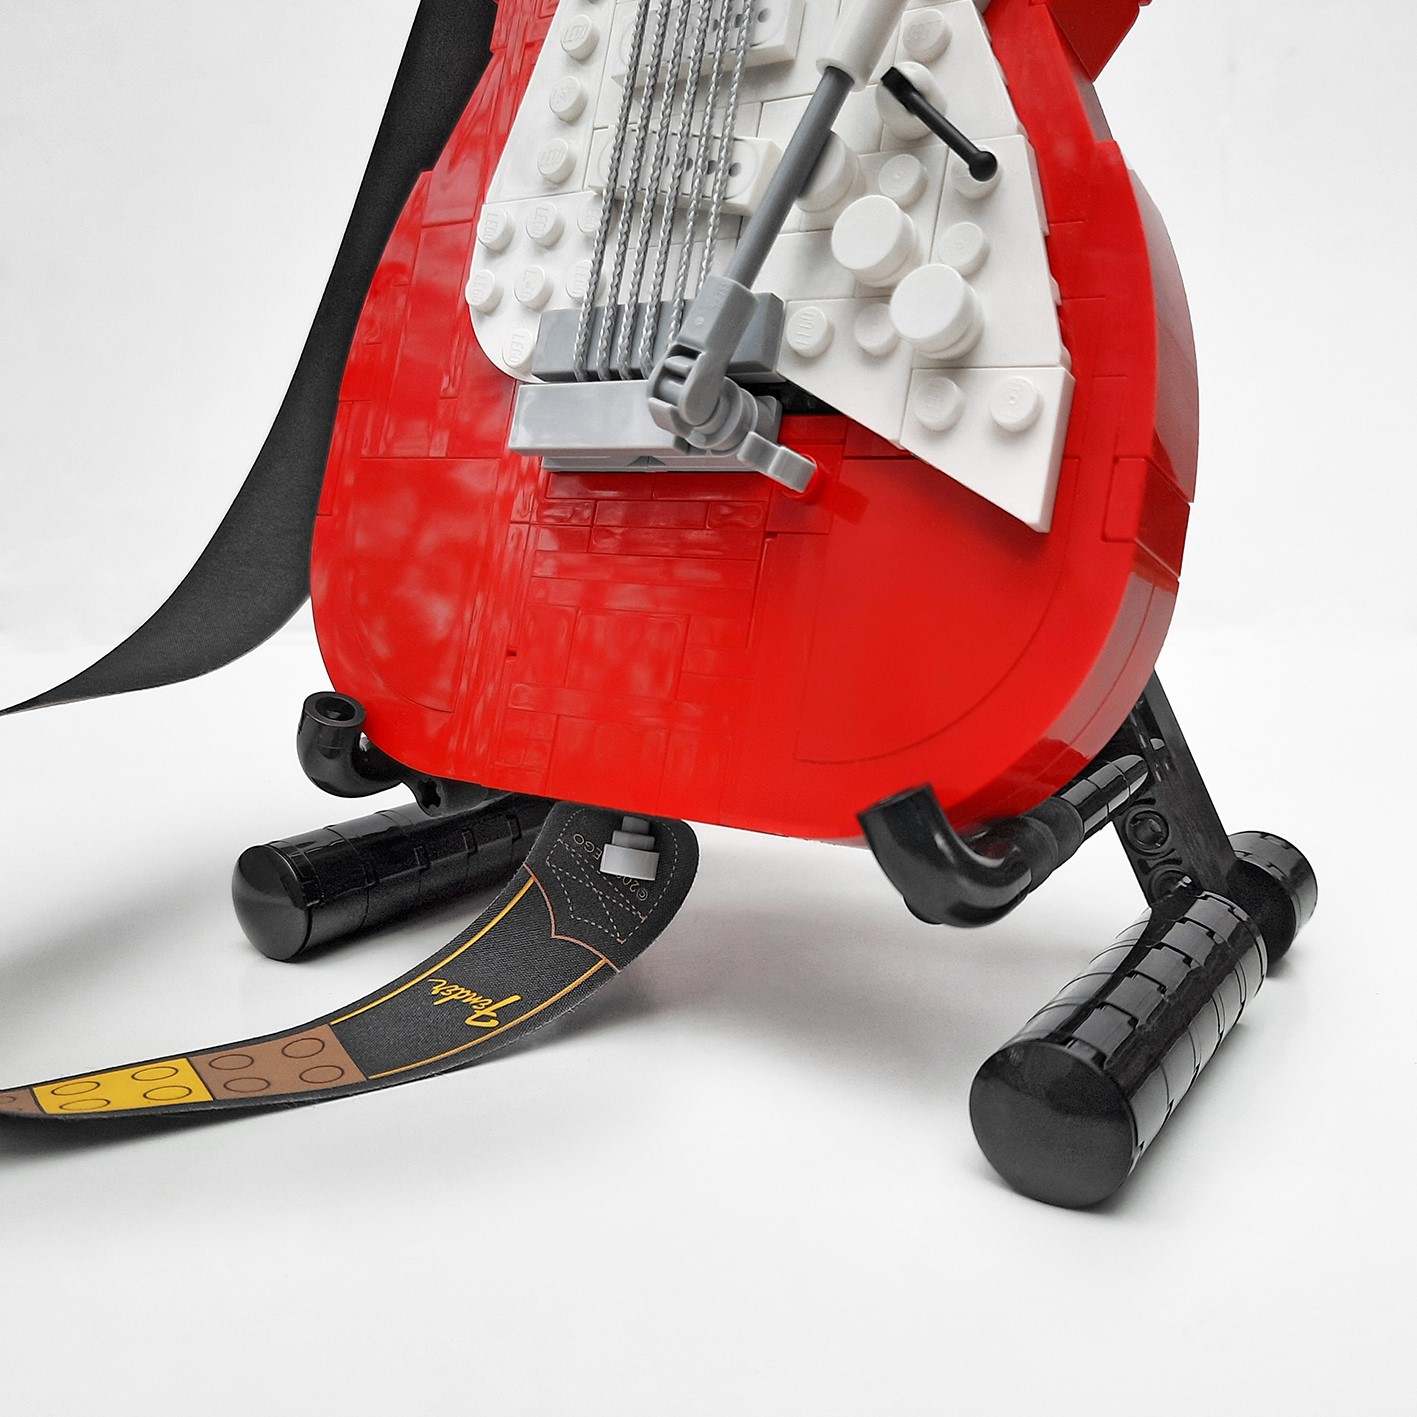
The set consists of a guitar, foldable display stand, amplifier and foot pedal
which comes in twelve numbered bags.
The first eight numbered bags contain the parts for the guitar, and the rest
are for the amplifier.
The instructions
booklet also includes some neat extra content including the history of the
Stratocaster and the fan designer behind the set’s original concept.
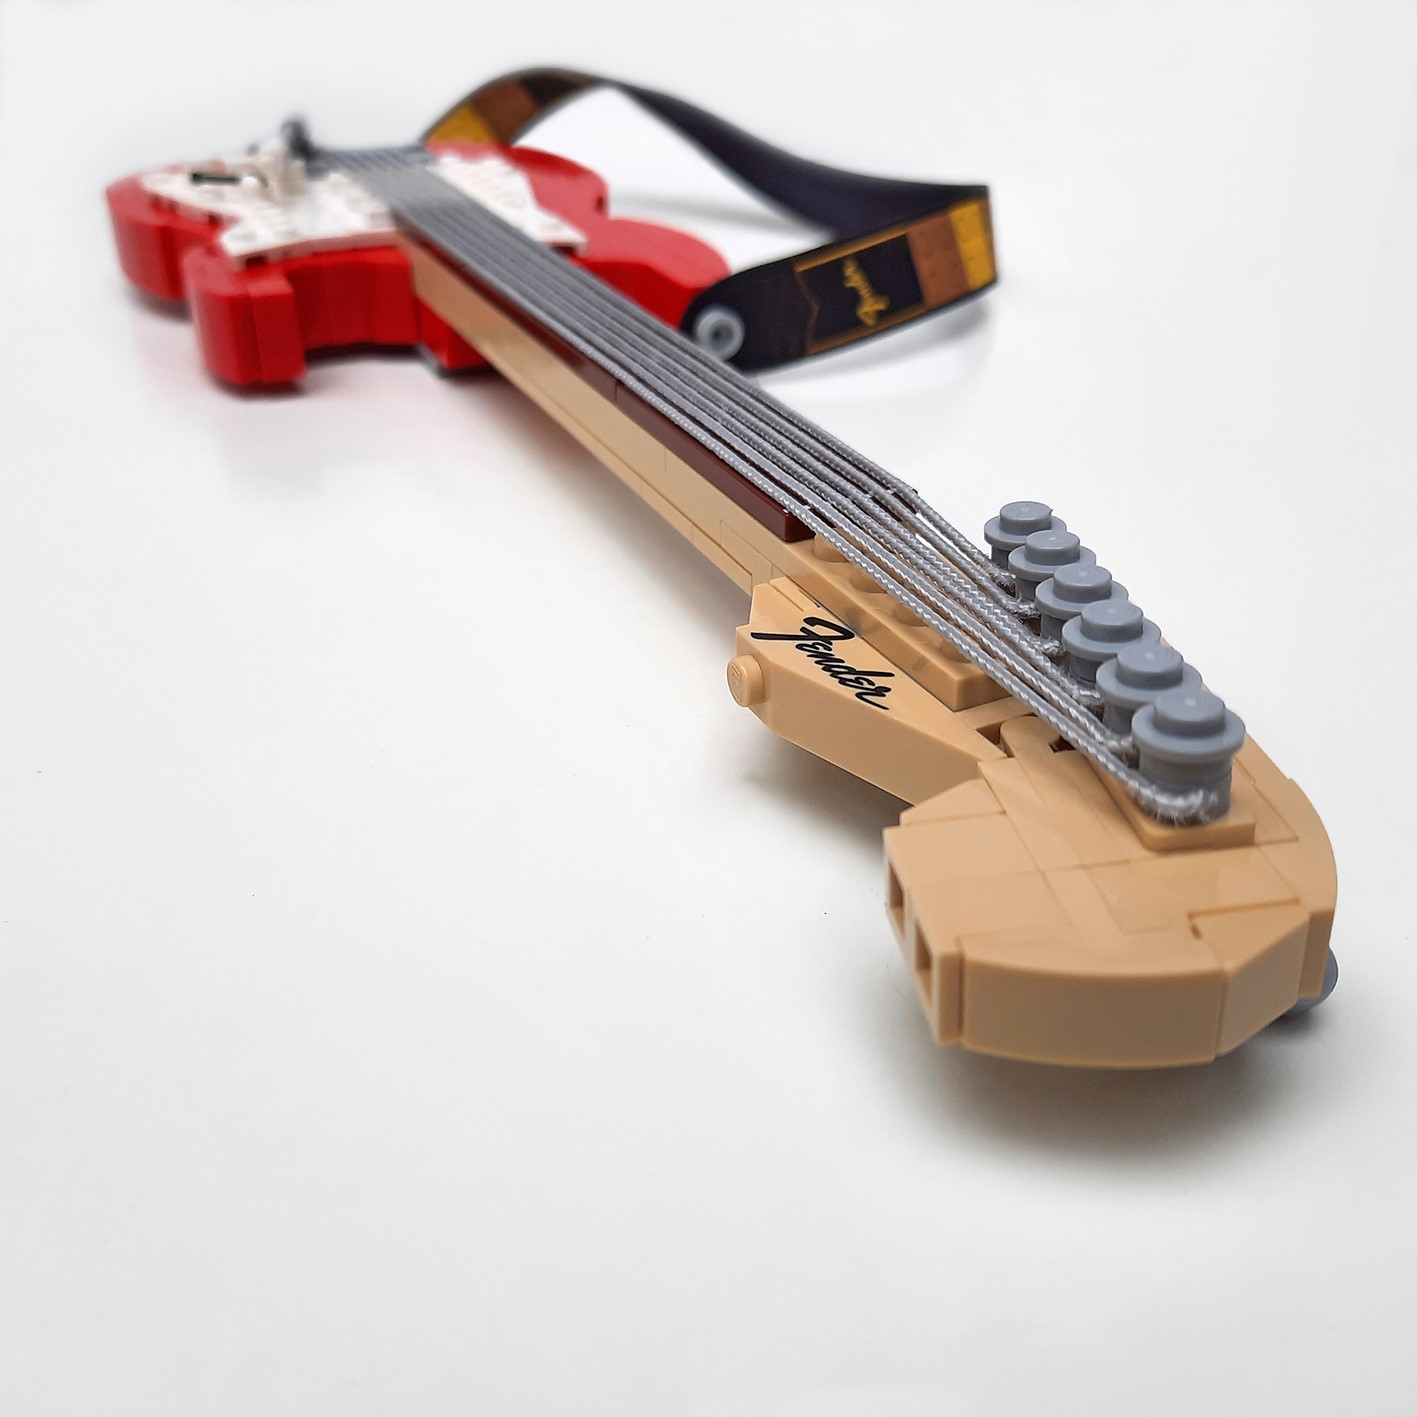
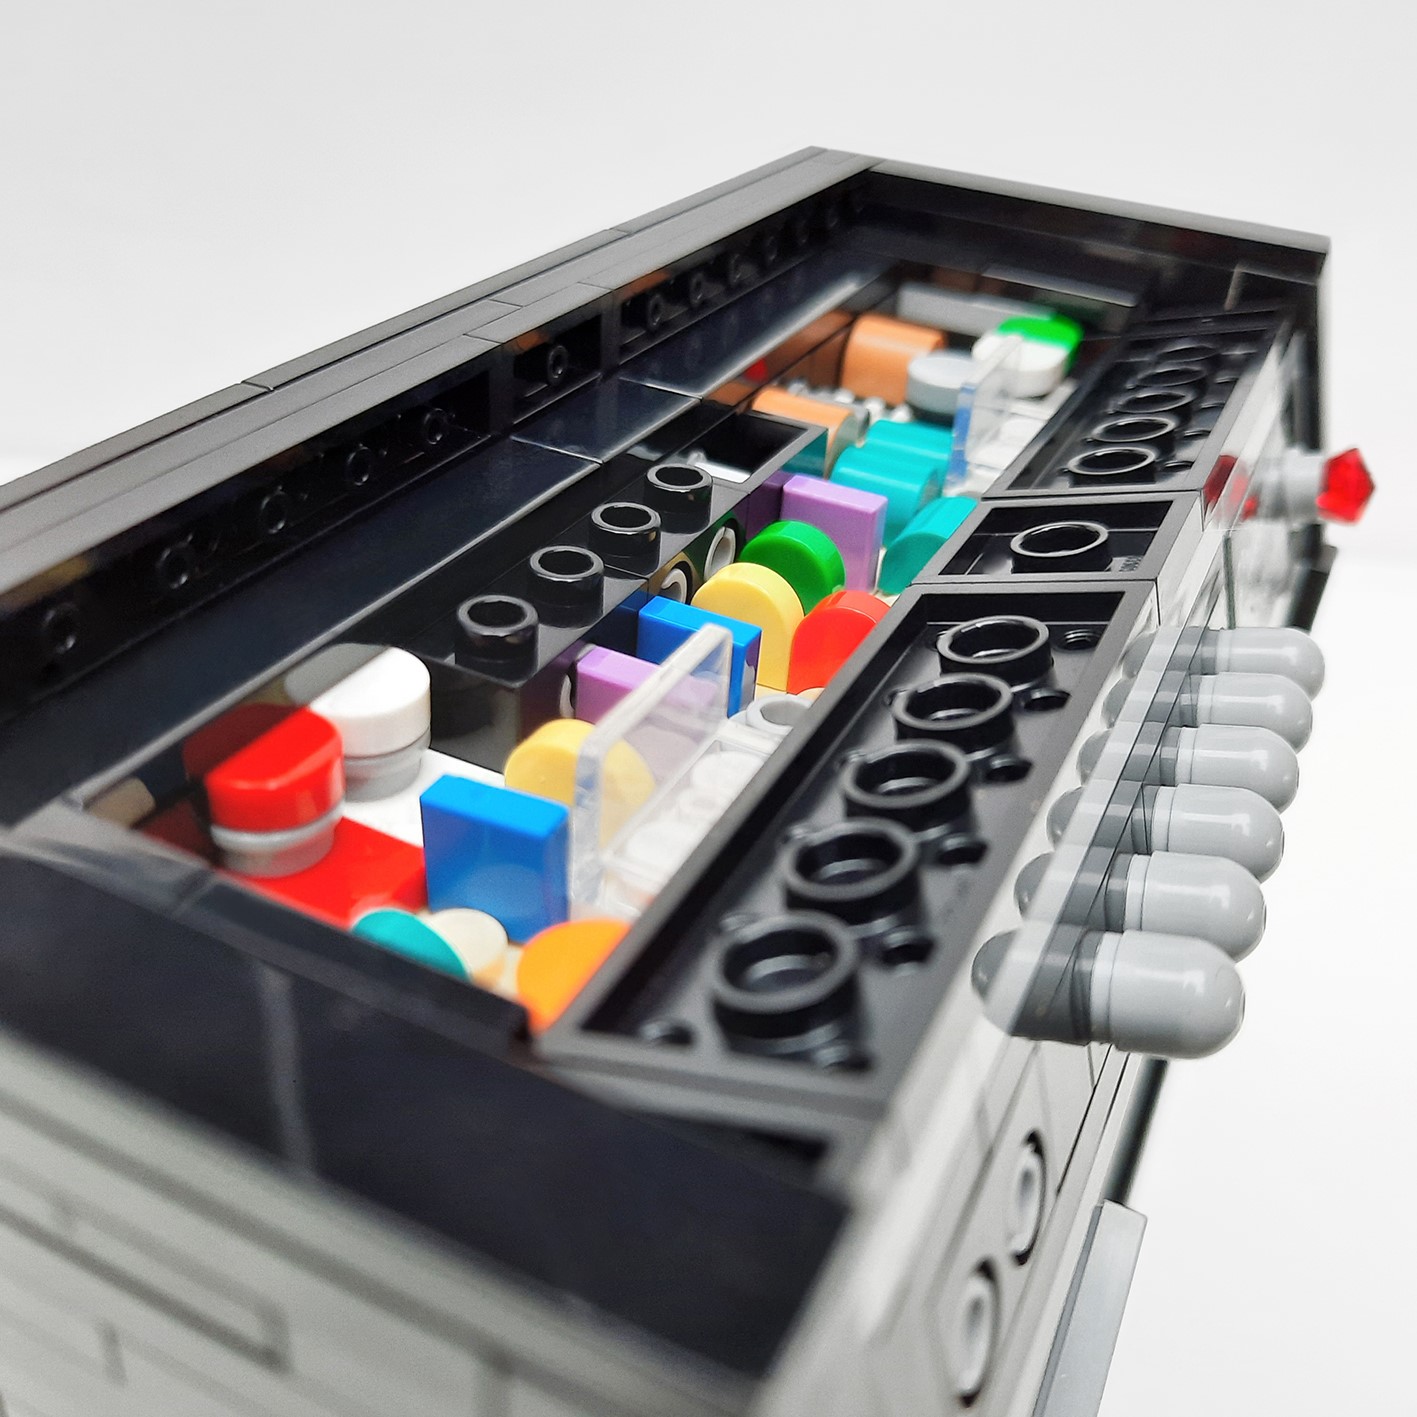
You start by constructing the neck and fretboard of the instrument. There are 6
strings included in the build that aren’t normally offered in such a long
length and they each have a coloured stud attached to them. Once correctly
placed in position, these are then removed. This visual marker is a simple yet
helpful way to ensure the strings are placed in the right formation. Once they
are, you are required to twist them counterclockwise in order to tighten them.
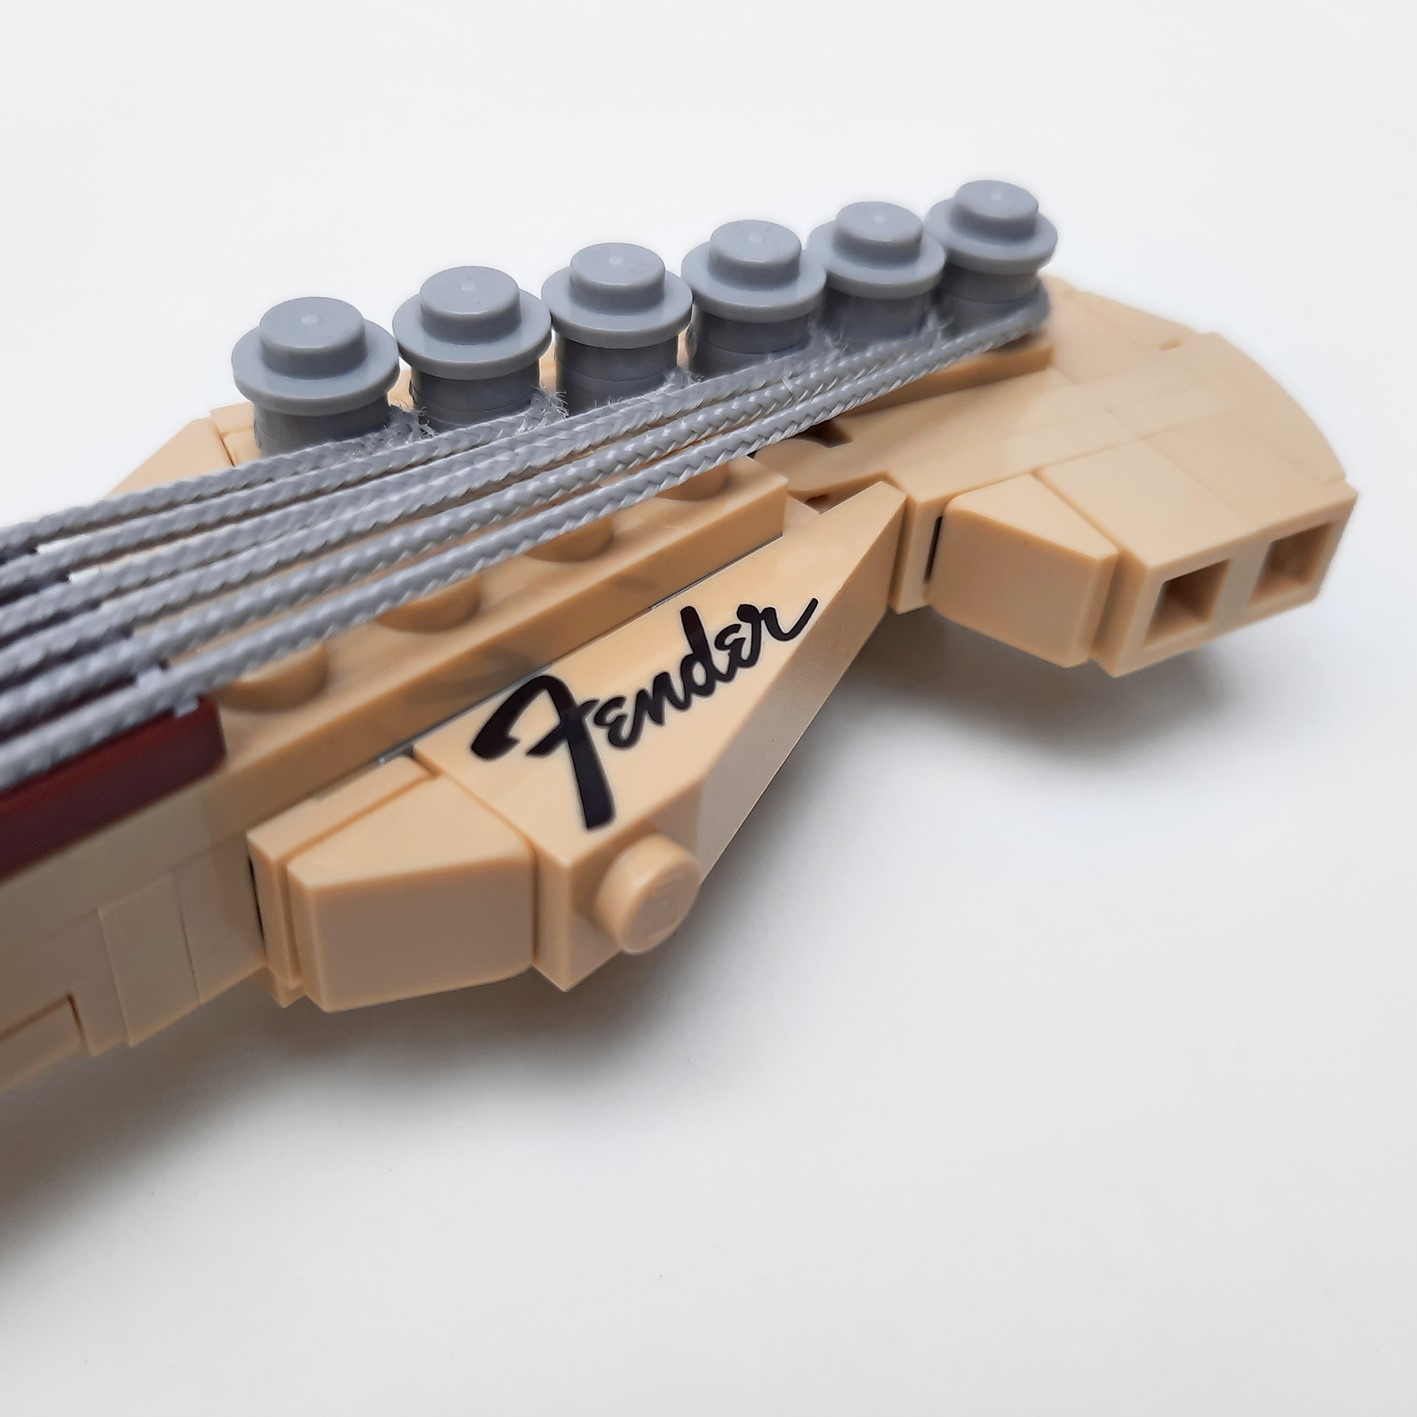
The unique fretboard tiles are really cool and make it possible for MOC
builders to now create some other brand guitars. The 1×1 corner tiles supplied
for 4 different picks are also a nice touch.
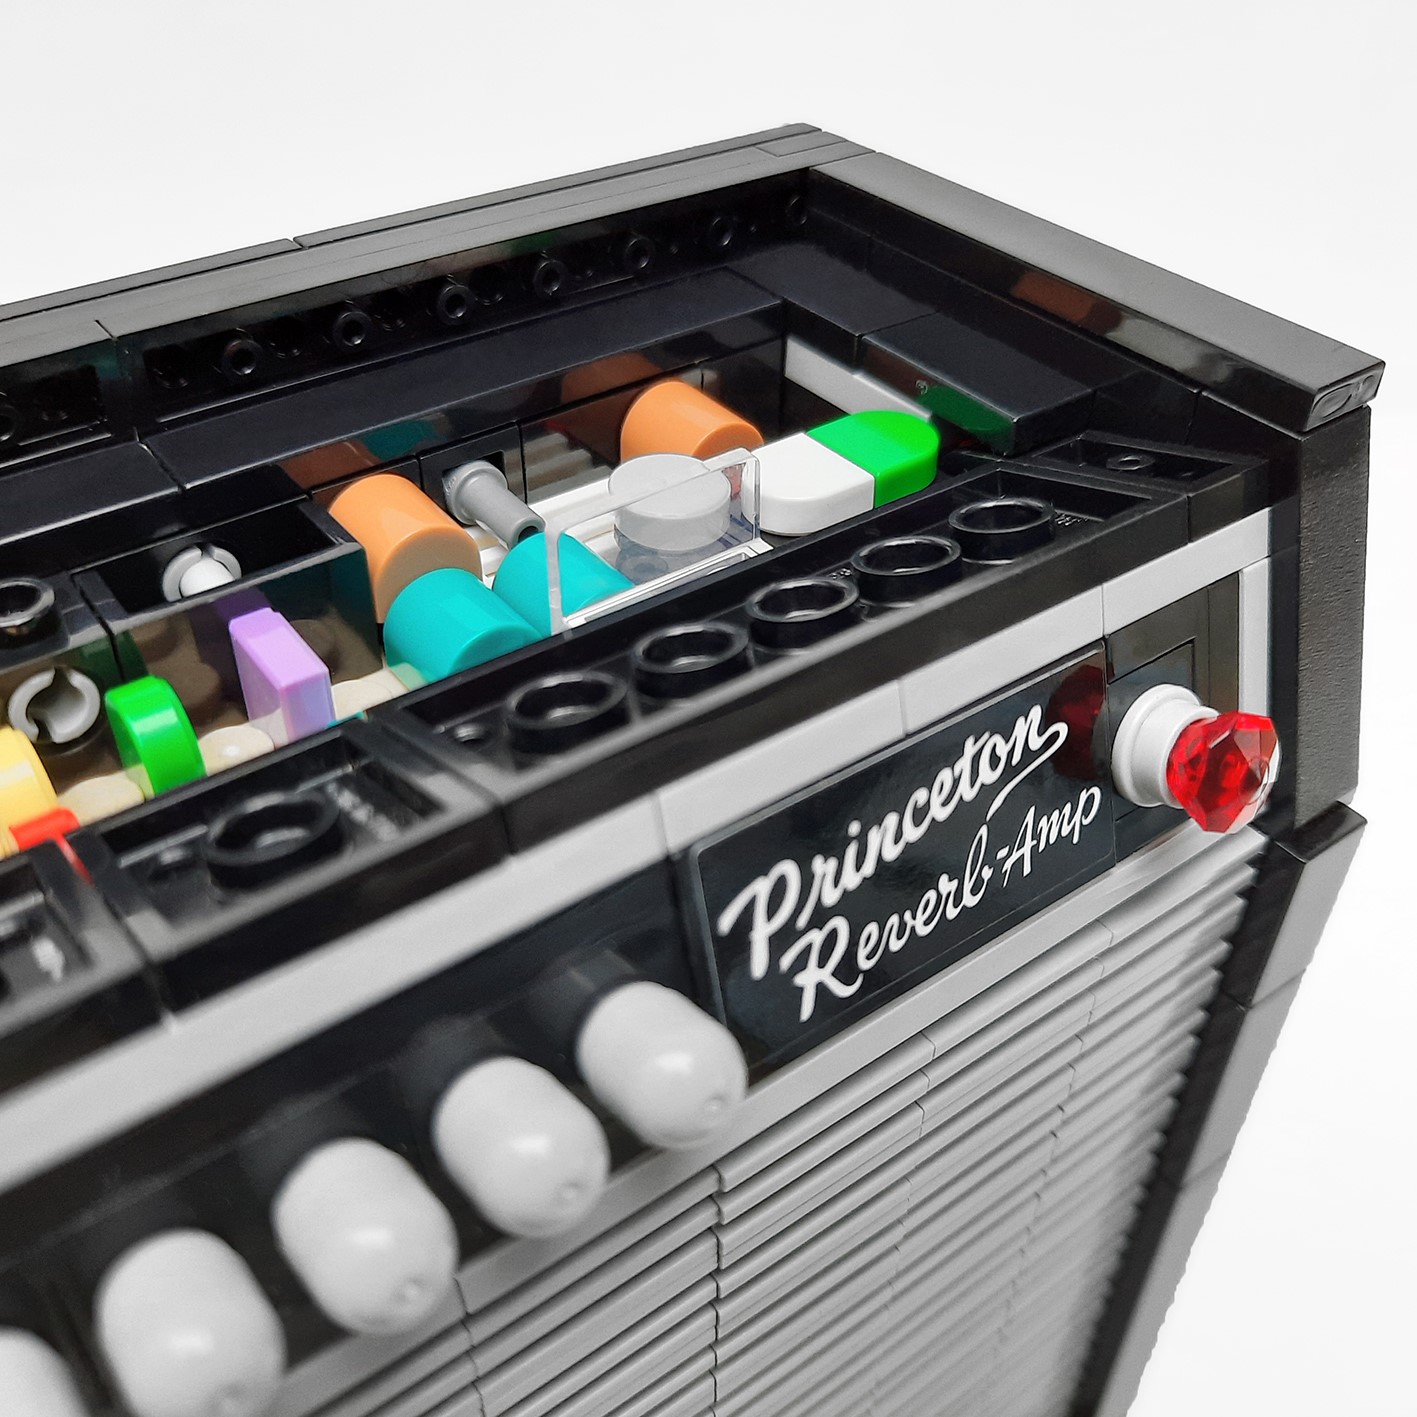
The headstock looks
somewhat close to the real thing, but the connector piece makes it look a bit
crappy and the tuning keys and bridge in silver would have been a real bonus.
The printed Fender logo could also have been a fraction smaller just so it
doesn’t freak out my semi-OCD mind.
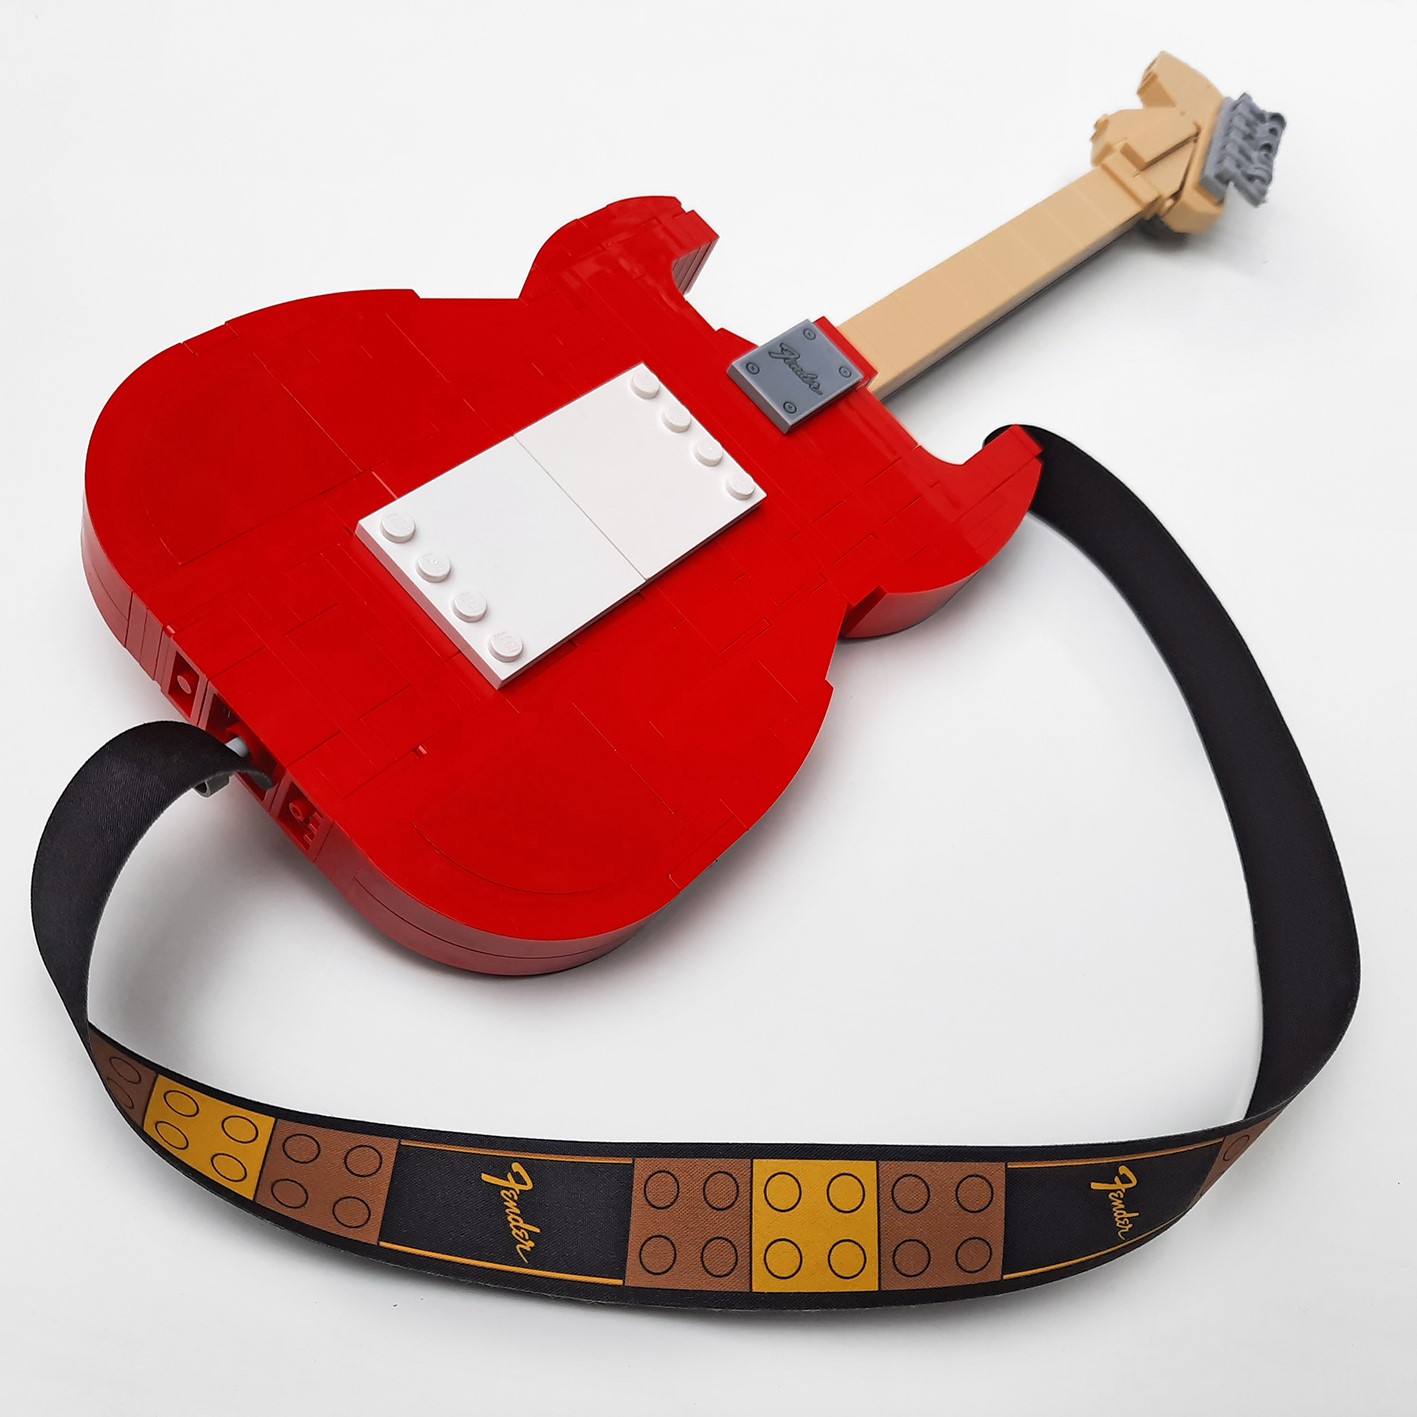
The guitar can be built in red or black and I chose the red version to build
first as that is what is shown as the main image on the box, and I personally
find the red ‘Strat’ more iconic.
The body of the guitar uses various sideways building techniques using slopes to recreate the curves. The top curves are unfortunately not as smooth as have been achieved on the bottom of the guitar shape. The result is that swapping between the two colour ways isn’t all that simple. You can’t just cleanly detach the black body and attach a red sub-assembly as the official images suggest; thanks to the way the strings are integrated into the bottom of the pick guard and the body, you’ll have to pry apart chunks of the guitar if you fancy a change. The volume and tone knobs could have been detailed whether printed or with stickers. LEGO® have printed tons of random 1×1 round tiles… Oh yes, the stickers… there are a few nice ones to apply, one for the back of the guitar and three for the amp.
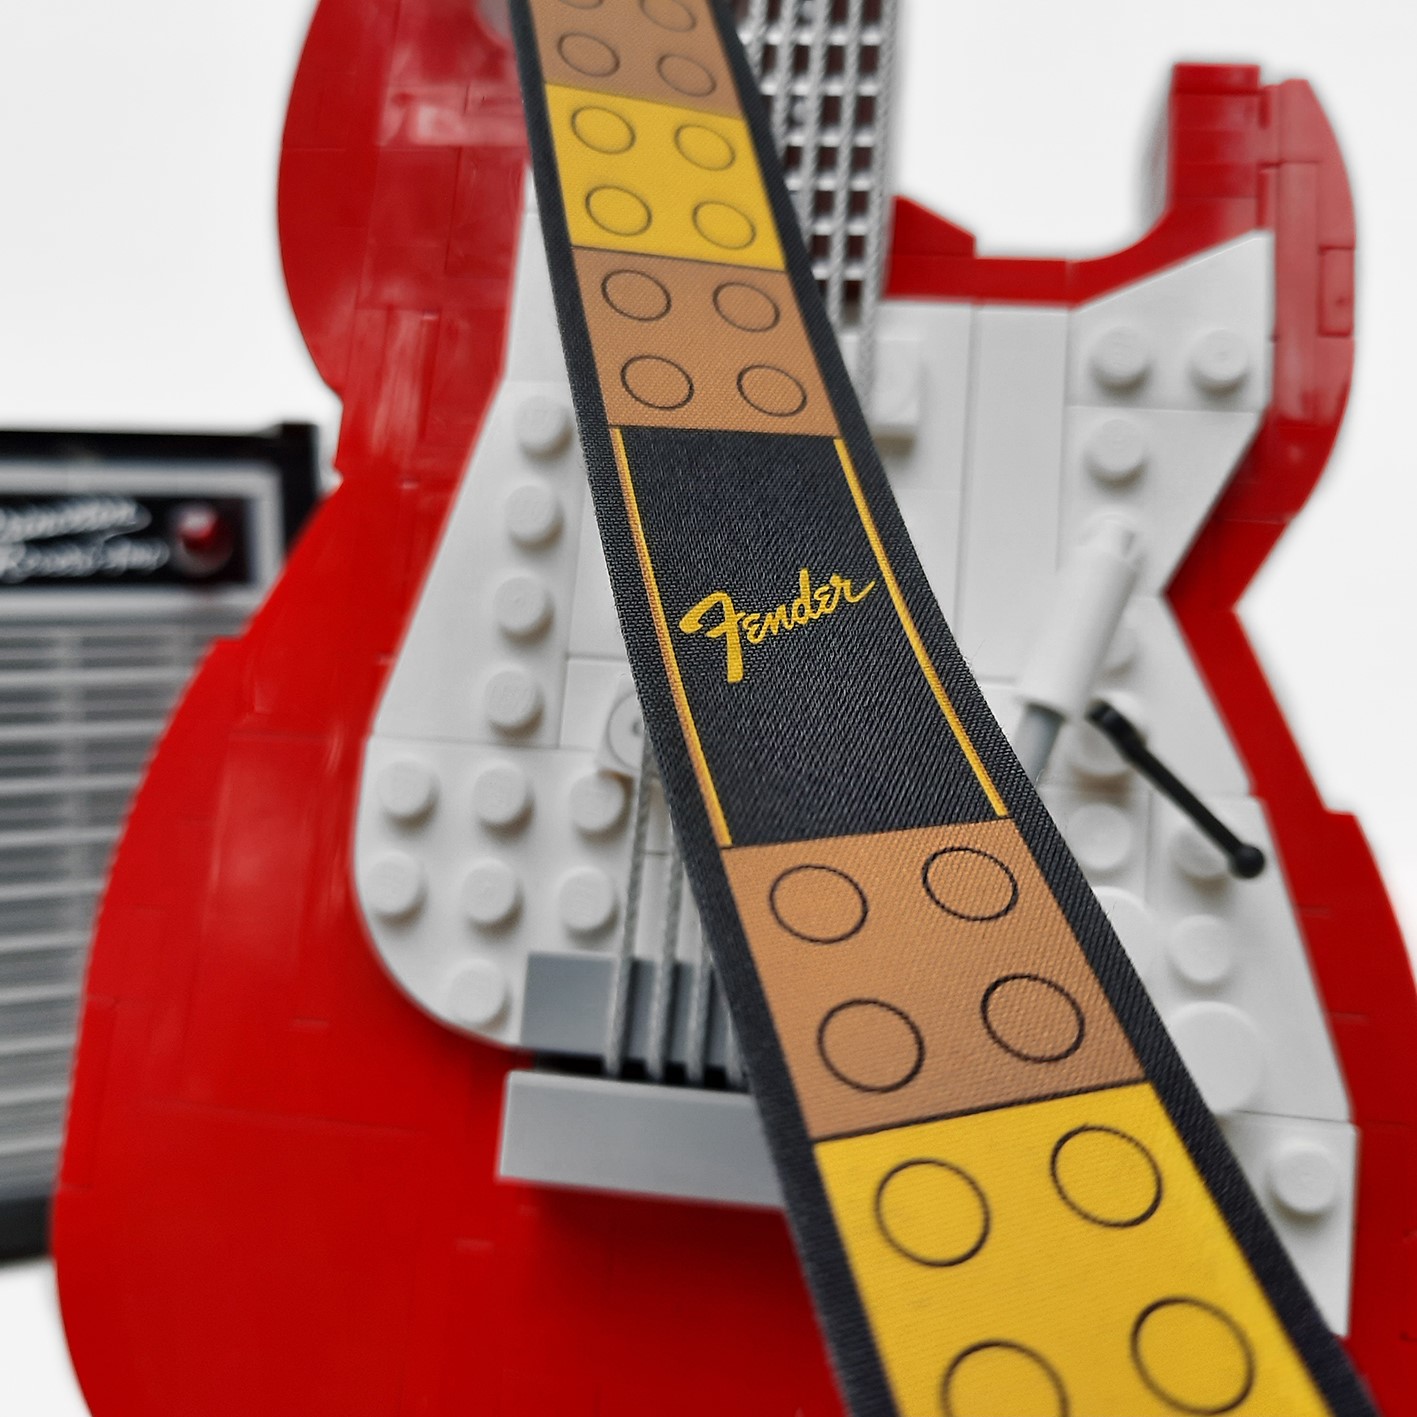
One of my favourite
parts of the Fender build is the unique textile strap (same as used for
minifigure capes etc). On a real instrument, the strap is an important tool to
help with playing it.
The version here has been given a LEGO® twist, with brick stud patterns
interwoven with the Fender logo, a nice print!
As much as the focus
of the set is the guitar, the accompanying ’65 Princeton Reverb amplifier is
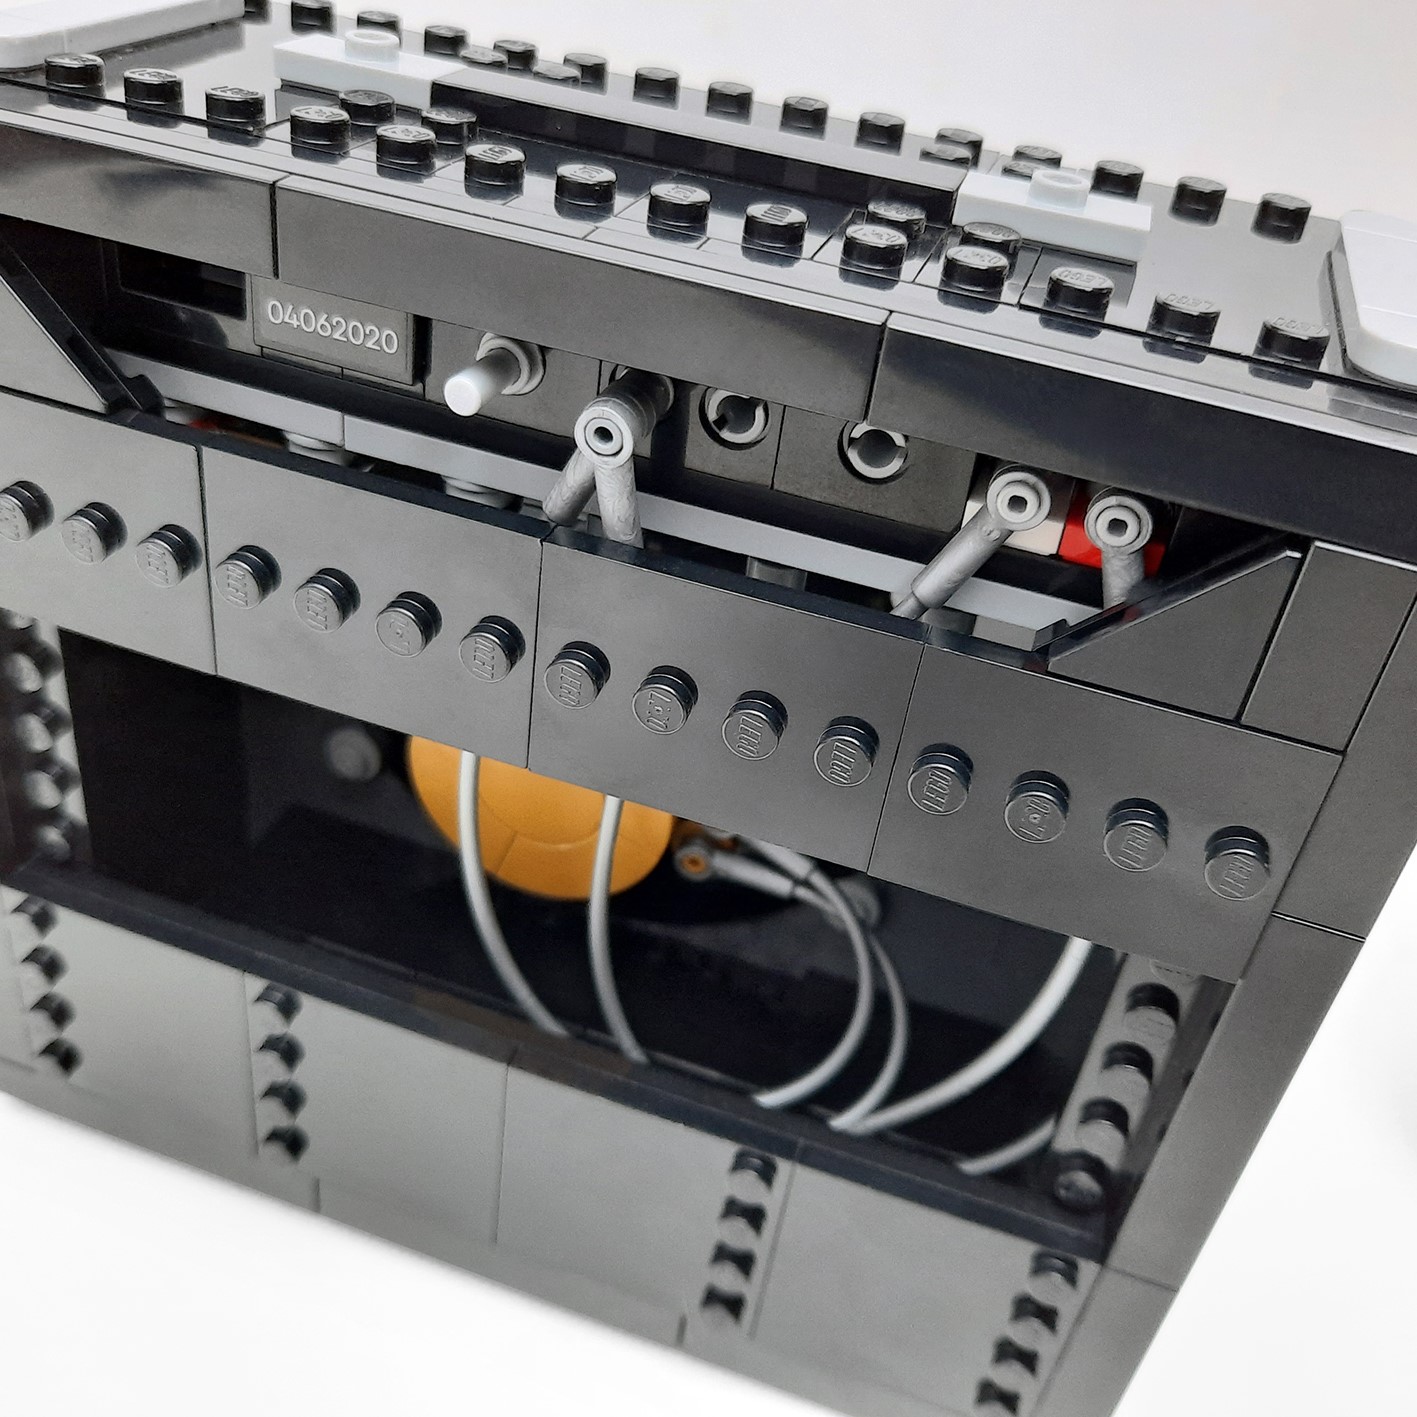
just as important and in fact, is even more interesting to build.
The amp pulls a similar trick to the LEGO® 71374 Nintendo Entertainment
System’s console in how it’s designed first and foremost to be dynamic for the
builder, rather than solely to be admired on display. The various components of
the motherboard and fuses that form the inner workings of the amp have all been
worked into the build, even if some of those pieces aren’t connected in a
traditional manner. This includes the speaker dish being held in place by the
edge of studs and various different coloured 1×1 tiles wedged sideways between
studs. The results are pretty cool and can be easily viewed or accessed once
the set is built as the back and top covers can be removed.
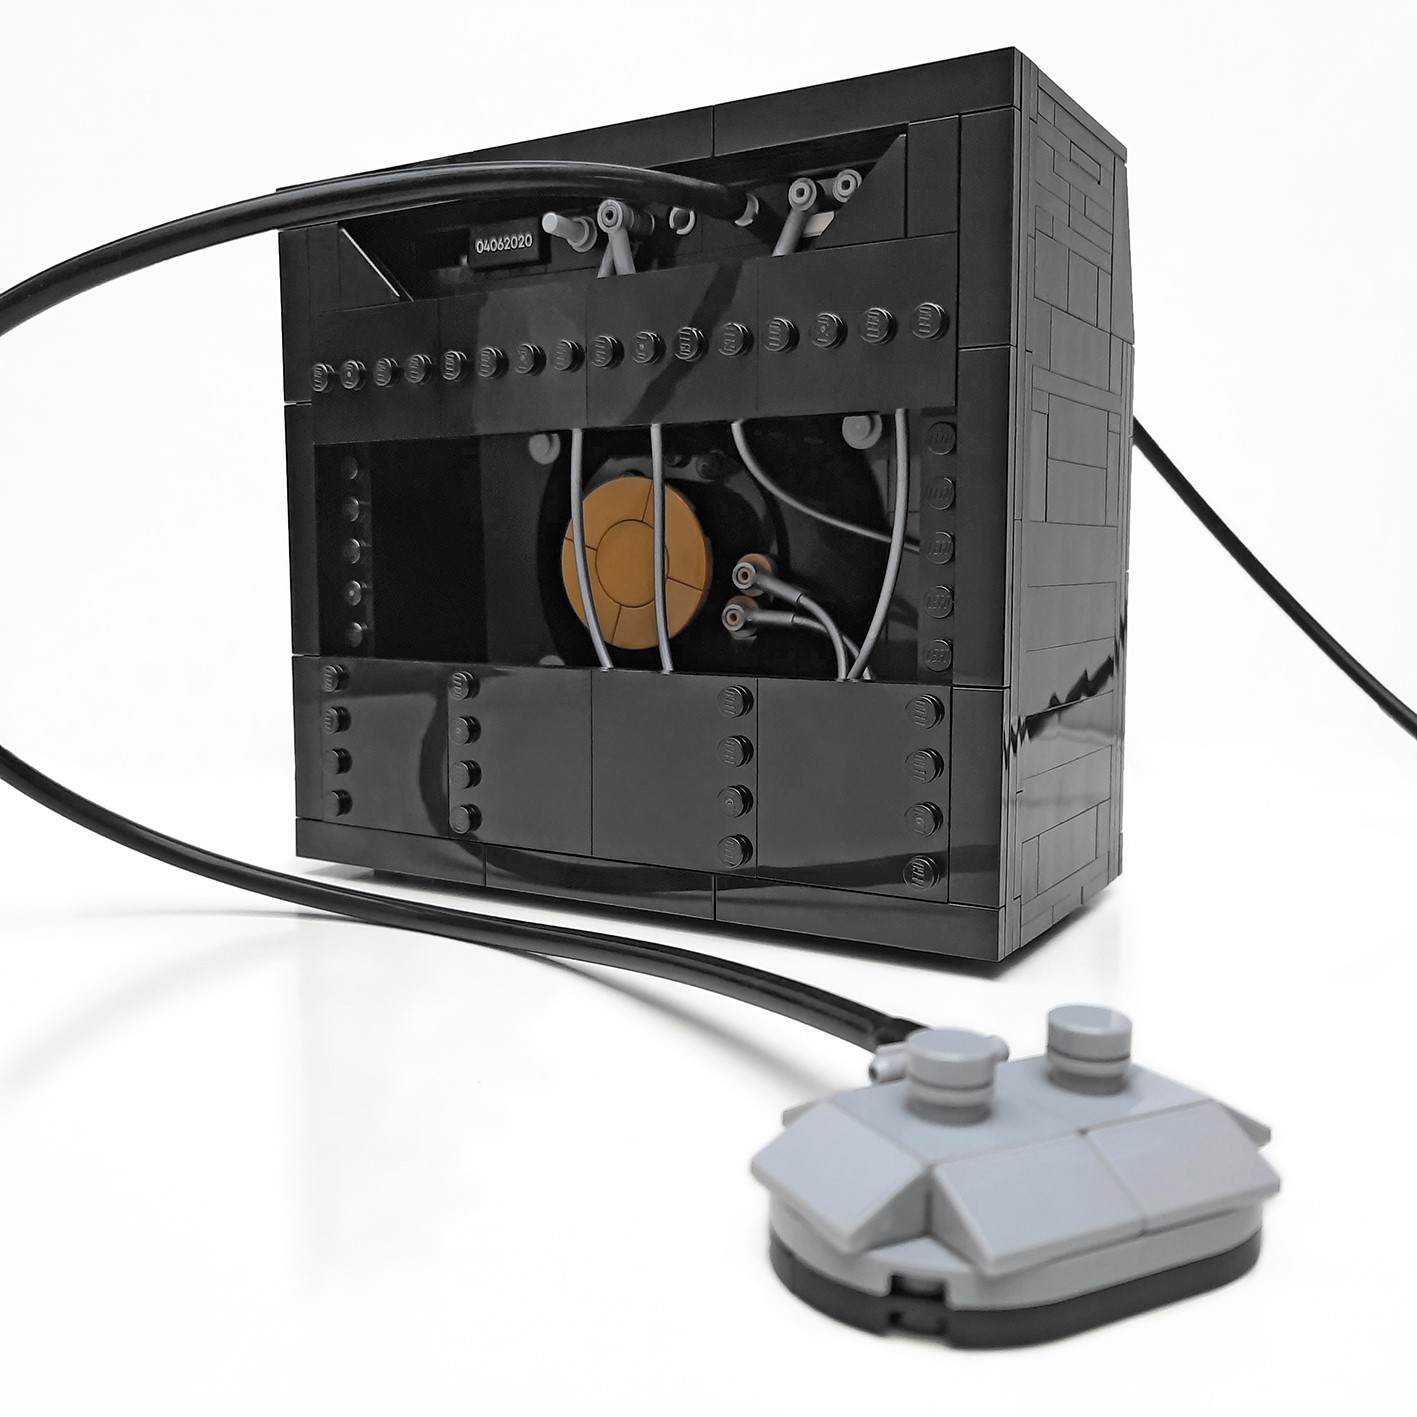
Just as you would a real guitar, the LEGO® Stratocaster can be connected to the amp via a uniquely long piece of tubing. Another is used to connect the foot pedal to the back of the amp. Even the pieces used to achieve this are interesting, with ‘lipstick’ elements used to create connector pins. These elements are also used inside some of the fuse tubes inside the speaker.
The guitar measures in at a reasonable 36cm tall and 11cm wide and comes in surprisingly close to the initial design concept, both in scale and design.
This build brilliantly
captures the iconic shape, proportions, and details of the Fender Stratocaster,
across both the guitar and amp.
It does seem a little
smaller than expected but I think that adds to the charm as well as making it a
lot easier to display. Interestingly, the amp seems to be the overall bigger
hit in the set.
There is not really any playability in the set so best to stick to your air guitar
or a real one for that.
Oh yes, LEGO® throw in a nice big LEGO® Fender sticker as an added bonus!
This set took 4hrs build time including making the black version of the body to
swap if I feel like it one day…
Review by James Burnett (SAFOLs Members, CapeLUG Members)
The Chima theme is centred on the fictional world of Chima, a place
inhabited by warring tribes of anthropomorphic animals. There are 12 main
tribes living in the various parts of Chima. These are Bear, Beaver,
Crawler
(sub-divided into Bat, Scorpion, and Spider), Crocodile, Eagle,
Fire
(sub-divided into Phoenix, and Tiger), Gorilla, Ice Hunter (sub-divided
into Ice-Bear, Mammoth, Saber-Tooth Tiger, and Vulture), Lion, Raven,
Rhino,
and Wolf
Tribes.
The Wolf tribe is a nomadic tribe and have no need for large cities.
They have a permanent base in the Timber Woods called Wolf Camp, but they
prefer to roam the land. They have no royal family or formal leadership
structure as it has little need for a leader because they form a close pack
that all think alike. They do choose one wolf (the Alpha) to handle interaction
and negotiations with other tribes. The Wolf tribe loves destructive. The
Wolves revere a great “Mother Wolf” whose “Mother Tooth”
was left to them to provide light in darkness and thus is treated as a holy.
The tribe consist of 5 members:
Worriz (the Alpha male of the tribe)
Wakz (elder of the tribe).
Wilhurt (a soldier and the Alpha’s second in command)
Windra (a female member of the tribe.
Winzar (a soldier of the tribe)
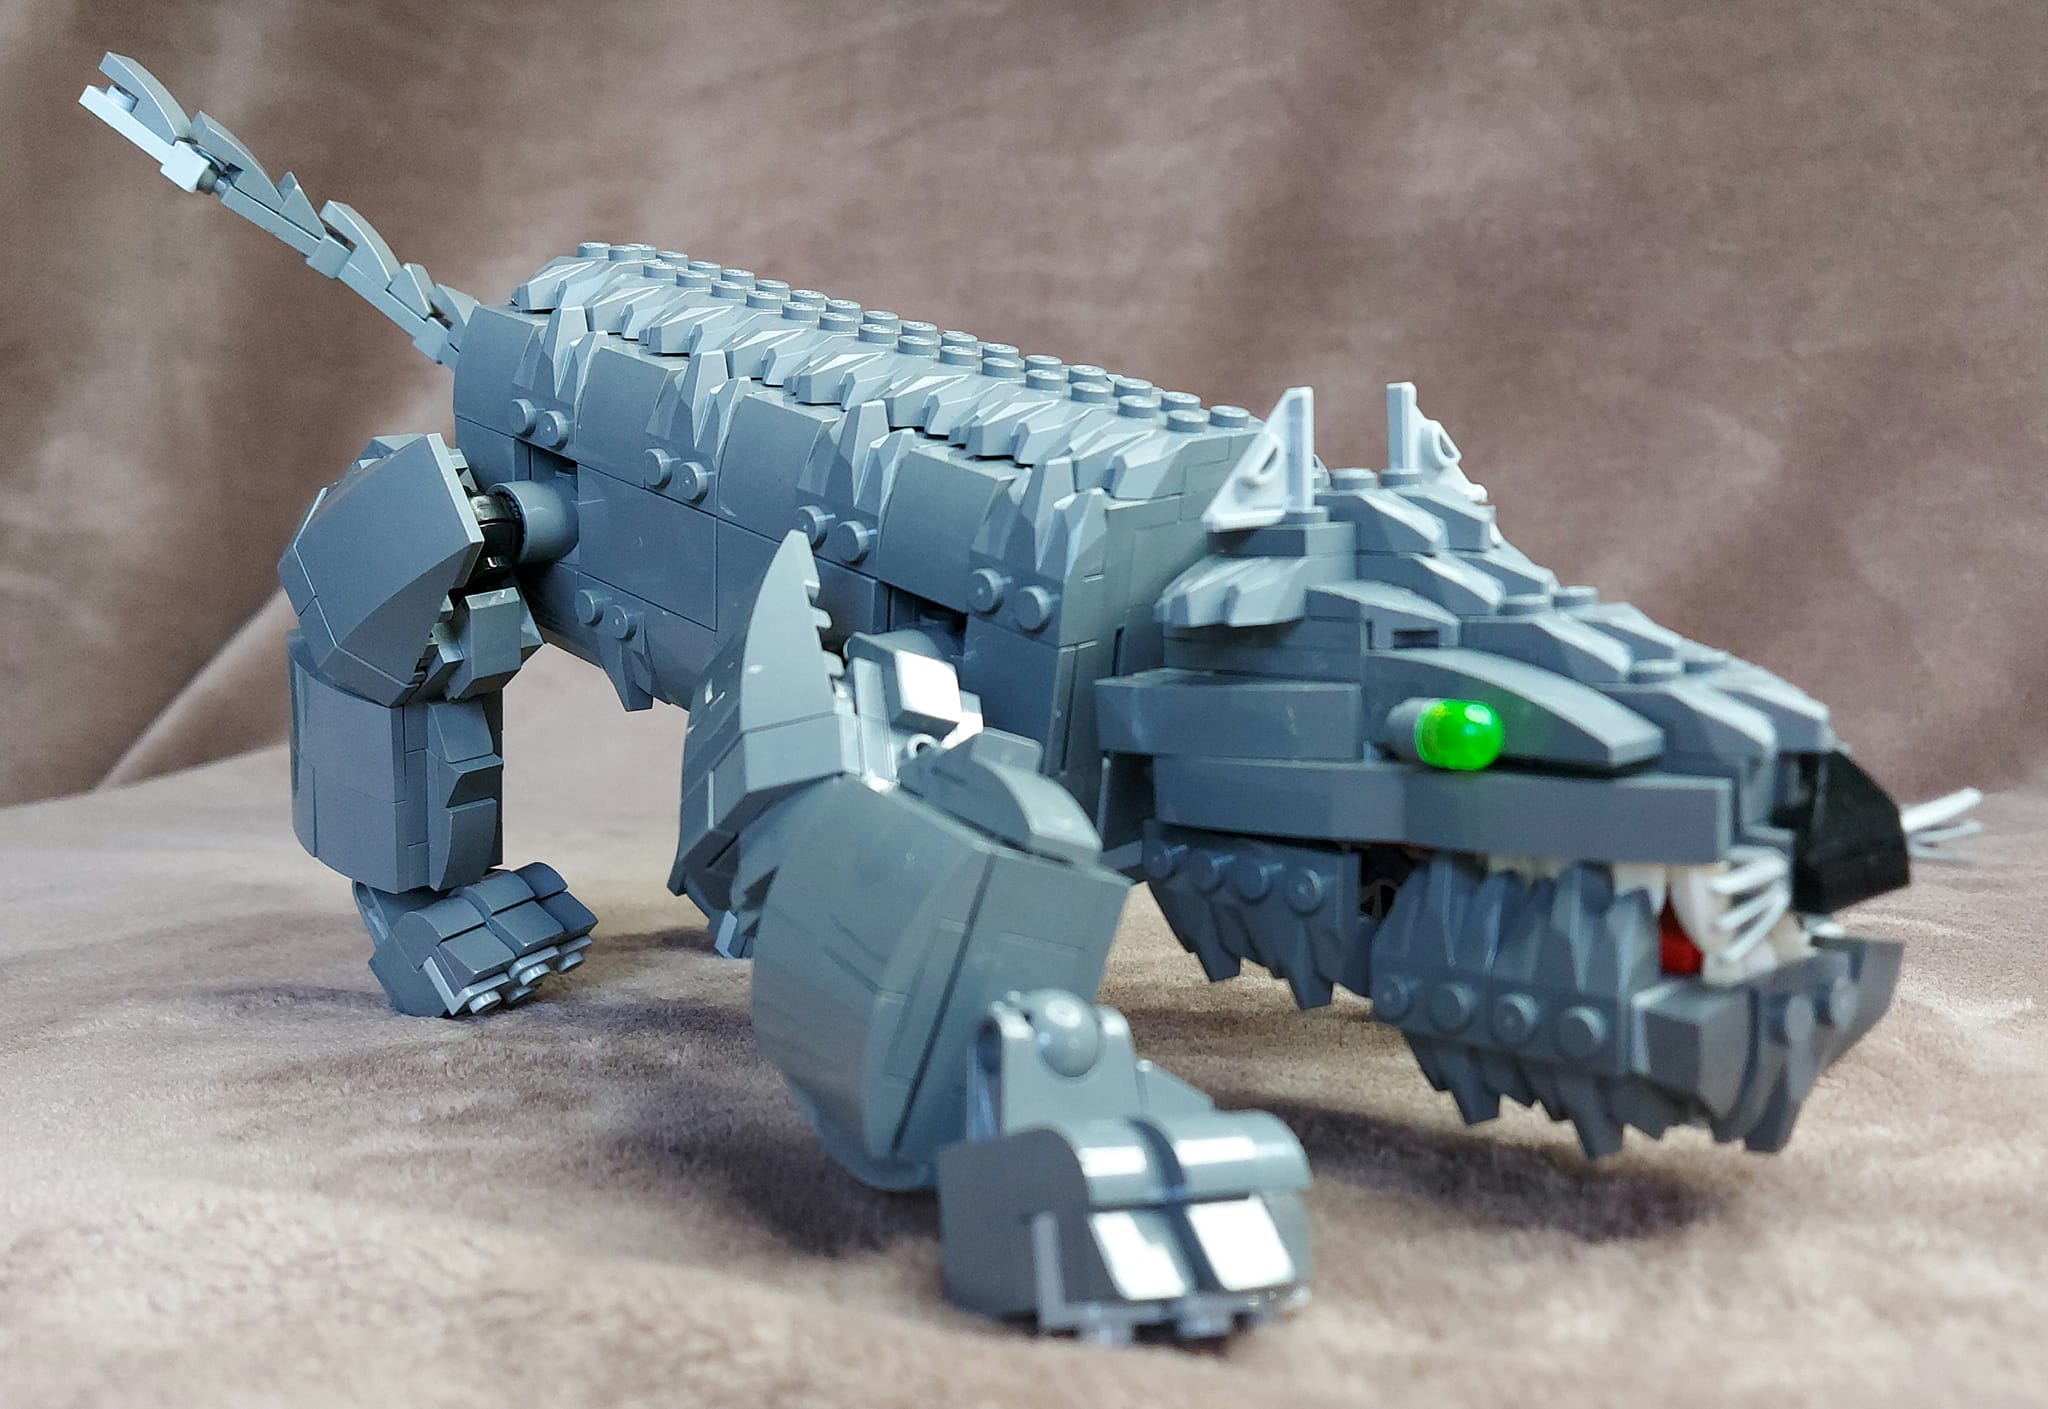
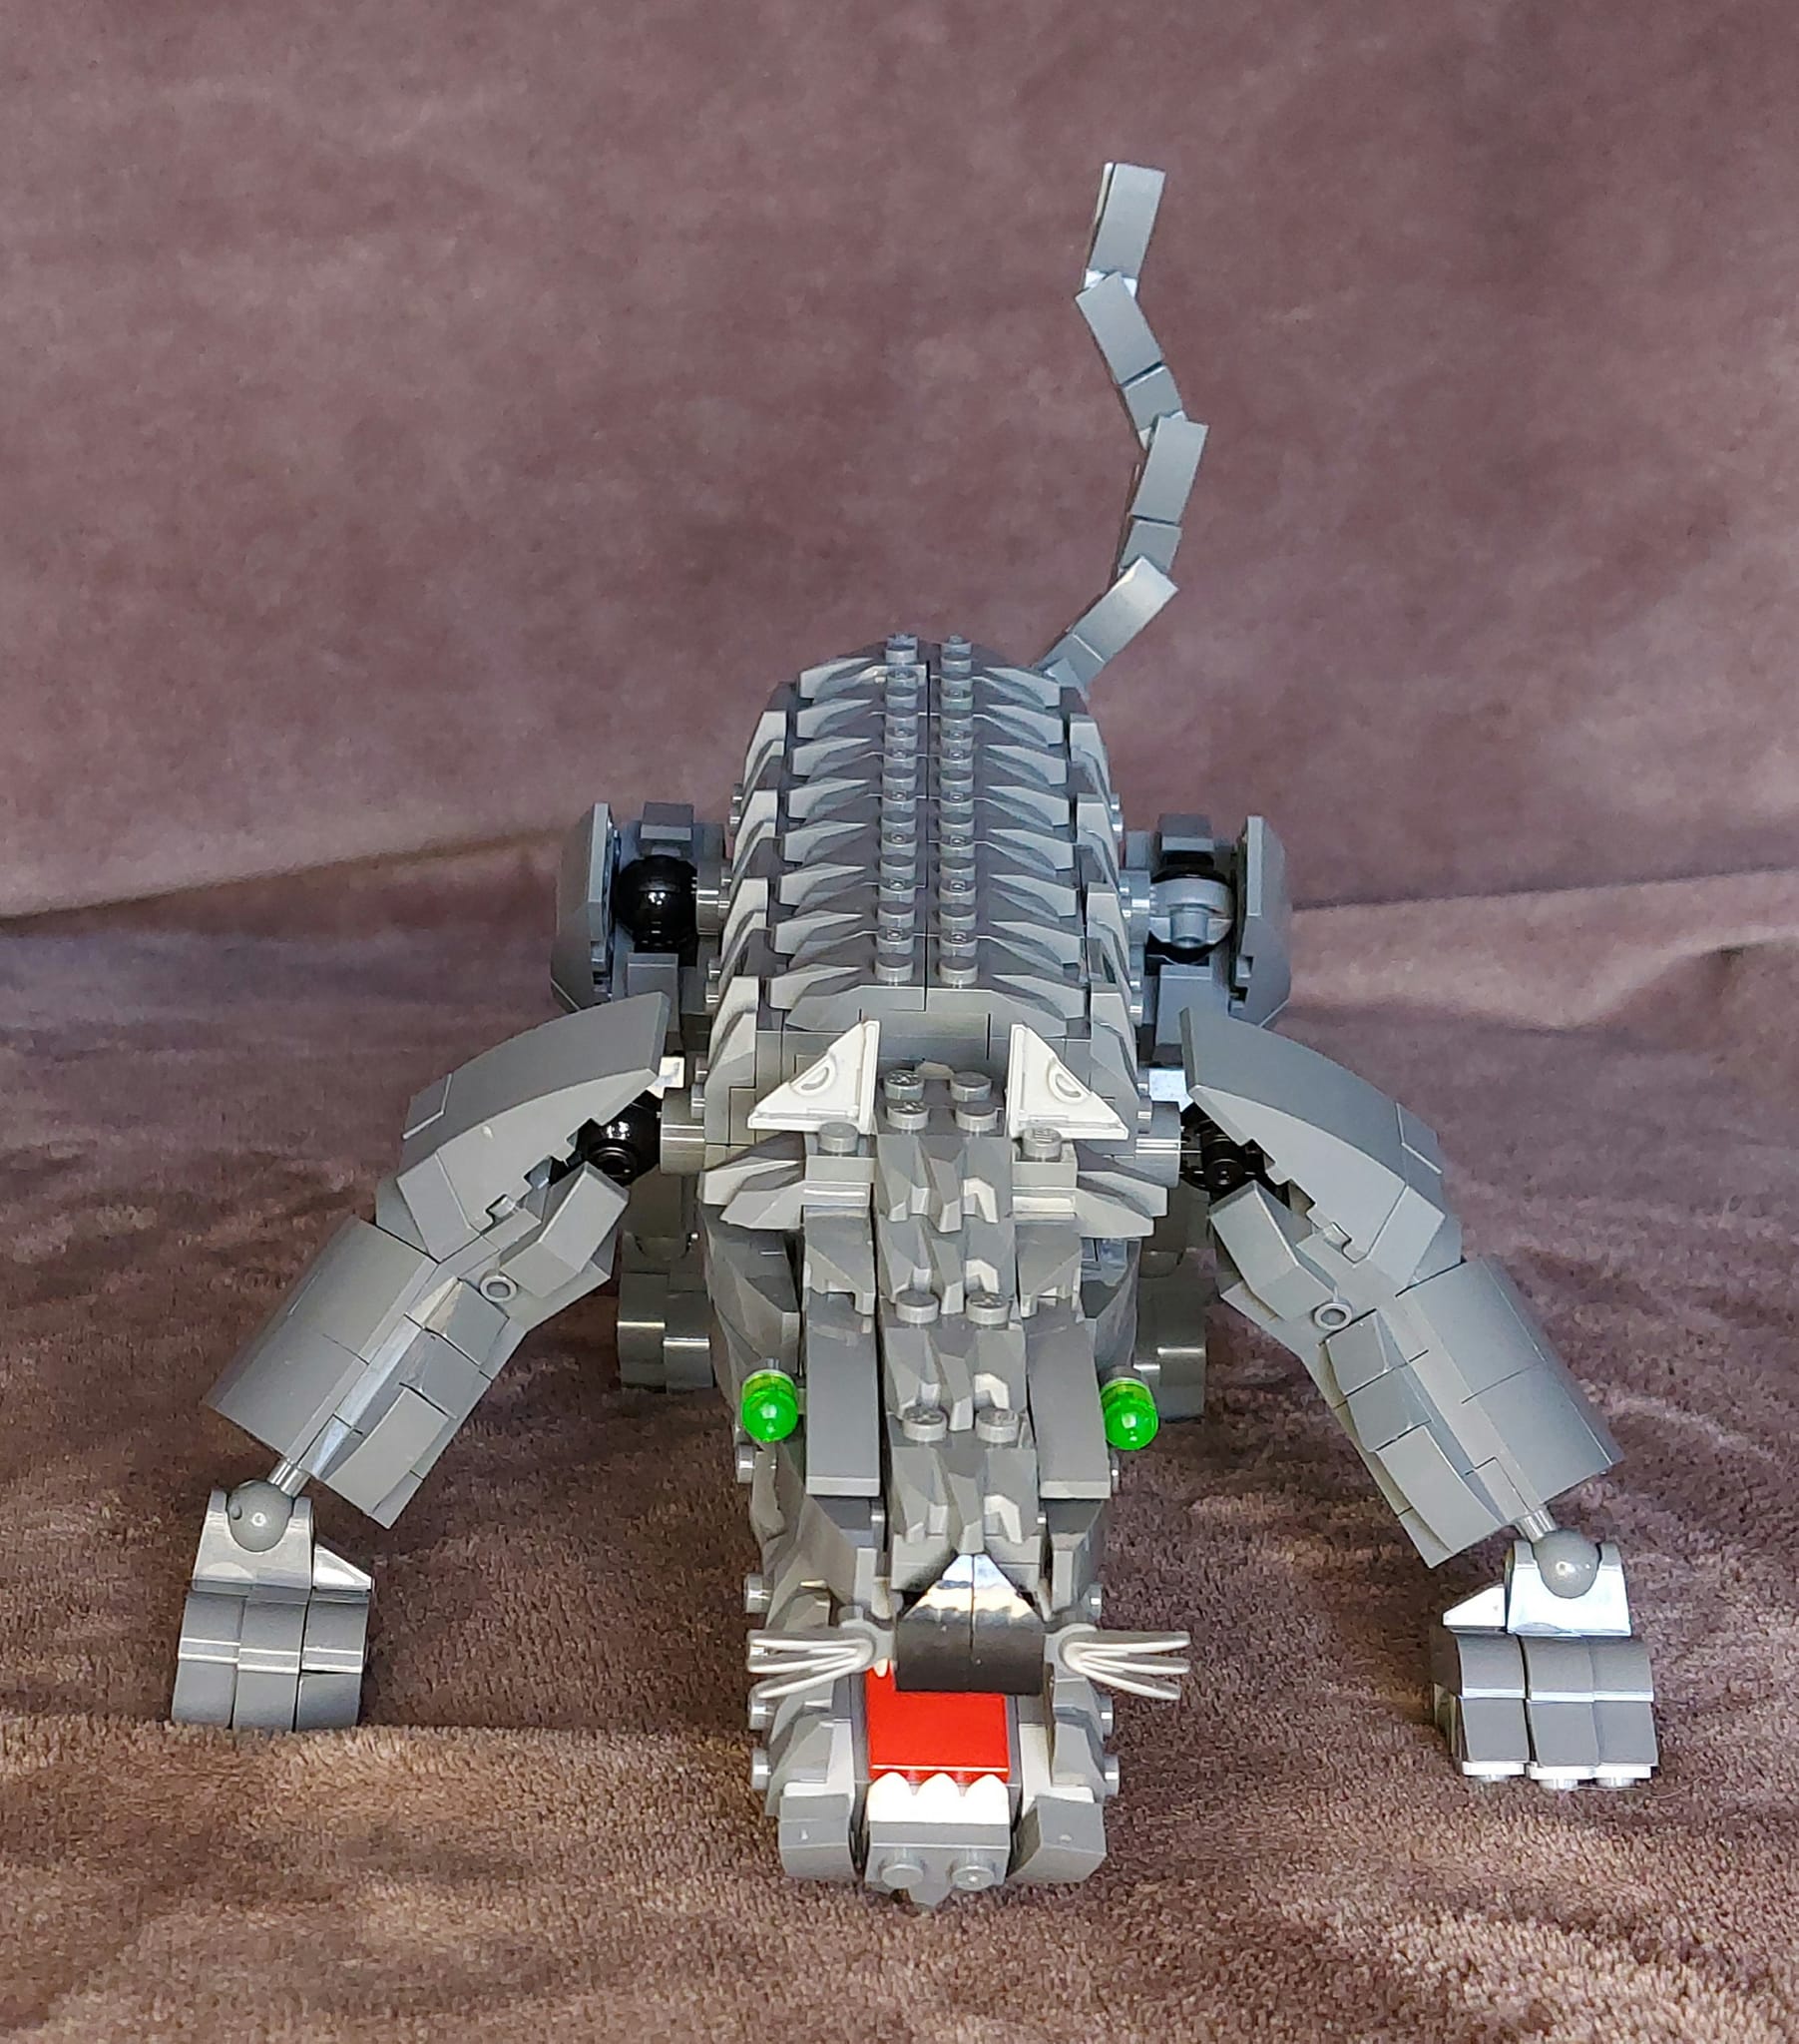
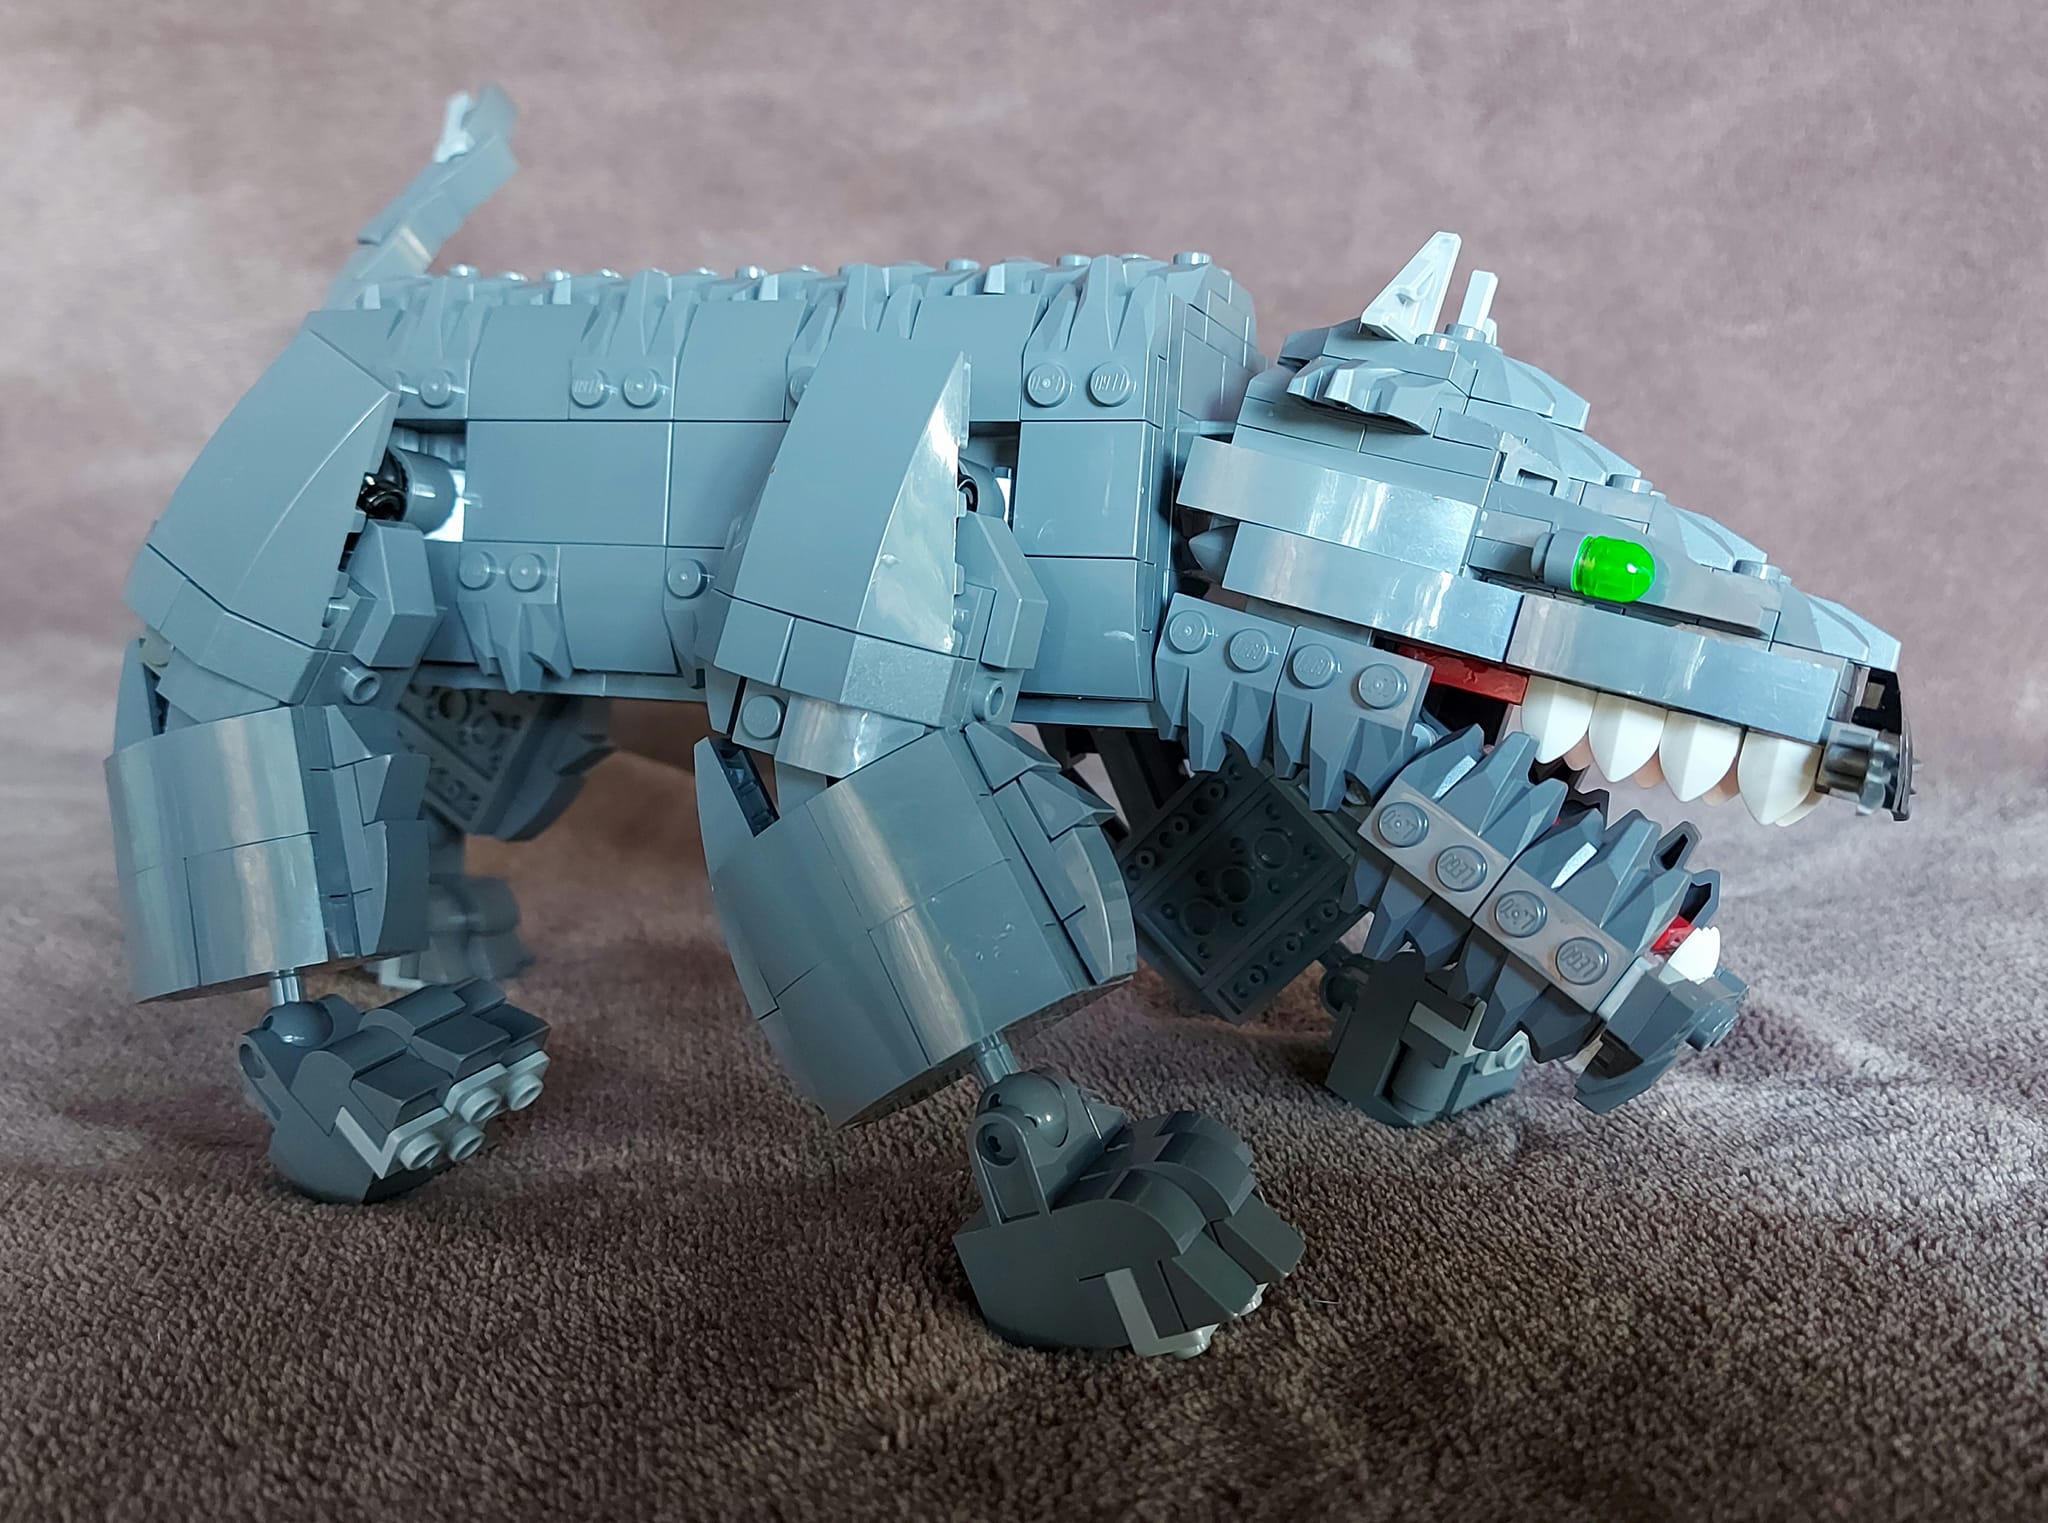
All Wolf tribe vehicles feature a full wolf-head build into a truck in
gray, black and dark red. Vehicle features include a head, jaw, white teeth,
fangs, large wheels and flaming exhausts.
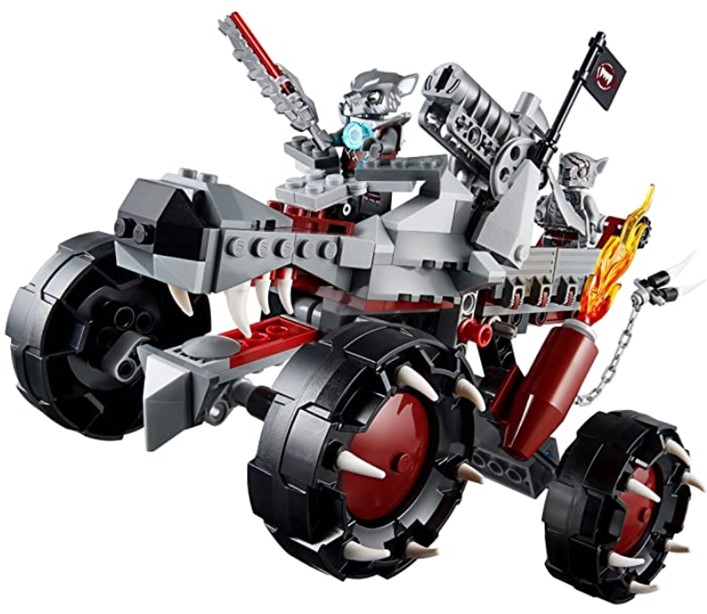
The Build
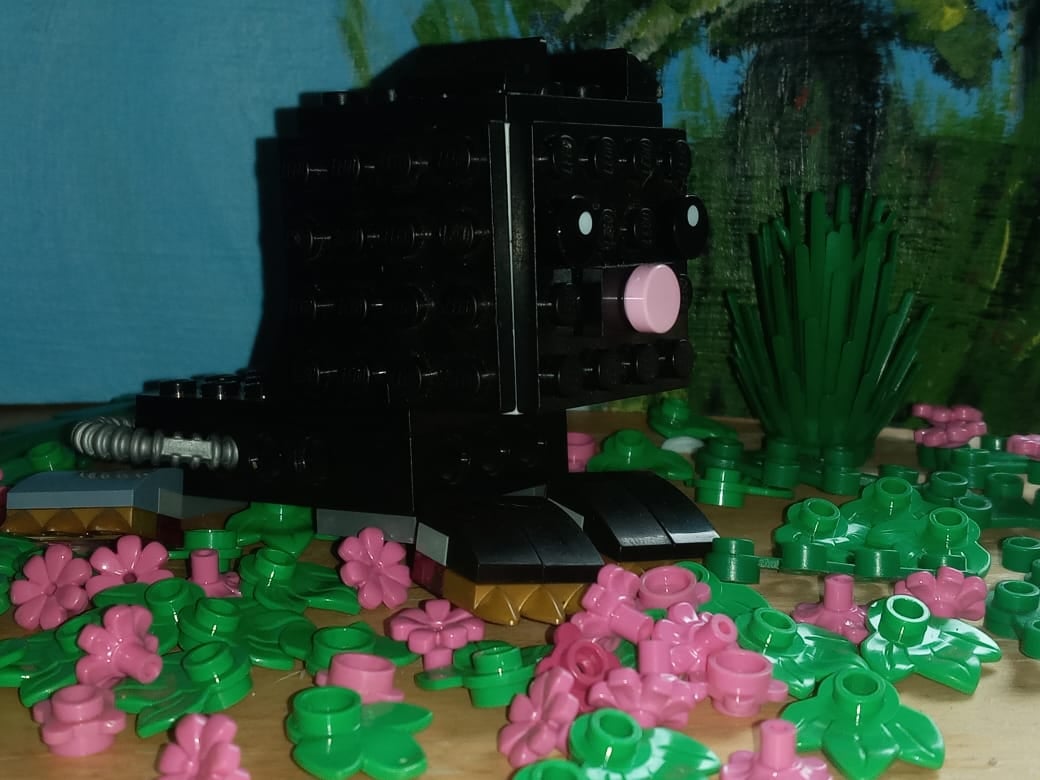
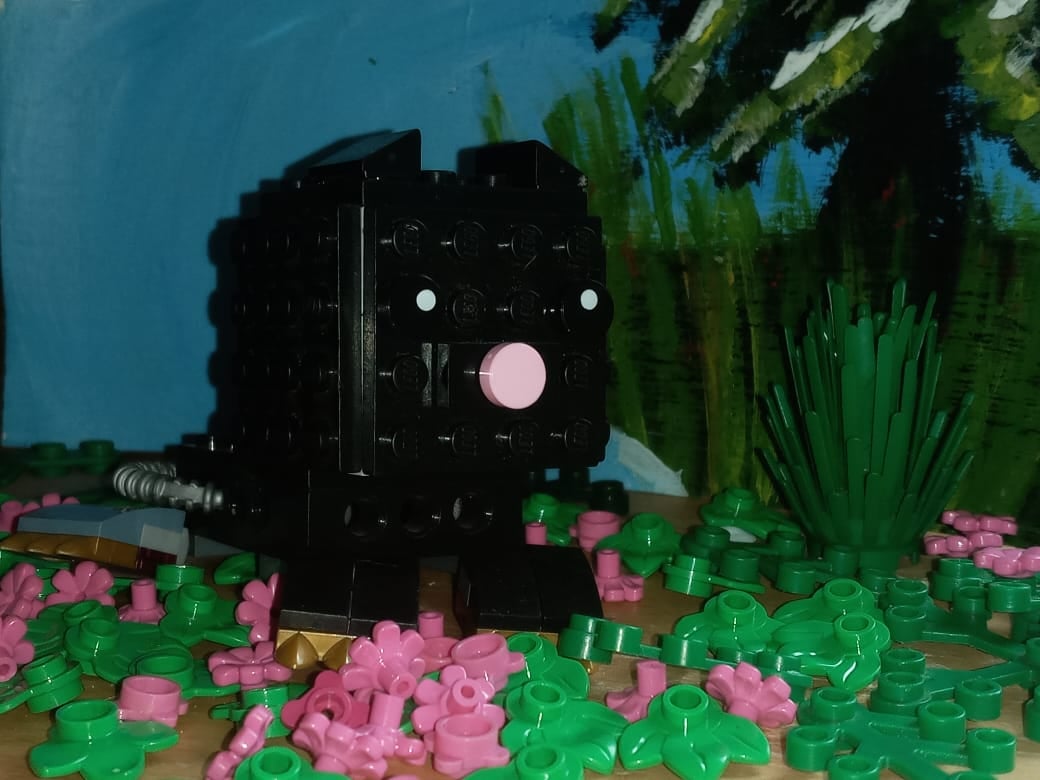
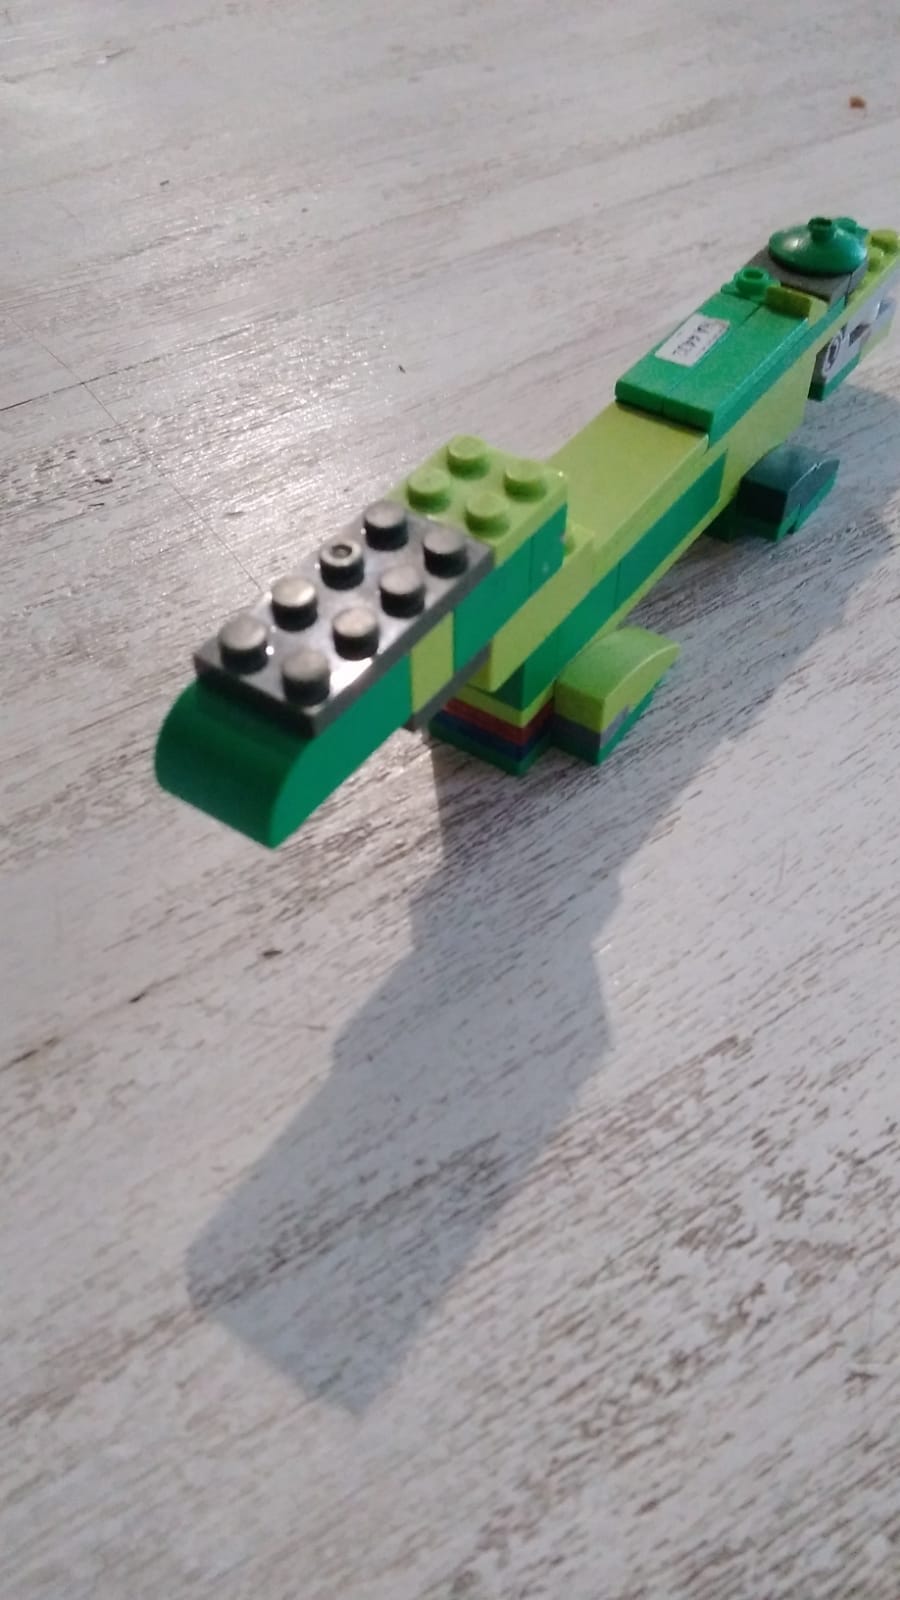
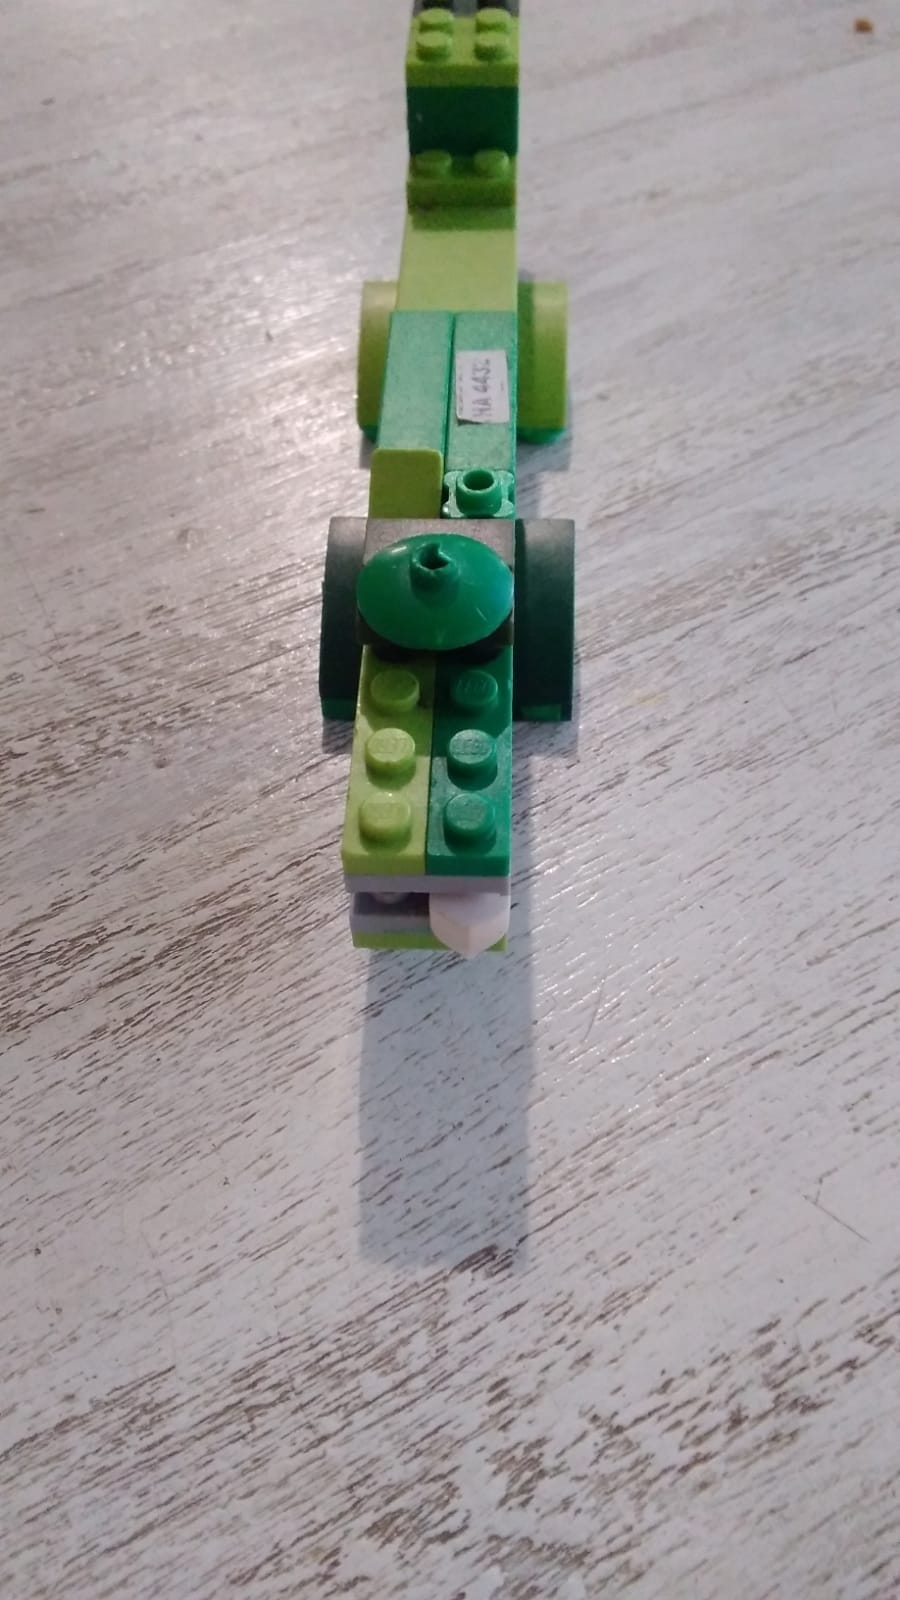
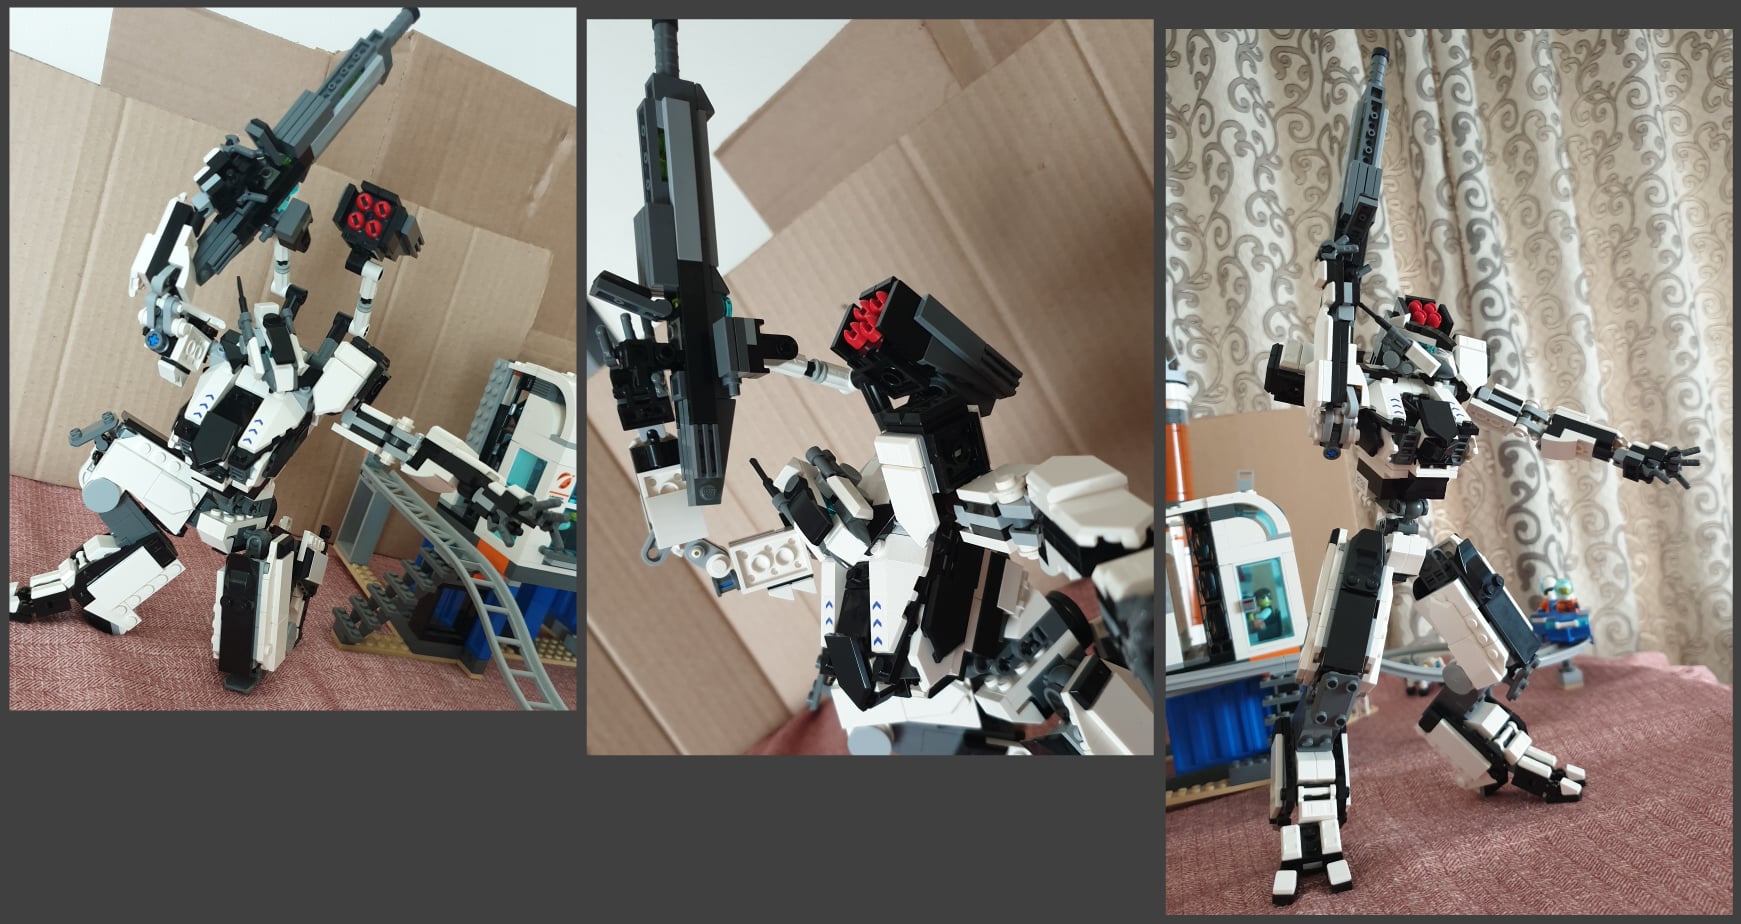
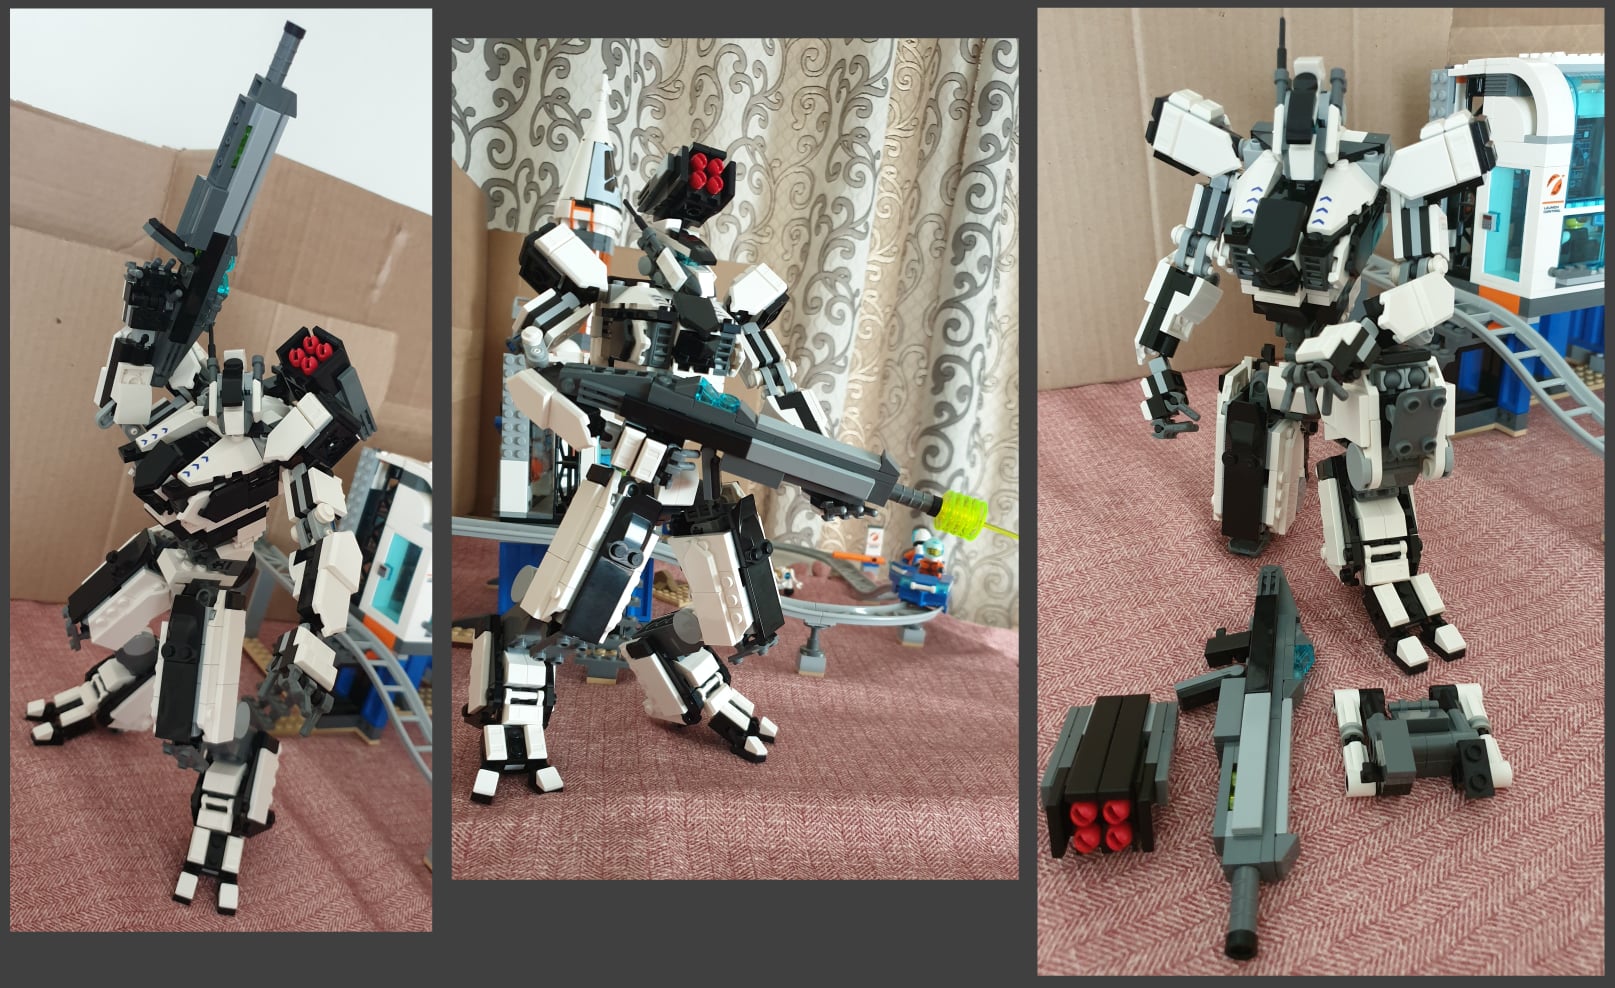
The main build consists only of the Wolf tribe vehicle called a Pack
Tracker and it uses mainly
black, dark red, DBG and LBG. It is built to resemble a wolf. The drivers cabin
is shaped like the head of a wolf with eyebrows and everything. The bottom jaw
of the snout is hinged and can be opened or closed, depending on the pose you
could like to have.
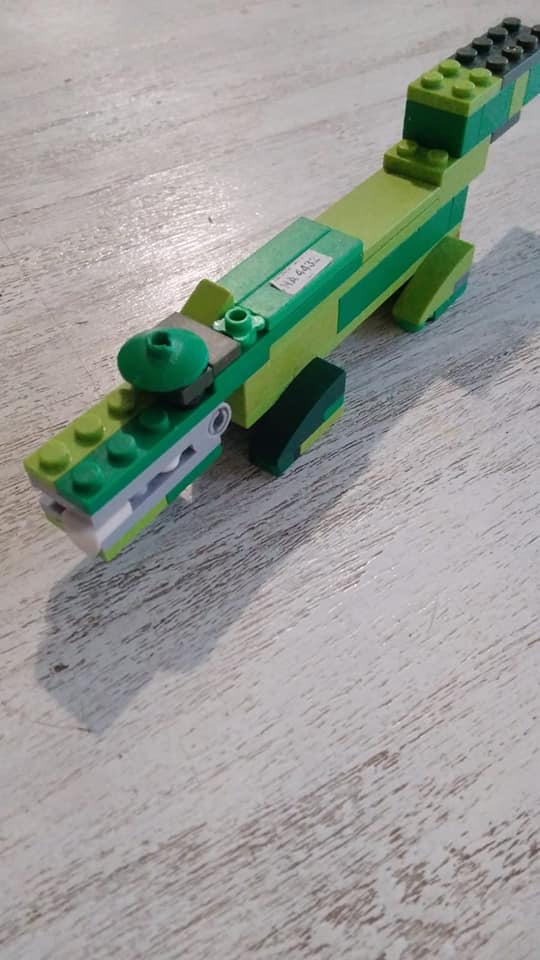
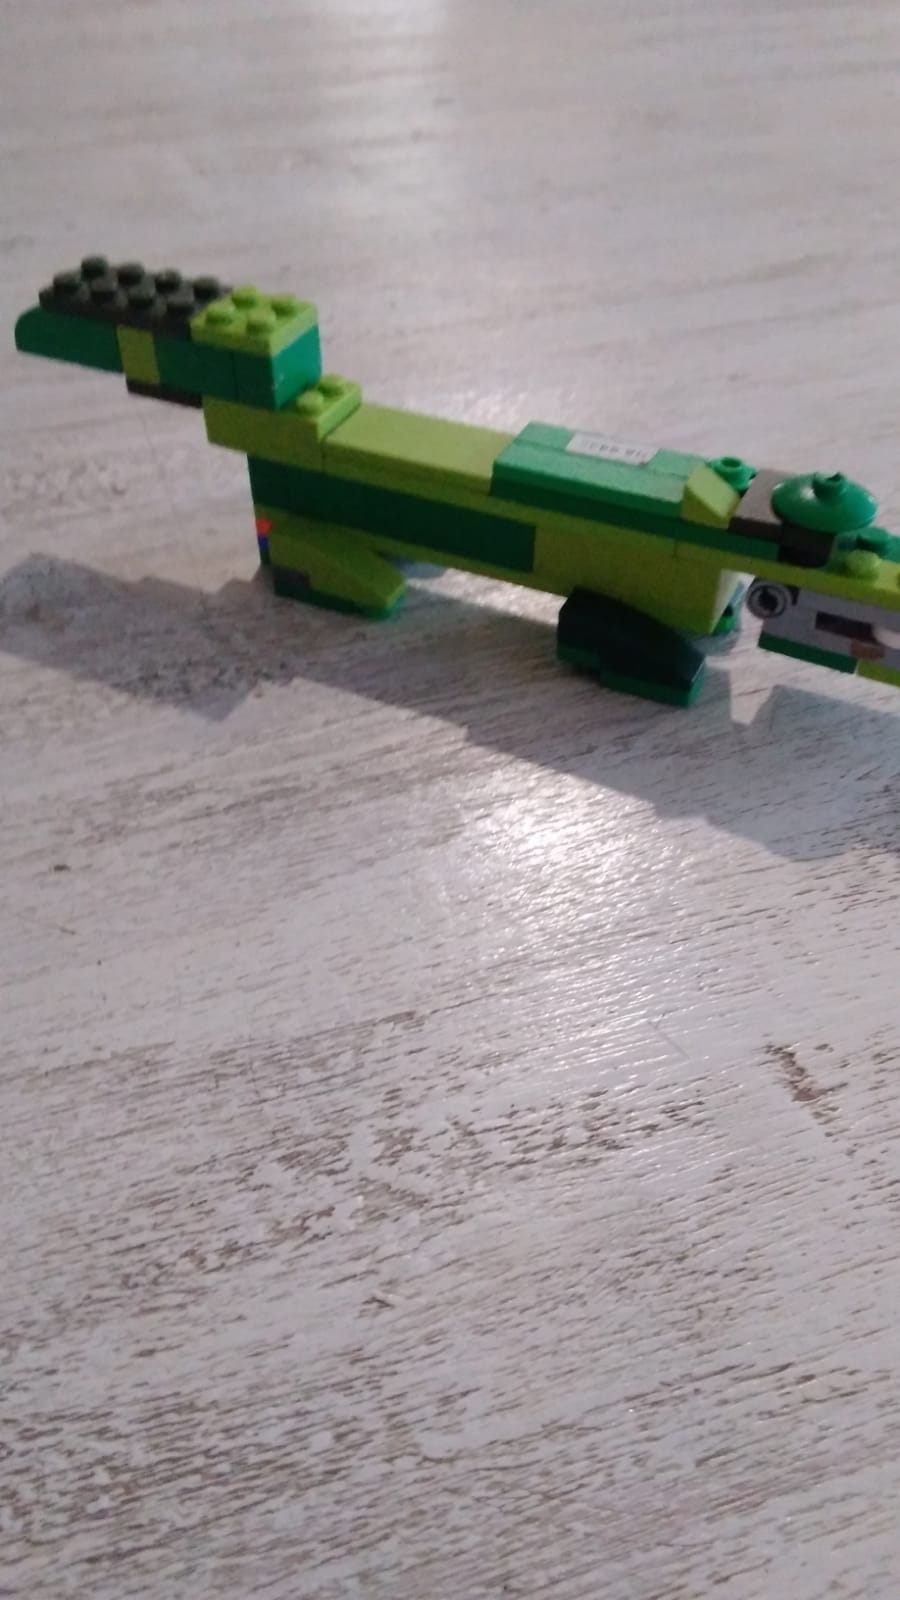
The back of the vehicle resembles a stand truck flatbed and this is
where the primary weapon is located which is one of the newer projectile
launchers (cannon). The projectile has a good range and does shoot out with a
decent force, so avoid shooting yourself in the eyes as it will hurt (don’t ask
how I know J ).
The tail is a chain with two claws attached to it, and is a secondary weapon. It can be rolled in using technic gears thereby capturing enemies and bringing them on board the vehicle. The large open snout, large black wheels and dark red exhausts (with flames) gives the vehicle an a very aggressive look, which fits in perfectly with the nature of the Wolf tribe.
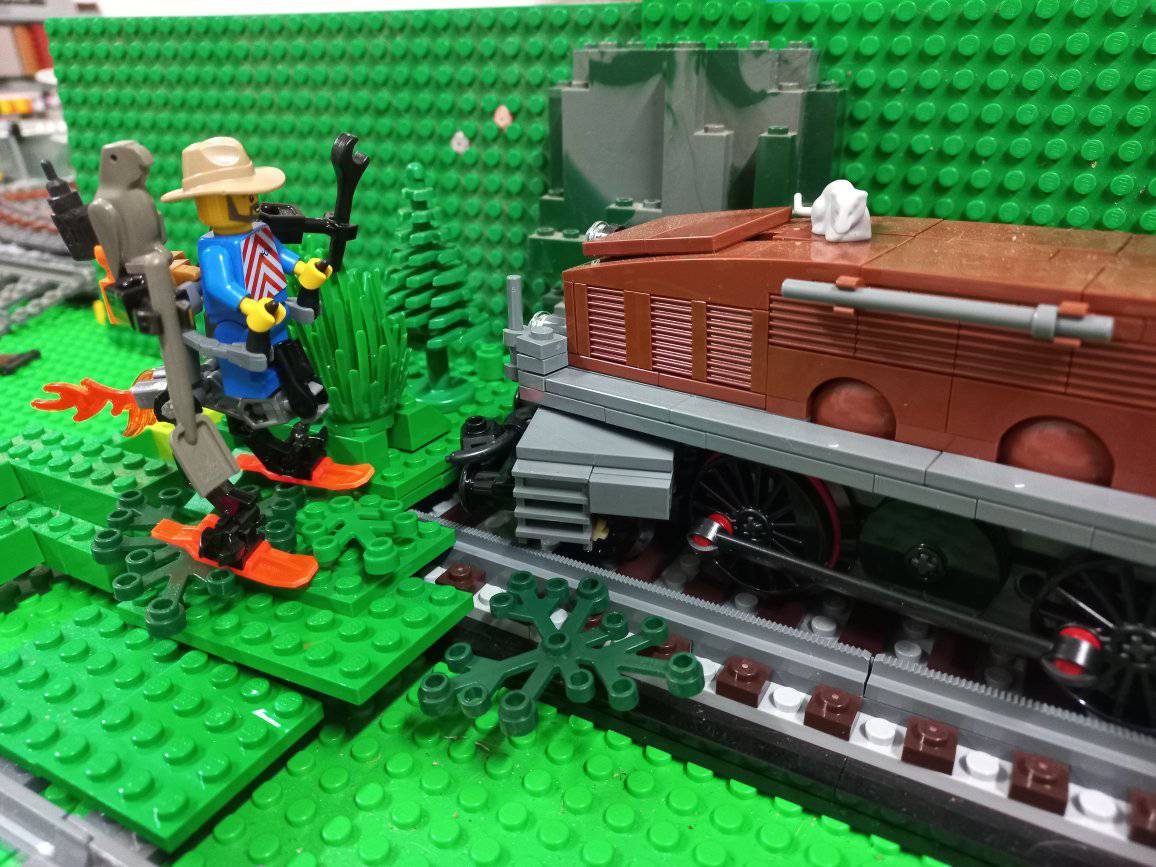
The Minifigure
The set comes with 3 minifigures. The first is Wakz, one of the pack
Elders. His legs are DBG with white claws and he is wearing dark red pants.
Patches of fur can be seen sticking out of his pants. On the front of his torso
is a dark azure circle (representing CHI) with dark red armour, silver
markings, and a fur animal pelt print. The same detail is on the back of his
torso. A flat silver armour piece fits on the torso.
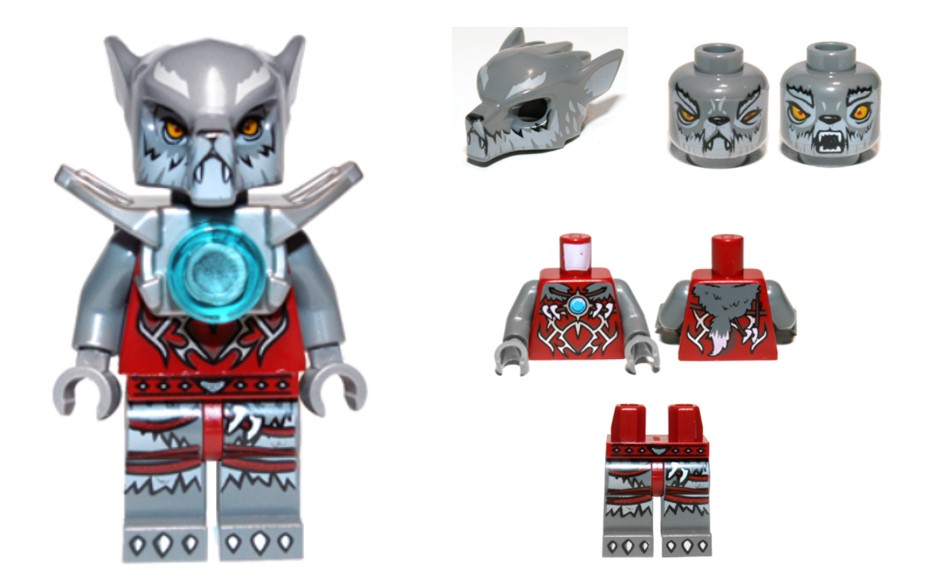
His head is double-sided with one side being stern, and the other appearing as if he is snarling. A wolf head-piece goes over the standard minifigure head in order to enhance the look of a wold. The headpiece is DBG with LBG accents which helps to create the look of an older wolf (seeing as he is an Elder).
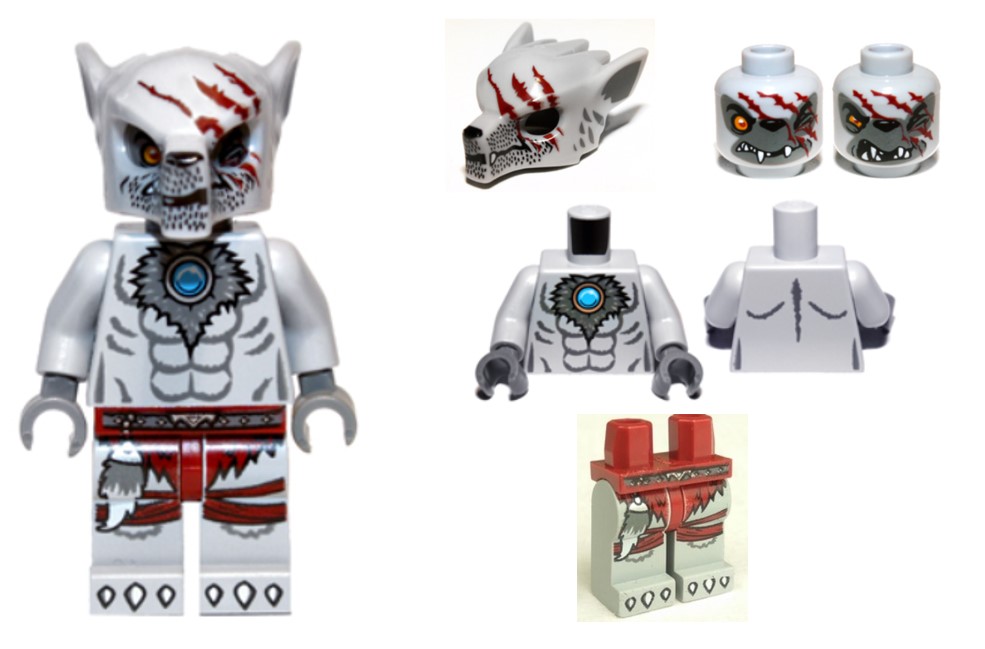
The second minifigure is Winzar (a soldier of the tribe). His legs are
LGB with white claw. He is wearing a dark red loincloth and has a fur tail
lucky charm dangling from his belt.
On the front of his torso is a dark azure circle (representing CHI),
surrounded by DBG chest hair. The rest of his fur is LBG with muscle printing.
The back of the torso is mostly LBG with a few strips of BDG fur. I am slightly
disappointed how plain his back print is, but luckily you would display him from
the front.
His head is double-sided with very detailed red scars over his left eye with is closed. I am not sure if he lost the eye in a previous battle or if it is only swollen shut. His wolf head-piece has stubble and the same red scars as on the head. Over all the printing detail creates an angry and ferocious looking wolf soldier.
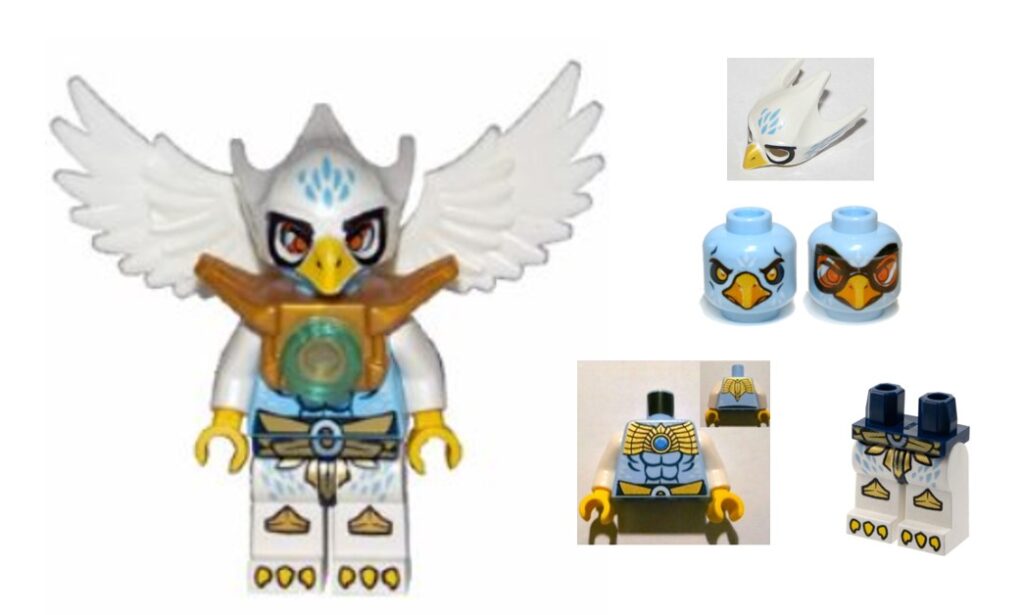
The third minifigure is Equila (the Tournament Announcer of the Eagle
tribe). His legs are white with yellow talons. He is wearing a dark blue belt
and pearl gold belt as well as pearl hold knee covers.
On the front of his torso is a blue circle (representing CHI), with an
absolutely stunning pearl gold armour plate pattern. The rest of the torso is
bright light blue with muscle printing. The back of the torso has the same
beautiful armour plate printing. A pearl gold armour piece fits on the torso
with a trans-light blue round tile represents the CHI on the front. White wings
can be attached to the back.
He has a double-sided head with one side having very cool orange goggles. An eagle head-piece goes over the standard minifigure head in order to enhance the look of an eagle. The headpiece is mostly white with some medium blue feather.
Conclusion
While the vehicle is a fun build that does a great job representing a
wolf, the true value of the set lies in the detailed minifigures which is a
pure joy to display and look at on a daily basis.